Spotlight preferences: Loads and Rigging pane
|
Command |
Path |
|
Spotlight Preferences |
File > Document Settings |
The Loads and Rigging pane of the Spotlight Preferences dialog box controls automatic positioning and automatic classing options for rigging and load objects, and enables truss coloring.
Lighting devices and other loads can automatically attach to rigging objects, both at insertion and when an existing load is moved in the drawing. Use the auto positioning options to control automatic attachment, so you don’t accidentally attach a load to a nearby rigging object when making small adjustments. See Concept: Attaching loads to rigging objects.
When inserting, moving, copying, duplicating, or mirroring a load, and attaching it to rigging, the Snap to Object option (in the Snapping set on the Status bar) controls how the load attaches to the rigging object. When snapping is enabled, red highlighting indicates that the load's elevation and orientation will change to match that of the rigging object. When snapping is disabled, there's no highlighting, which indicates that while the load will be attached to the rigging, it only changes its position, and not its elevation or orientation.
To set preferences for rigging and load objects:
Select the command.
The Spotlight Preferences dialog box opens. Click the Loads and Rigging pane.
Click to show/hide the parameters.Click to show/hide the parameters.
|
Parameter |
Description |
|
Auto-Positioning |
Sets the parameters for attaching loads to rigging objects |
|
Pick Radius |
Specifies the radius for automatic attachment when creating and moving load objects |
|
Auto-position loads when created |
Toggles the option to automatically attach load objects to nearby rigging objects at insertion. When selected, a load that is created automatically associates with the closest rigging object within the Pick Radius. Valid rigging objects are highlighted as the cursor moves over them. When deselected, inserted loads do not associate with a rigging object. Rigging objects do not highlight as the cursor moves over them. |
|
Auto-position loads when moved |
Toggles the option to automatically attach load objects to nearby rigging objects when moved. When selected, a load that is moved automatically associates with the closest rigging object within the Pick Radius. Valid rigging objects are highlighted as the cursor moves over them. When deselected, rigging objects do not highlight as the cursor moves over them. When a load is moved off of a rigging object, the load maintains its association. To break the association, see Removing loads. If loads are still being added to a complex light plot, select this option, but decrease the Pick Radius so existing loads can be moved without losing their association. When loads are only being repositioned, deselect this option. |
|
Orient loads with rigging objects when snapping in 2D |
This option only applies to load objects that support 3D rotation, such as lighting devices, when they attach to rigging objects in 2D views. When selected, load objects automatically assume the orientation of the rigging object when they are attached. When deselected, the orientation of attached load objects depends on the active working plane settings. Auto-positioning must be enabled for rigging objects to highlight for snapping. |
|
Orient loads with rigging objects when snapping in 3D |
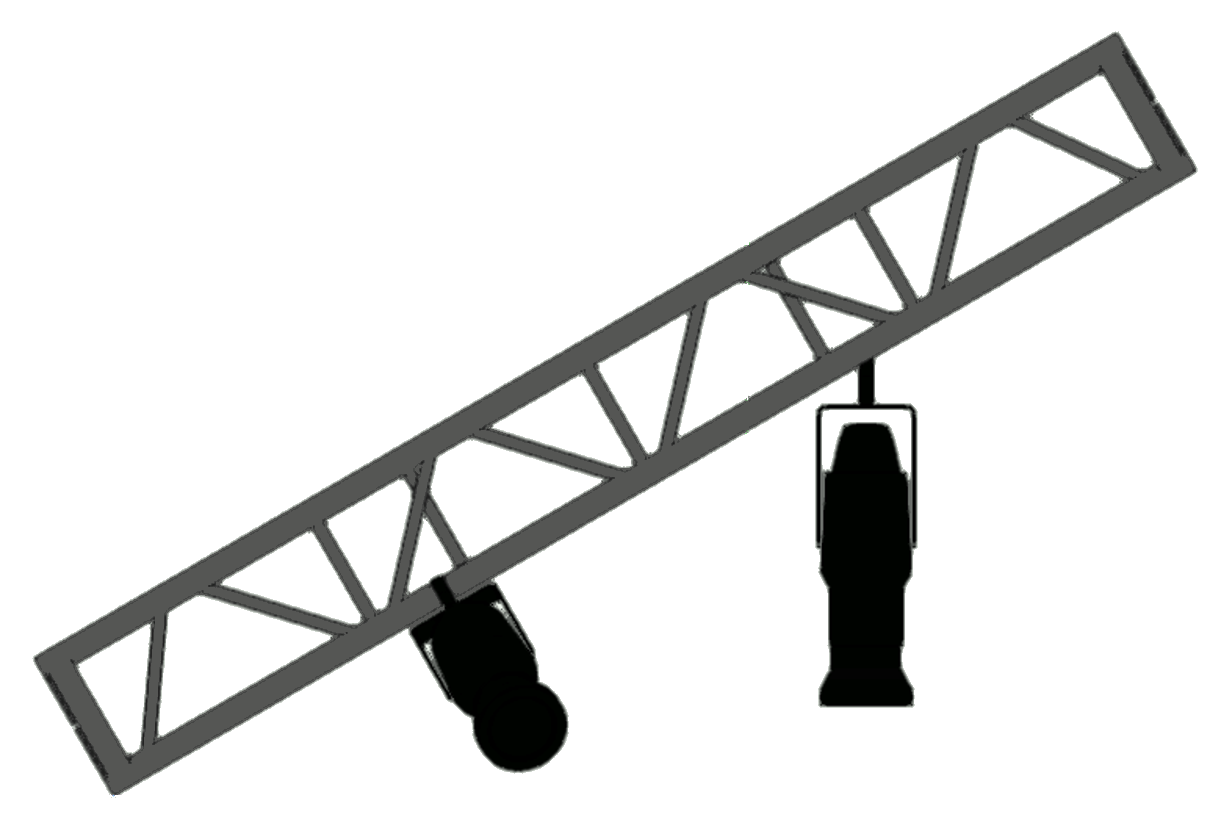
This option only applies to load objects that support 3D rotation, such as lighting devices, when they attach to rigging objects in 3D views. When selected, load objects automatically assume the orientation of the rigging object when they are attached. When deselected, the orientation of attached load objects depends on the active working plane settings. Auto-positioning must be enabled for rigging objects to highlight for snapping.
With the option selected, the light on the left is inserted at the same angle as the rotated truss. With the option deselected, the light on the right is inserted based on the working plane. |
|
Schematic View Classes |
|
|
Witness Line Class |
To control the appearance and visibility of witness lines in schematic views, use the standard class, select a class from the list of classes present in the drawing, or create a new class |
|
Footprint Class |
To control the appearance and visibility of footprints in schematic views, use the standard class, select a class from the list of classes present in the drawing, or create a new class |
|
Automatically assign the class of all truss objects |
Enables automatic classing of trusses |
|
Use existing document class |
Places all truss objects in the selected class; use the selected standard class, select a class from the list of classes present in the drawing, or create a new class |
|
Use value of field |
Places all truss objects in a class determined by the value of a record field; select a record field from the list |
|
Class Name |
Adds either a prefix or suffix to the selected class name; select Prefix or Suffix and then enter its alphanumerical value |
|
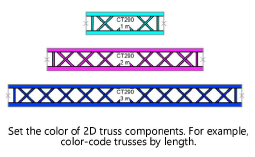
Modify truss object color |
Enables color-coding of 2D truss geometry. Color can be set directly from the Attributes palette for selected trusses or controlled by class attributes; see Setting class attributes. If Color by Class is selected on the Attributes palette, truss objects will automatically use their class’s color setting. |
|
Modify Only Geometry in the Class |
Modifies the color of 2D truss components only within the selected class. Select <All> to modify all the 2D truss geometry, select a class from the list of classes present in the drawing, or create a new class. Select the Rigging-Truss-Simplified class to only change the color of a truss symbol’s simplified geometry. |
|
Automatically assign the class of all point and distributed loads |
Enables automatic classing of loads |
|
Use existing document class |
Places all load objects in the selected class; use the selected standard class, select a class from the list of classes present in the drawing, or create a new class |
|
Use value of field |
Places all load objects in a class determined by the value of a record field; select a record field from the list |
|
Class Name |
Adds either a prefix or suffix to the selected class name; select Prefix or Suffix and then enter its alphanumerical value |
|
Save as default |
Saves the current settings for all panes in the dialog box as the default settings for this and future documents |
|
Automatically assign the class of all truss cross objects |
Enables automatic classing of truss crosses. Specify whether to use the selected standard class, select a class from the list of classes present in the drawing, or create a new class. |