Managing object textures from the Object Info palette
To manage the texture applied to one or more selected objects:
Select the object with applied textures to manage.
For most objects, you must apply textures to objects and individual faces (see Applying textures to objects and faces using the Texture tool) before the textureable entities can display in the Render pane. However, objects such as walls, slabs, roofs, and hardscapes that have textureable components and parts display those entities automatically.
If more than one object is selected, the texture resource management applies to all objects in the selection. If the selected objects do not have the same applied textures, the Texture list and mapping cannot accurately reflect multiple objects, and there may be unexpected results. To resolve this issue, select either Multiple Edit or Individual Edit mode, as described in Editing multiple objects.
While existing objects such as walls and roofs can be textured in all Vectorworks products, a Design Suite product is required to create the objects.
Curtain wall textures are determined by frame and panel settings, and cannot be set from the Render tab.
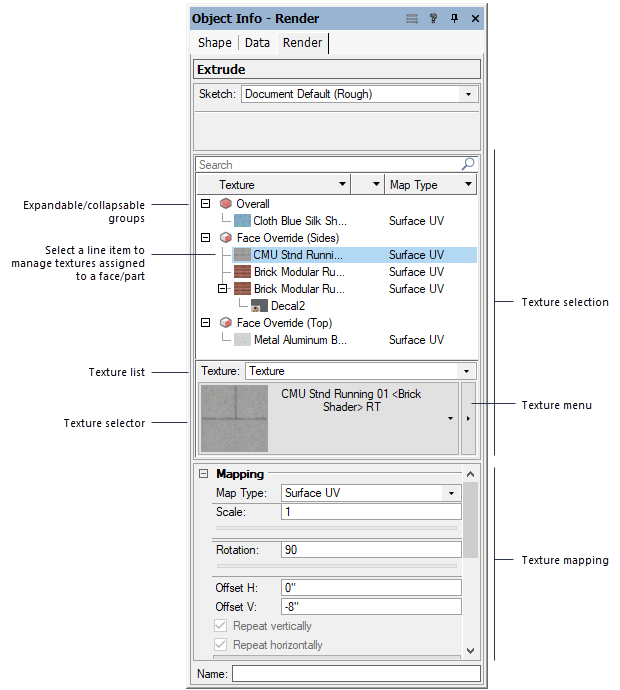
Click the Render tab from the Object Info palette and specify the rendering settings. These changes are visible immediately in the drawing, as the selected object is re-rendered.
Click to show/hide the parameters.Click to show/hide the parameters.
|
Parameter |
Description |
|
Sketch |
Assign the object's sketch rendering style, if desired; see Sketch rendering |
|
Mode |
For objects with textureable components, such as walls, roofs, slabs, and hardscapes, select whether to apply the texture By Object or By Component. For the best drawing accuracy, use an object style with textures assigned by style, or assign textures to object components, and set this parameter By Component. |
|
Search |
Enter text in the search box to filter the Texture browser list |
|
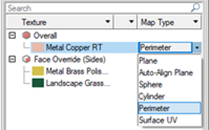
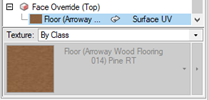
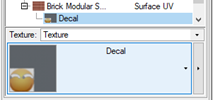
Texture browser |
The textures applied to the object display, divided into expandable/collapsable groups. Most objects can have different textures (including decals) applied to different faces, components, or parts. See Textures on 3D objects and Textures on objects with components for information about how different object types display in the browser. Select a list item in the Texture browser to apply a different texture, or to map the texture on that item. When multiple list items are selected, the same texture/mapping changes are applied to all selected items. A context menu provides additional ways to manage the list items in the Texture browser; see Texture browser context menu commands. Click the Map Type column for a list item and then click the disclosure arrow to the right of the current map type to change the texture map type for that entity; see Concept: Texture projection and orientation.
If the texture is set by class, a curved arrow displays in the middle column of the browser. The class texture's thumbnail displays, but the texture selector and Texture menu are disabled and grayed.
When a decal is applied to a texture, the decal resource displays offset under the entity's main texture list item. A thumbnail of the decal displays when the decal's list item is selected.
|
|
Texture list |
Select to apply a texture resource, to apply the class texture, to use no texture, or, if applicable, to revert to the object’s default material texture (Design Suite product required). If Texture is selected, select a texture from the Resource Selector. Selecting None specifies that the item does not have a texture, but does not remove the list item from the Texture browser. |
|
Projected Texture list (Spot light objects only) |
To project the color and mask transparency properties of a specified Renderworks texture in the beam of a spot light; select Texture, and then select a texture from the Resource Selector. See Projecting a texture in a spot light beam for additional information. |
|
[texture selector] |
Click to select a texture from the Resource Selector; a thumbnail view of the selected texture displays |
|
Texture menu |
Click the arrow next to the texture selector to open the Texture menu. The texture resource or shader used to create the resource can be edited from here as described in Editing textures and shaders of selected objects. An associated surface hatch can also be edited. Before editing, the resource can be copied to preserve the original resource parameters. |
|
Mapping |
Mapping can be applied to selected list items from the Texture browser; it affects only the way the texture is applied to the selected item. Alternatively, use the Attribute Mapping tool; see Direct texture mapping. |
|
Map Type |
Select how the texture is applied to the 3D object or its selected part or face; see Map types. Use this parameter to change the mapping type while the Attribute Mapping tool is in use. |
|
Scale |
Determines the texture size when projected onto the object. For example, a value of 2 doubles the size of the texture projection. Either enter a scale value or use the slider to change the scale.
|
|
Rotation |
Sets the angle of texture rotation. Either enter a rotation value from 0 to 360 degrees or use the slider to change the rotation angle.
|
|
Offset H |
Sets the start location of the texture horizontally
|
|
Offset V |
Sets the start location of the texture vertically
|
|
Repeat vertically/horizontally |
Repeats the texture in a vertical/horizontal direction |
|
Flip Vertically |
Flips the texture vertically, along the horizontal axis |
|
Flip Horizontally |
Flips the texture horizontally, along the vertical axis |
|
Reset to Default Mapping |
Removes any changes made by the Attribute Mapping tool or in the Object Info palette, restoring the texture to its original location, scale, and rotation |
|
Radius |
For sphere and cylinder map types, sets the texture radius; the default radius is the same as the 3D object radius. Increasing this value reduces the size of the texture on the object. |
|
Follow longest edge |
Aligns the texture’s U axis with the long edge of a face, for simpler mapping when the auto-align plane map type is selected. When deselected, the texture aligns horizontally in object space. |
|
Use world Z for origin |
For all mapping types, sets the texture's Z origin to be relative to the world Z origin, rather than to object space. This aligns the texture seamlessly along the Z axis, across multiple objects and layers. |
|
Use world origin |
For all mapping types, maps the texture in all directions (X, Y, Z) relative to the world origin, rather than to object space. This aligns the texture seamlessly in all directions, across multiple objects and layers. Depending on the object shape, mapping, and texture, this option generally produces better results when mapping textures across multiple objects. |
|
Update |
Updates the drawing display |
|
Smoothing |
|
|
Mesh Smoothing |
Set the mesh smoothing preference for the selected object(s) to None, Use Document Preference, Custom Crease Angle, or Imported. If Custom Crease Angle is selected, specify the desired Crease Angle. Mesh objects imported from SketchUp or 3ds are automatically set to Imported to preserve the surface normal data from the original imported file. Imported smooth normals can be disabled and edited by selecting a different mesh smoothing option, but imported smooth normal data is deleted if the mesh is edited. This setting overrides the document preference mesh smoothing setting for the selected object(s) only. To set the document preference for mesh smoothing, see Document preferences: Display tab. This parameter is available for editing Shaded renderings in Vectorworks Design Suite products. |


Texture browser context menu commands
Right-click a list item in the Texture browser to open a context menu with additional commands for that item. Some of the commands are also available when you right-click a textured object or face in the drawing area.
Click to show/hide the parametersClick to show/hide the parameters
|
Parameter |
Description |
|
Locate in View |
Changes the drawing to the standard view that provides the best view of the selected entity |
|
Add Decal |
Adds a decal texture to the selected entity; see Creating decal textures |
|
Remove Texture Override |
Removes the selected texture or decal from the entity; depending on other texture settings, the entity texture is changed to None or from Overall. If this command is executed on a face of a 3D object, the list item is removed from the Texture browser. Alternatively, select the list item in the Texture browser and press the Delete key, or right-click the object or face in the drawing area and select Remove Texture Override from the context menu. |
|
Rotate Texture by 90° |
Rotates the selected texture's mapping by 90° |
|
Reset to Default Mapping |
Removes any changes made by the Attribute Mapping tool or in the Object Info palette, restoring the texture to its original location, scale, and rotation |
|
Expand/Collapse All |
Expands or collapses the list to display all the textures or only the group headers |
