Renderworks shader parameters
Renderworks textures are composed of four shaders: color, reflectivity, transparency, and bump. The following topics describe the shader parameters.
Color shader parameters
Click to show/hide the parameters.Click to show/hide the parameters.
|
Shader |
Description |
|
Object Attribute |
Selects the object’s fill color attribute to apply as a color texture |
|
Image |
Selects an imported image to apply as a color texture; the image can also be tinted with color (see Using an image in a texture shader) |
|
Color |
Specifies a color to be applied as a texture |
|
Color |
Click the color box to select the shader color |
|
Brightness (%) |
Lightens or darkens the selected color |
|
Fresnel |
Can be used to create a texture with a somewhat fuzzy appearance, like that of a pillow that appears slightly darker or lighter on its edges |
|
Edge Color |
Select the edge color by clicking the color box |
|
Center Color |
Select the main color by clicking the color box |
|
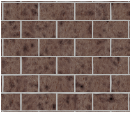
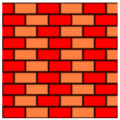
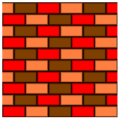
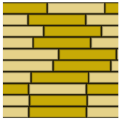
Bricks |
Creates a variegated brick pattern
|
|
Scale (%) |
Specifies the size of the bricks relative to the texture Size |
|
Colors |
On the Bricks, Gaps, and Alt Bricks panes, click the color boxes to select color variations within a brick/gap, or choose the same color for no variation |
|
Choose Image |
On the Bricks, Gaps, and Alt Bricks panes, click to use an image for the brick or gap texture. The chosen image is randomized to show no repetition on the textured object, so each brick/mortar joint will look realistically unique. For the completed brick surface to display correctly, the brick image should show only the flat face of a single brick or a portion of a brick, without any mortar joints. The gap image should show only mortar without any brick. Images of clay tiles and other similar objects can also be used in place of a brick. |
|
Delete Image |
Removes the selected image from the shader and uses only colors to create the variegated pattern |
|
Image Blend (%) |
When an image is used, specifies the blending between the image and the colors selected, to enhance the randomization of the resulting pattern. A low percentage value uses more color in the pattern, while a high value uses more of the image. The selected colors tint the image unless a blend value of 100% is set. |
|
Bricks |
|
|
Contrast (%) |
Sets the color contrast between the two brick colors, establishing the dot-like variation within a brick |
|
Brick Width/Height |
Sets the brick width and height in real-world dimensions |
|
Shift (%) |
Sets the horizontal offset between rows of bricks |
|
Half Brick Row |
Adds a row of half bricks at the specified row interval |
|
Half Brick Shift (%) |
For half-brick rows, sets the amount of horizontal shift |
|
Gaps |
|
|
Size |
Sets the size of the mortar joint gap in real-world dimensions |
|
Noise (%) |
Specifies the wobbliness of the mortar joints |
|
Alt Bricks |
|
|
Row |
Adds a row of alternate brick colors at the specified row interval |
|
Column |
Adds a column of alternate brick colors at the specified column interval. Row must be greater than 0 to show columns. |
|
Grass |
Depending on the grass Density and the size of the model, using a grass shader on large surfaces can add significantly to the required render time. For large areas, using only an image shader rather than the grass shader is recommended, or break up the model into a foreground area with grass, and a background area with an image texture or color but no grass shader. Custom Renderworks and Renderworks styles have an option to deselect Grass, controlling when blades of grass are depicted. Then, only the ground color or ground image is shown, without rendering grass blades. Grass is always off for Fast Renderworks and always on for Final Quality Renderworks. |
|
Colors |
The first color box specifies a color for the grass blade base and the ground, when an image is not used. The second color sets the color of the grass blade up to its tip. |
|
Choose Image |
Select an image to use for the grass as well as the ground between the blades of grass |
|
Delete Image |
Removes the selected image from the shader and uses only colors to create the grass |
|
Image Blend (%) |
When an image is used, specifies the blending between the image and the colors selected, to enhance the randomization of the resulting pattern. A low percentage value uses more color in the pattern, while a high value uses more of the image. The selected colors tint the image unless a blend value of 100% is set. |
|
Length |
Determines the length of each blade of grass |
|
Width |
Sets the width of the grass blades at the base. Each blade tapers to a point at its tip with a width of zero. |
|
Density (%) |
Specifies the grass blade density |
|
Crinkle (%) |
Specifies the curliness of the blades |
|
Bend (%) |
Curves the blades sideways |
|
Wetness (%) |
Makes the blades look shiny/wet |
|
Noise |
|
|
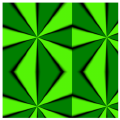
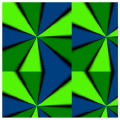
Pattern |
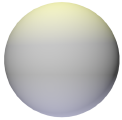
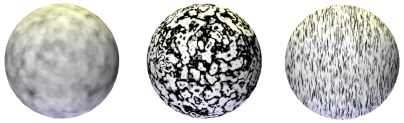
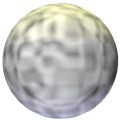
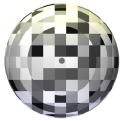
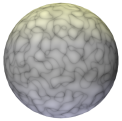
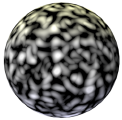
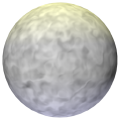
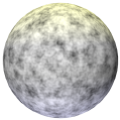
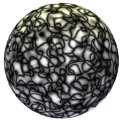
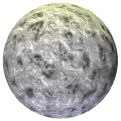
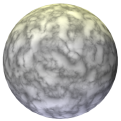
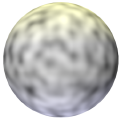
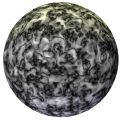
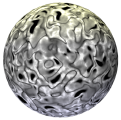
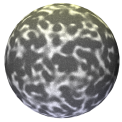
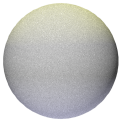
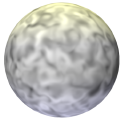
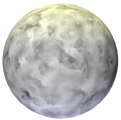
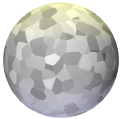
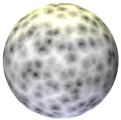
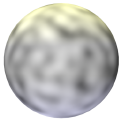
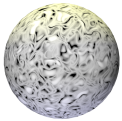
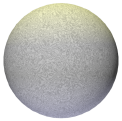
Select the type of noise pattern to use. The preview helps distinguish the differences among the patterns. A generic noise pattern to select is Turbulence. Cell Voronoi is useful for creating speckled noise (set Low and High Clip around 70% each). An example of each pattern is shown using default values for a color shader on a sphere with warm lighting on the top and cool lighting on the bottom. For comparison, this sphere has no texture applied:
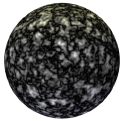
The pattern might look different on a plane as opposed to the sphere used for the example. In addition, the appearance of each pattern can be dramatically affected by changes to its parameters. This example shows three variations of the blistered turbulence pattern.
|
|
Pattern |
Varying only the Low Clip and High Clip percentages can completely change the appearance of the pattern.
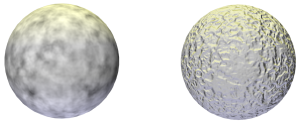
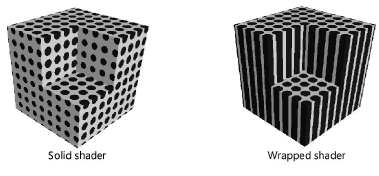
The selected shader type also obviously affects the appearance of the pattern. This example shows the blistered turbulence pattern as a color shader and as a bump shader.
|
|
Box |
Smoothed, random cube pattern
|
|
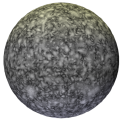
Blistered Turbulence |
Varied distribution of light and dark areas
|
|
Buya |
Generally dark background with occasional random light areas
|
|
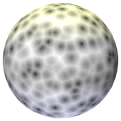
Cell Noise |
Tiled pattern with high contrast
|
|
Cranal |
Looping, curving pattern of lines
|
|
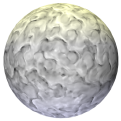
Dents |
Organic, twisted pattern of light and dark areas
|
|
Displaced Turbulence |
Smooth version of turbulence, with random light and dark areas
|
|
FBM |
Finer, detailed pattern of random light and dark areas
|
|
Hama |
Similar to the looping pattern of cranal, but more abrupt and with high contrast
|
|
Luka |
Mineral-like pattern of rough and more detailed areas
|
|
Mod Noise |
Similar to the tiled pattern of cell noise, but with less contrast
|
|
Naki |
Rough, concrete pattern
|
|
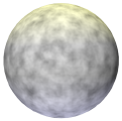
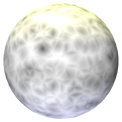
Noise |
Soft, random, and unfocused pattern of wider light areas and some dark areas
|
|
Nutous |
Generally dark background with smooth, flaked light areas
|
|
Ober |
A variety of rough and detailed areas, interspersed with looping, flowing lines
|
|
Pezo |
Generally dark background with smaller, patchy, lighter areas
|
|
Poxo |
Fine-grained, detailed pattern
|
|
Random |
Very fine and even detailed pattern
|
|
Sema |
Generally dark background with random, dripping/melted lines
|
|
Stupl |
Flowing, smeared pattern of light and dark areas
|
|
Turbulence |
Soft and smooth, yet detailed noise pattern
|
|
VL Noise |
Smoothed, varied, less-focused noise pattern
|
|
Wavy Turbulence |
Smooth, soft noise pattern with occasional random peaks
|
|
Cell Voronoi |
Similar to mod noise, but with irregular mosaic shapes rather than square tiles
|
|
Displaced Voronoi |
Organic voronoi pattern with smaller, inner pattern offset
|
|
Sparse Convolution |
Soft, unfocused, wide pattern of light and dark areas
|
|
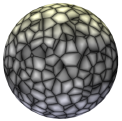
Voronoi 1 |
Organic, detailed voronoi pattern of small cell shapes
|
|
Voronoi 2 |
Blurred voronoi pattern with offset secondary pattern
|
|
Voronoi 3 |
Sharp organic voronoi pattern of irregular cell shapes, high contrast with dark outlines
|
|
Zada |
Twisting, organic pattern with sharp looping areas and flat areas
|
|
Wood |
Detailed wood-grain pattern
|
|
Marble |
Marbled, veined pattern with high detail
|
|
Colors |
Click the color boxes to select color variations within the noise pattern |
|
Scale |
|
|
Global (%) |
Sets the size of the pattern as a percentage of the texture Size |
|
Relative (%) U, V, W |
Allows the pattern to be stretched in the U, V, and/or W direction; can be used to simulate the appearance of scratches |
|
Options |
|
|
Dimensionality |
Select 2D Wrapped or 3D Solid. Wrapped shaders are 2D patterns projected onto a 3D object surface. Solid shaders are 3D patterns applied to a 3D object surface; when the shape changes, the object and pattern are still displayed correctly.
|
|
Detail |
Sets the level of detail or resolution for many of the patterns |
|
Cycles |
Creates a repeating pattern of banded noise texture; set the number of repetition cycles to use |
|
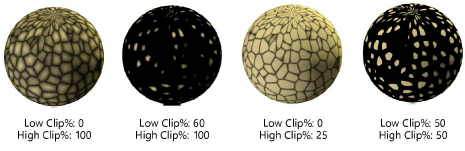
Low/High Clip (%) |
The low and high clip determine the abruptness of the transition between noise colors and are often set as a combination to achieve a desired effect. Set the Low clip higher or the high clip lower for a sharp transition to the other color; set the clips evenly to make the transition between noise colors more even. |
|
Pavement |
Creates the appearance of cracked pavement; with no gaps, simulates variegated pavement, and with the same two colors, simulates solid pavement
|
|
Scale (%) |
Sets the size of the pavement as a percentage of the texture Size |
|
Stones |
|
|
Colors |
Click the color boxes to select color variations within the pavement, or choose the same color for no variation |
|
Coarse Marbling (%) |
Increases or decreases the coarse marbling appearance of the stones |
|
Fine Marbling (%) |
Increases or decreases the fine marbling appearance of the stones |
|
Gaps |
|
|
Colors |
Click the color boxes to select color variations within the pavement joints |
|
Width (%) |
Sets the width of the pavement joint gap as a percentage of the texture Size |
|
Softness (%) |
Sets the bevel amount between pavement stones and pavement joints |
|
Grain (%) |
Sets the amount of color variation within the pavement gaps |
|
Smudges |
|
|
Colors |
Click the color boxes to select color smudging variation within the pavement gaps |
|
Amount (%) |
Sets the amount of smudging for the pavement gap smudges |
|
Size (%) |
Increases or decreases the amount that the smudging extends from the gap centers |
|
Tiles |
|
|
Pattern |
Select the type of tile pattern. The preview helps distinguish the differences among the patterns. Some of the patterns use two of the tile colors, while others make use of all three. |
|
Brick 1 |
Alternating brick pattern with two colors
|
|
Brick 2 |
Alternating brick pattern with three colors
|
|
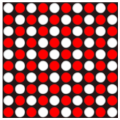
Circles 1 |
Alternating polka dot pattern with two colors
|
|
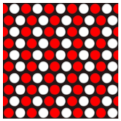
Circles 2 |
Offset polka dot pattern with two colors
|
|
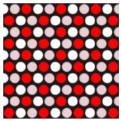
Circles 3 |
Offset polka dot pattern with three colors
|
|
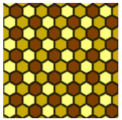
Hexagons |
Alternating hexagon pattern with three colors
|
|
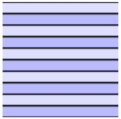
Lines 1 |
Alternating pattern of lines with two colors
|
|
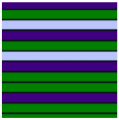
Lines 2 |
Line pattern with three colors
|
|
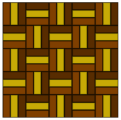
Parquet |
Parquet pattern with three colors
|
|
Planks |
Alternating rectangular pattern, similar to wood planks, with two colors
|
|
Radial Lines 1 |
Starburst pattern with two colors
|
|
Radial Lines 2 |
Starburst pattern with three colors
|
|
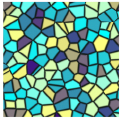
Random |
Irregular cellular pattern with blends of three colors for a stained glass effect
|
|
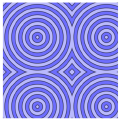
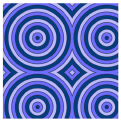
Rings 1 |
Alternating circular pattern with two colors
|
|
Rings 2 |
Alternating circular pattern with three colors
|
|
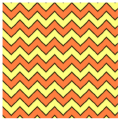
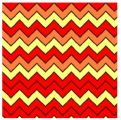
Sawtooth 1 |
Alternating zig-zag pattern with two colors
|
|
Sawtooth 2 |
Zig-zag pattern with three colors
|
|
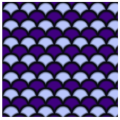
Scales 1 |
Alternating scale pattern with two colors
|
|
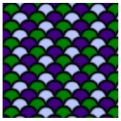
Scales 2 |
Alternating scale pattern with three colors
|
|
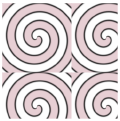
Spiral 1 |
Alternating spiral pattern with two colors
|
|
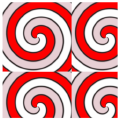
Spiral 2 |
Alternating spiral pattern with three colors
|
|
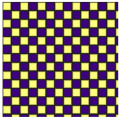
Squares |
Alternating checkerboard pattern with two colors
|
|
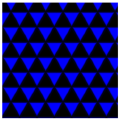
Triangles 1 |
Alternating triangle pattern with two colors
|
|
Triangles 2 |
Offset triangle pattern with two colors
|
|
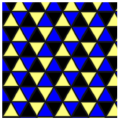
Triangles 3 |
Offset triangle pattern with three colors
|
|
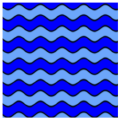
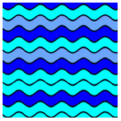
Waves 1 |
Alternating wavy pattern with two colors
|
|
Waves 2 |
Wavy pattern with three colors
|
|
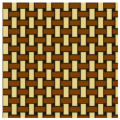
Weave |
Basketweave pattern with two colors
|
|
Colors |
Click each color box to select the color for the grout, and up to three colors for the tiles |
|
Randomize Colors |
Uses randomly-selected colors for the pattern, mixing the selected colors in no particular order |
|
Dimensions |
|
|
Grout Width (%) |
Sets the width of the grout joint as a percentage of the texture |
|
Bevel Width (%) |
Sets the bevel amount between tiles and grout |
|
Horizontal Orientation |
When selected, tiles are oriented horizontally; deselect for vertical tiles |
|
Scale |
|
|
Global (%) |
Sets the size of the tile pattern as a percentage of the texture Size |
|
Relative (%) U, V |
Sets the relative scale of the tile pattern in the U (width) or V (height), allowing the tiles to be stretched |


Reflectivity shader parameters
Click to show/hide the parameters.Click to show/hide the parameters.
|
Shader |
Description |
|
Image |
Specifies an imported image to be used as the reflectivity shader (white is more reflective; black is less reflective); see Using an image in a texture shader |
|
Backlit |
This shader is useful for lamp shades, light bulbs, and curtains that are lit from behind. If Cast is selected in the Shadows section of the Edit Texture dialog box, the backlit shader acts as an area light for indirect lighting. If Cast is not selected, the backlit shader does not emit light. |
|
Color |
Specifies a color to be applied as a backlit color; click the color box to select the color |
|
Brightness (%) |
Controls the backlit brightness |
|
Reflection (%) |
Sets the amount of reflection to use, or set to 0 for no reflection |
|
Blurriness (%) |
Sets the amount of blurriness for the reflection, or set to 0 for no blur |
|
Glass |
Glass shaders usually look best with a dark Color shader combination |
|
Edge Color |
Click the color box to set the color applied to the glass at an angle, which is seen at the edge of the glass |
|
Center Color |
Click the color box to set the color at the center (main) part of the glass |
|
Blurriness (%) |
Sets the amount of blurriness for the reflection, or set to 0 for no blur |
|
Glow |
The glow shader offers an alternative to creating line or area lights, and can create “neon” signs. See the video links below.
|
|
Brightness (%) |
Sets the amount of glow |
|
Emit Light |
Allows the texture to become a light source, when Indirect Lighting is enabled (View > Set Lighting Options) |
|
Add Matte Reflectivity |
Creates a partially glowing light that is also lit by other light sources |
|
Reflection (%) |
Sets the amount of reflection to use, or set to 0 for no reflection |
|
Blurriness (%) |
Sets the amount of blurriness for the reflection, or set to 0 for no blur |
|
Mirror |
Mirror shaders usually look best with a dark Color shader combination |
|
Color |
Click the color box to select the mirror color; use grayscale for a regular mirror effect, and select colors for mirrored metallic effects |
|
Reflection (%) |
Sets the amount of reflection to use, or set to 0 for no reflection |
|
Blurriness (%) |
Sets the amount of blurriness for the reflection; using a non-grayscale color and some blurriness creates an effective metallic look |
|
Plastic |
|
|
Color |
Click the color box to select the plastic color |
|
Brightness (%) |
Sets how bright the shader appears |
|
Roughness (%) |
Sets the width of shiny areas on the plastic; increase the percentage for wider shiny areas |
|
Reflection (%) |
Sets the amount of reflection to use, or set to 0 for no reflection |
|
Blurriness (%) |
Sets the amount of blurriness for the reflection, or set to 0 for no blur |
|
|
|
|
Preset |
Select a cloth to base the texture on, or select Custom to create an entirely new cloth texture |
|
Colors |
|
|
Warp/Warp Highlight |
Sets the base and highlight colors for threads running in the warp direction |
|
Weft/Weft Highlight |
Sets the base and highlight colors for threads running in the weft direction |
|
Scale and Orientation |
|
|
Scale U/V(%) |
Scales the weave pattern in the U/V direction |
|
Orientation |
Rotates the weave pattern |
|
Highlights |
|
|
Thread Highlight (%) |
Controls the width of the highlight on individual threads; smaller values produce sharper highlights, and larger values give more diffuse results |
|
Polyester/Silk Highlight (%) |
For a polyester or silk Preset, controls the shape and brightness of the cloth’s characteristic sheen; higher values produce brighter, more blurred highlights |
|
Uniform Scattering Factor |
Specifies the overall reflective strength of the cloth; higher values produce more reflective cloths |
|
Forward Scattering Factor |
Specifies the reflective strength of the brighter regions of the cloth |
|
Irregularities |
|
|
Color (%) |
Controls irregularities in the warp and weft colors, to create a more realistic appearance for some kinds of cloth |
|
Color Scale (%) |
Controls the size of the color irregularities |
|
Warp/Weft (%) |
Defines the irregularities in the warp/weft direction of the cloth, to create a more raw-looking weave |
|
Thread Scale (%) |
Controls the size of the irregularities in thread directions |
|
Creates metallic effects (also try colored mirror shaders for polished metal effects). Metallic shaders usually look best with a dark Color shader combination. If a legacy Preset metal is selected, metallic effects require the presence of light objects in the drawing; panoramic image Renderworks background lighting will not produce metallic effects. |
|
|
Preset |
Select a metal |
|
Color |
If Preset is None or a legacy metal, click the color box to select the metallic color |
|
Metal Reflection (%) |
Sets the reflection of the metallic layer. Metal and clear coat shaders are layered to create complex metals; combine the reflection and roughness of both shaders to achieve the desired result. |
|
Metal Roughness (%) |
Sets the roughness of the metallic layer to simulate micro scratches |
|
Clear Coat Reflection (%) |
Sets the reflection of the clear coat layer. Metal and clear coat shaders are layered to create complex metals; combine the reflection and roughness of both shaders to achieve the desired result. |
|
Clear Coat Roughness (%) |
Sets the roughness of the clear coat layer to simulate micro scratches |
|
Reflection (%) |
For a Preset legacy metal, sets the amount of reflection to use, or set to 0 for no reflection |
|
Blurriness (%) |
For a Preset legacy metal, sets the amount of blurriness for the reflection, or set to 0 for no blur |
|
Brushed |
Creates a brushed metal effect by adding microscopic scratches (not available with Preset legacy metals) |
|
Pattern |
Select the pattern that microscopic scratches form on the metal; Radial settings project the scratches in a curve, while Planar rotates them without curving |
|
Scale (%) |
Defines the size of the selected Pattern |
|
Orientation |
Sets the angle of the scratches; this changes the reflective behavior of the object without repositioning a light source |
|
Offset U/V (%) |
Moves the Pattern horizontally/vertically |
|
Primary Scratches |
Adds scratches that run parallel to the microscopic scratches; enter the Depth, Width, and Length of the additional scratches |
|
Secondary Scratches |
Adds scratches that run perpendicular to the microscopic scratches; enter the Depth, Width, and Length of the additional scratches |
|
Bricks |
These parameters are the same for all shaders; see Color shader parameters |
|
Noise |
These parameters are the same for all shaders; see Color shader parameters |
|
Pavement |
These parameters are the same for all shaders; see Color shader parameters |
|
Tiles |
These parameters are the same for all shaders; see Color shader parameters |
Glow parameter videos
Transparency shader parameters
Click to show/hide the parameters.Click to show/hide the parameters.
|
Shader |
Description |
|
Image Mask |
Selects an imported image to apply as a transparency mask (see Using an image in a texture shader) |
|
Image |
Selects an imported image to apply as a transparency texture (see Using an image in a texture shader), for colored transparency and projected colored lights like gobo projections in the Vectorworks Spotlight software |
|
Color |
Specifies a color to be applied as a transparency |
|
Color |
Click the color box to select the transparency color |
|
Brightness (%) |
Lightens or darkens the selected color |
|
Glass |
When using glass transparency, set the accompanying color shader to a dark color (or even black) for best results. See the video link below. |
|
Transmission (%) |
Sets how much light passes through the glass; set to a high value when the glass is very clear |
|
Index of Refraction |
As light moves through a medium, the index measures the change in the direction of the light’s rays. An index of 1.0 indicates no change; a typical value for water and ice is 1.3, and for glass use 1.5–1.6. To save time, use a value of 1.0x (just above 1) when the glass is thin. |
|
Color |
Click the color box to select the color that appears in a very thin object; for glass, this is usually set to white |
|
Blurriness (%) |
Blurs the transparency by the specified amount, or set to 0 for no blur. Blurred glass appears frosted (and takes longer to render). |
|
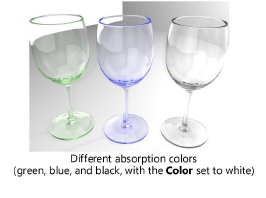
Absorption Color |
Click the color box to select the color that a large, thick object assumes, when a ray of light has traveled the Absorption Distance
|
|
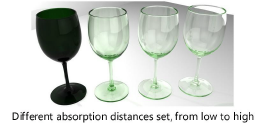
Absorption Distance |
Defines the distance rays of light have to travel before Absorption Color replaces Color. The lower the value, the more intense the Absorption Color is. This applies to thick or thin glass.
|
|
Plain |
Provides plain, uniform transparency of a specified amount |
|
Opacity (%) |
Sets how opaque the shader is; set to a lower value for more transparency and to a higher value for more opacity |
|
Uses the texture as a rectangular mask to apply as a transparent texture (usually combined with another shader to create a specific masking effect). Useful for decals. |
|
|
Horizontal/Vertical Repetitions |
Indicates how to display the mask: a single instance, infinite repetitions, or a set number of repetitions in each direction |
|
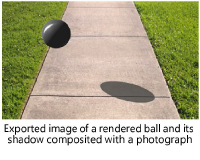
Shadow Catcher |
Catches shadows and/or reflections that fall onto the object the shadow catcher is applied to in the alpha channel, so they show on an invisible ground plane. Rendered images with the shadow catcher can be composited with a rendered or photographic image file that has the alpha channel enabled to produce realistic shadows and reflections.
Objects that have a shadow catcher texture render black in Vectorworks, but everything other than the shadow/reflection is transparent in the composited image. The shadow catcher cannot be used when rendering with a visible Renderworks background in a viewport. Shadow catcher textures can be used in design layers with a visible Renderworks background. See the video link below. |
|
Catch Shadows |
Captures shadows of rendered objects; deselect to show only reflections |
|
Shadow Strength (%) |
Controls the transparency of the shadows; lower values are recommended for more realistic shadows (0 shows no shadow and 100 is opaque) |
|
Shadow Color |
Specifies the color of the shadow; for daylight scenes, a dark blue is recommended for more realistic shadows |
|
Uniform Shadow Strength |
Sets all shadows the same color/intensity regardless of light source; deselect if multiple light sources are used, for more realistic shadows |
|
Reflection Strength (%) |
Controls the intensity of the reflections included in the alpha channel; 0 shows no reflections |
|
Bricks |
These parameters are the same for all shaders; for a description, see Color shader parameters |
|
Noise |
These parameters are the same for all shaders; for a description, see Color shader parameters |
|
Pavement |
These parameters are the same for all shaders; for a description, see Color shader parameters |
|
Tiles |
These parameters are the same for all shaders; for a description, see Color shader parameters |
Glass parameter video
Shadow Catcher parameter video
Bump shader parameters
Click to show/hide the parameters.Click to show/hide the parameters.
|
Shader |
Description |
|
Image |
Specifies an imported image to be used as the source of the bump map displacement (see Using an image in a texture shader) |
|
Bricks |
Many of these parameters are the same as for Color shader parameters; additional bump-specific parameters follow |
|
Noise |
Many of these parameters are the same as for Color shader parameters; additional bump-specific parameters follow |
|
Pavement |
Many of these parameters are the same as for Color shader parameters; additional bump-specific parameters follow |
|
Tiles |
Many of these parameters are the same as for Color shader parameters; additional bump-specific parameters follow |
|
Parallax Offset (%) |
Sets the amplitude of the parallax mapping. Positive and negative values can be entered. Parallax mapping enhances bump mapping by giving textures such as bricks more apparent depth, without the performance slowdown that can be associated with displacement mapping. Unlike displacement mapping, parallax mapping appears flat in silhouette. |
|
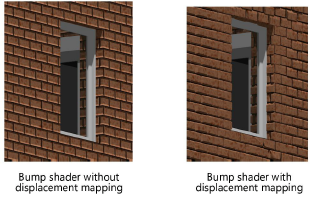
Displacement Mapping |
For realistic bump textures, displacement mapping creates texture and bumpy details with a rendering technique that appears embossed, projecting the geometry outward from the surface.
This mapping applies only to Final Quality Renderworks and Custom Renderworks when Displacement Mapping is enabled in the render options. Rendering can be significantly slower with displacement mapping. If an image bump does not provide the desired results, try a noise bump shader. |
|
Height |
Specify a non-zero height to enable displacement mapping; large height values may result in longer render times |
|
Detail |
Sets the level of detail for displacement mapping; requirements and results vary depending on the texture and the surface’s face size. Textures without too much bump detail and a large face size, such as boards or stones, render with less detail and can be set with a lower level of detail; fine, faceted textures like grass or leaves may require a high level of detail, which also requires more rendering time. Conversely, very large surfaces, like a ground plane, may need higher levels of detail to see the displacement. |
|
Self-Shadowing |
Adds shadows to the displaced geometry, increasing realism as well as rendering time |