 Creating custom cabinets
|
Mode |
Tool |
Workspace: Tool set |
|
Modes for The Symbol Insertion tool |
Custom Cabinet
|
Architect and Spotlight: Furn/Fixtures Landmark: Building Shell |
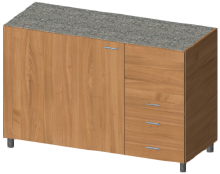
The Custom Cabinet tool provides flexibility in the design of a variety of casework, such as shelves, cupboards, and wardrobes.

The Vectorworks software also provides tools to insert base, wall, and tall cabinets and shelving units that require less customization; see Creating cabinets and Inserting shelving units.
To create a custom cabinet:
Click the tool and mode.
Do one of the following:
Click Custom Cabinet Style on the Tool bar to select a resource from the Resource Selector.
Click Preferences to open the Custom Cabinet Settings dialog box and specify the tool’s default parameters.
The parameters can be edited later from the Object Info palette.
Click to place the object, and click again to set the rotation.
Custom cabinet settings
Click to show/hide the parameters.Click to show/hide the parameters.
|
Parameter |
Description |
|
3D Preview |
Dynamically displays a 3D preview of the custom cabinet with the currently selected parameters; on the Details pane, the preview becomes interactive and is used to set parameters |
|
View (Base and Attributes panes only) |
Select the standard view for the 3D preview |
|
Mode (Base and Attributes panes only) |
Select the render mode for the 3D preview |
Custom cabinet settings: Base pane
Click to show/hide the parameters.Click to show/hide the parameters.
|
Parameter |
Description |
|
Symbol |
There are two methods to specify the custom cabinet to use as a template for the new cabinet: Access the dialog box by clicking Preferences on the Tool bar, with no custom cabinet selected. Select whether to base the new custom cabinet on a template from the current document or from the Custom Defaults or Vectorworks Defaults library folder, and then select the template. The preview updates to reflect the selected template. Access the dialog box by clicking Settings from the Object Info palette of a selected custom cabinet object. Transfer the desired settings from the selected cabinet to use as a template for the new cabinet, as described in Creating a new custom cabinet from an existing custom cabinet. |
|
Save as Symbol |
Saves the current cabinet as a symbol; see Saving a custom cabinet as a symbol |
|
General Geometry |
|
|
Class |
To control appearance and visibility, select a class from the list of classes present in the drawing, or create a new class |
|
Height/Width/Depth |
Sets the overall height/width/depth of the cabinet |
|
Type |
Specifies whether the custom cabinet is a 2D, 3D, or 2D/3D hybrid object |
|
Show Diagonals in Top/Plan view |
Shows diagonal markers across the top of the object in Top/Plan view |
Custom cabinet settings: Details pane
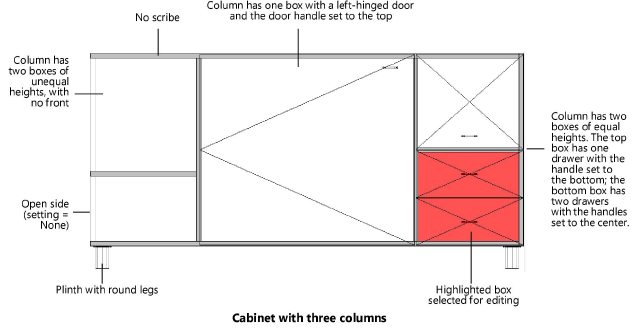
The custom cabinet preview changes to a front view and becomes interactive to specify the cabinet’s details. Click on the preview in order to activate and set the parameters on this pane; many parameters are enabled only when the preview is clicked. When you click on a column, box, or vertical divider of the preview, it becomes highlighted to indicate which section you are editing. Hold the Shift key to select multiple columns or multiple boxes within the same column; edits apply to all selected sections.

Click to show/hide the parameters.Click to show/hide the parameters.
|
Parameter |
Description |
|
Section |
|
|
Columns |
Sets the number of columns in the cabinet. When you click in this field, all columns become deselected; if the number of columns is changed, columns are added to or deleted from the right side of the cabinet. |
|
Column Width |
If there are multiple columns, click on a column and set its width, or select Equal columns to make all columns in the cabinet the same width. As you change the width of the selected column, the widths of the other columns adjust automatically to fill the space allotted; columns that cannot fit within the overall width of the cabinet are automatically deleted. |
|
Boxes |
Sets the number of boxes in the selected column |
|
Box Height |
If there are multiple boxes, click on a box and set its height, or select Equal boxes to make all boxes in that column the same height. As you change the height of the selected box, the heights of the other boxes adjust automatically to fill the space allotted; boxes that cannot fit within the overall height of the cabinet are automatically deleted. The first click in a column selects the entire column, and the second click selects a specific box, as indicated by the highlighted section of the object. |
|
Side/Stile |
For selected cabinet sides and vertical partitions, sets whether it is a solid Side, a Stile, or, for end sides only, has no partition |
|
Front |
|
|
Door/Drawer |
Specify the door/drawer type for the selected columns or boxes, or select No Box Item to have no doors or drawers |
|
Handle |
For doors and drawers, specifies the handle resource from the current document or library default content |
|
Handle Position |
For doors and drawers with a handle, specifies the handle position. Top and Bottom settings position the handle two inches from the upper/lower edge of the door/drawer. |
|
Scribe |
Adds a scribe |
|
Height/Offset |
Set the scribe’s height and offset |
|
Plinth |
Adds a plinth; select whether it’s continuous or has legs |
|
Legs |
For a plinth with legs, select the leg type resource from the current document or library default content. Legs and casters are created without a plinth board; their height is a fixed four inches and they are placed two inches from the edges of the cabinet. |
|
Height/Offset |
For a continuous plinth, set the plinth’s height and offset |
|
Has Back |
Adds a back to the cabinet |
Custom cabinet settings: Attributes pane
To control appearance and visibility, attributes and textures can be applied separately to different parts of the custom cabinet (called construction groups).
Click to show/hide the parameters.Click to show/hide the parameters.
|
Parameter |
Description |
|
Construction groups |
Select a part of the cabinet to apply attributes |
|
Class |
To control appearance and visibility, select a class from the list of classes present in the drawing, or create a new class. Select <Custom Cabinet Class> to place the cabinet part in the same class as the custom cabinet object. |
|
Fill/Pen/Texture |
Specify the attributes and/or texture for each cabinet part; see The Attributes palette |
