 Landscape area preferences
These settings are available in the following locations:
Landscape Area Preferences dialog box (creating an object)
Landscape Area Settings dialog box (editing an object)
Object Info palette (editing an object)
Landscape Area Style dialog box (creating or editing a style)
If a style is selected, only parameters set by instance can be edited (see Concept: Plug-in object styles). Instance parameters can be set independently for each instance of the object in the drawing.
Additional plug-in object settings for the 2D components and cut plane display are available; see Additional plug-in object style and instance options.
Landscape area settings: Overall
Click to show/hide the parameters.Click to show/hide the parameters.
|
Parameter |
Description |
|
Use Style |
From the Resource Selector, double-click a style to apply it, or leave the landscape area unstyled. If a style is selected, only parameters set by instance can be edited (see Concept: Plug-in object styles). |
|
Convert to Unstyled |
Converts a styled landscape area to unstyled for editing; the current values are retained, but all parameters on all panes are set to By Instance to allow editing |
|
By Style/Instance |
A graphic indicates whether each parameter is set to By Style and given a fixed value or set to By Instance and editable in the dialog box. An object style may have a combination of both settings, to balance the need for consistency and flexibility. By Style/Instance settings are established by the style and cannot be changed from the settings dialog box.
To edit the object style, see Editing plug-in object styles; editing the style modifies all plug-in objects in the file that use the style. |
|
Name Formula (Landscape Area Style dialog box only) |
Enter the primary name of the landscape area style in the center field, and optionally select a prefix and/or suffix to autopopulate the style name based on the selected parameter values. For example a Name Formula of [Prefix=ID] [Main Name manually entered as "Meadow and Prairie"] [Suffix=Softscape Category] might display as SE6 Meadow and Prairie Perennials in the list of landscape area styles available for use. See Creating plug-in object styles for more general information about creating a plug-in object style. |
Landscape area settings: General pane
Click to show/hide the parameters.Click to show/hide the parameters.
|
Parameter |
Description |
|
Class |
To control appearance and visibility, select a class from the list of classes present in the drawing, or create a new class; if this parameter is set by style, all instances using this style are assigned to this class. The current active class displays in the Landscape Area Preferences dialog box. Changes here automatically update the class for the bed area in the Attributes palette, and also change the file's active class. |
|
Softscape Category |
Optionally, select a softscape category, or select Manage Custom Categories to edit the list. From the Manage Custom Categories dialog box, click Add or select a list item and click Edit, and then enter a new name. Select a list item and click Delete to remove it from the list of available categories. If a softscape category is specified, it can be used in the instance or style name formula. |
|
Softscape Name |
Enter a landscape area name, which can be used as part of the instance name formula; Vectorworks-provided landscape area styles use this name as the root of the style name |
|
ID |
Optionally, enter an ID for the landscape area. If an ID is specified, it can be used in the instance or style name formula. |
|
Instance Name |
Select whether to manually enter a name for this instance or to use a name formula. For Manual, enter a name For Instance name formula, select a name formula from the list of name formulas present in the drawing. Select Manage Custom Name Formulas to add, edit, or delete a name formula from the list; see below. |
|
Area Units |
Select the units for calculating the landscape area, or select to use document units (see Units) |
Adding or editing an instance name formula
To create or edit a name formula for a landscape area instance:
On the General pane of the Landscape Area Preferences or Landscape Area Settings dialog box, select Instance name formula for the Instance Name.
In the list of name formulas, select Manage Custom Name Formulas to open the Manage Custom Instance Name Formulas dialog box.
Click Add, or select a name formula from the list and click Edit.
To delete a name formula from the list, select it and click Delete.
The Add/Edit Custom Instance Name Formula dialog box opens.
Click to show/hide the parameters.Click to show/hide the parameters.
|
Parameter |
Description |
|
Name |
Enter the formula's display name, for use in the list of name formulas |
|
Name Definition |
Displays the name formula, which can consist of selected name components and manually entered characters |
|
Name Component |
To add a name component to the name formula, select it from the list, and then click Add. The component is added to the end of the Name Definition. |
|
Integer/Lower-case character/Upper case character |
If Incrementing Value is selected for the Name Component, before clicking Add, select whether the value should be numeric, or a lower-case or upper-case letter. Enter the Start Value and Increment. For incrementing values to function, the Instance Name parameter must be set by style. |
Landscape area settings: Specification pane
Click to show/hide the parameters.Click to show/hide the parameters.
|
Parameter |
Description |
|
Description |
Optionally, enter a description of the landscape area. The description can be long, such as a seed formula, or short. If short, this description can be used for the suffix in a landscape area style name formula. |
|
Permeability |
Includes permeability settings for the landscape area |
|
Permeable/Non-permeable |
Select whether the landscape area is permeable or non-permeable, based on all the components calculated together. If it is permeable, enter the Permeability Rate, and select the units. |
|
Runoff Coefficient |
If the runoff coefficient is based on the landscape area's components figured collectively, instead of individual components, enter the coefficient |
|
Sustainability |
Includes sustainability data for the landscape area
|
|
Metric Framework |
The current metric framework, habitat type, and the habitat type's metric value display. To change these values, click Select Metric Framework; the available habitat type options change depending on the selected Metric Framework. |
|
Solar Reflectance Index (SRI) |
Enter the solar reflectance index value |
|
Unit Price |
Specifies a general unit price (for indicating the price per square unit in worksheets) |
|
Price Code |
Enter the price code (such as a SKU number) |
|
Edit Components |
Opens the Landscape Components dialog box for determining the structure that makes up the landscape area, as described in Creating landscape area components. The calculated Bed Thickness based on the components displays. |
|
Cut into site model |
Allows the landscape area to cut into the site model to accommodate its components; if deselected, the landscape area is placed identically, but no excavation is done to the site model
|
Landscape area settings: Plant Information pane
Click to show/hide the parameters.Click to show/hide the parameters.
|
Parameter |
Description |
|
Calculate plant quantities based on |
Specifies the species makeup of the landscape area, as well as how to calculate the plant quantities for tag display and planting plan worksheets; select a Distribution rate or by Percentage |
|
Distribution rate (Custom rate/Fixed percentage) |
Calculates plant quantity based on plant distribution rate. As each plant is added to the list of plants in the landscape area, its rate per area or from the center is specified; the percentage of each plant in the landscape area is calculated automatically. Coverage is always set to 100%. |
|
Distribution rate (Custom rate/Custom percentage) |
Calculates plant quantity based on plant distribution rate as well as percentage. As each plant is added to the list of plants in the landscape area, its rate per area or from the center is specified, as well as the percentage of each plant in the landscape area. This option allows plants to be merged within the landscape area. This allows for a specification of more than 100%. |
|
Percentage (Fixed rate/Custom percentage) |
Calculates plant quantity based on plant percentage of the total. As each plant is added to the list of plants in the landscape area, its percentage is specified. The plant distribution rate must be the same for all plants in the landscape area; specify the rate and units to use. |
|
Rate (Percentage) |
For plant quantities based on percentage, enter the fixed distribution rate of the plants and select the calculation method for the rate. The percentage of each plant species is set when specifying the plants. |
|
Landscape Area |
Displays the surface area of the landscape based on the surface area of the connected site model, if one exists, or based on the projected area of the landscape area polyline multiplied by the Area Increase Factor, if no site model is connected or present. The units for the display are specified by the Area Units from the General pane. |
|
Area Increase Factor |
If there is no site model connected to the landscape area, specify the area increase factor to determine the Landscape Area value; this allows for correct quantities on steep slopes. If the value does not equal 1, the landscape area's Original Area (the area of the polyline) displays for comparison. |
|
Plant list |
Lists the plants in the landscape area, including each plant’s distribution rate and percentage of the plant total, and both the minimum number allowed and (in the Settings dialog box only) total number of the plants in the landscape area. The minimum number overrides the percentages, to ensure at least a certain number of a particular plant is used in each bed. The plant order can be changed by click-dragging an item in the # column to a new position; this affects the 2D plant stacking order (plants at the top of the list are drawn over the plants lower in the list) as well as the plant list order in the plant tag. |
|
Add Plant |
Opens the Edit Plant Information dialog box, to add a plant to the list of plants in the landscape area and specify its distribution rate or percentage; see below |
|
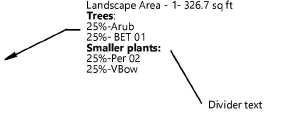
Opens the Edit Divider dialog box, to include divider text in the landscape area tag. If desired, the divider text can have different formatting from the rest of the tag text. Data tags can also display divider text.
Click-drag in the plant list # column to create the proper order of divider text within the plant list. The Plant/Tag ID of a divider consists of dashed lines, so that it is easy to find in the list. |
|
|
Edit |
Opens the Edit Plant Information dialog box, to edit the selected plant or plants; see below |
|
Delete |
Deletes the selected plant or plants from the list of plants in the landscape area |
|
Total % |
For a Distribution rate with a fixed percentage or a Percentage calculation, displays the total percentage of plant distribution. The total must equal 100. |
The Plant Information pane specifies the plants to include in the landscape area and their distribution. Click Add Plant, or select a plant from the list and click Edit, to open the Edit Plant Information dialog box. Alternatively, double-click an existing row of plants to edit it.
Click to show/hide the parameters.Click to show/hide the parameters.
|
Parameter |
Description |
|
Plant selector |
Opens the Resource Selector to select a plant style for placement; double-click a resource to activate it |
|
Latin Name/Common Name/Plant/Tag ID |
Displays the selected plant’s style information |
|
Rate |
If Distribution Rate is selected in the Landscape Area Preferences dialog box, indicate the plant distribution value and units. This distribution value is used to calculate the plant quantity for each plant type in the landscape area. |
|
Percentage |
If Percentage is selected in the Landscape Area Preferences dialog box, indicate the percentage of this plant in the landscape area. Using a fixed distribution rate for all plants, the percentage is used to calculate the plant quantity for each plant type in the landscape area. The total value of all plants must add up to 100%. |
Landscape area settings: Graphics pane
Click to show/hide the parameters.Click to show/hide the parameters.
|
Parameter |
Description |
|
Bed Area |
|
|
Show Bed Area in 2D |
Select how to display the bed area border in Top/Plan view. Standard: Sets the border to a single line. None: Displays no border; use it for a loose planting, such as in a gravel bed, where no exact bed is required, but plant quantities are calculated for the area. |
|
Show Bed Area in 3D |
Select how to display the bed area in 3D views. None: Doesn't display the bed area. Components: When components have been specified on the Landscape Area Components dialog box, displays the components in 3D section views. Display as 3D Polygon: Creates a 3D polygon at a default elevation of 0, which displays the texture of the landscape area's top component. The texture can’t be edited on the Render tab in the Object Info palette; use the Attributes pane for existing objects. If the landscape area is placed over a site model, the 3D polygon has no fill, and plants are placed on the site model surface. Display as Texture Bed on: Creates a texture bed for the 3D representation of the landscape area; select whether to display the texture bed on the Existing site model or the Proposed site model. The texture is only visible when placed over a site model with Cut into site model enabled. The texture can’t be edited on the render tab in the Object Info palette; use the Attributes pane for existing objects. |
|
Plants |
|
|
Show Plants in 2D |
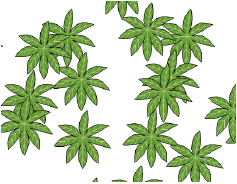
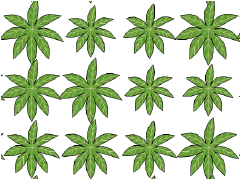
Select how to display the plants in Top/Plan view; this setting is independent of the bed area border display, and can have different attributes: None: Doesn't display plants; the bed is represented solely by the attributes of the bed area. Plant Cloud: Draws a convex or concave cloud shape around the border, in addition to the line around the bed area, if any. Specify the cloud billow type and the billow parameters. In addition to selecting the billow size and height, the billow variability sets the variation between the smallest and largest billows. Plant Line: Creates a freehand plant line around the border, in addition to the line around the bed area, if any; for a rougher plant line, specify a short segment length with high segment thickness. Plant Symbols: Displays individual plant symbols. |
|
Show Plants in 3D |
Select how to display the plants in 3D views in 3D views; plants conform to the surface of the site model if one exists. None: Doesn't display plants. Plant Block: Displays a solid extrude of the area; enter the height of the extrude. This setting is useful for IFC export and conceptual designs. Individual Plants: When the landscape area contains plant symbols with a 3D component (such as an image prop or 3D model like those provided by Laubwerk), these can be displayed for a realistic 3D view. Plant density is determined by the distribution or percentage specified for the landscape area. 3D loci are placed when the plant styles do not have a 3D representation. |
|
Visual Variation |
If Show Plants in 2D is set to Plant Symbols and/or if Show Plants in 3D is set to Individual Plants, additional options allow you to vary the appearance for a more natural growth pattern. |
|
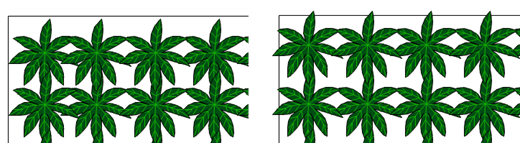
Show all plant edges inside bed area |
Displays plants completely within the bed area; if deselected, some parts of the plants may overlap outside the bed area. This is a graphic setting and does not affect calculated plant quantities.
|
|
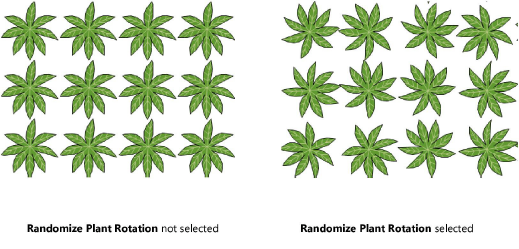
Randomize plant rotation |
Rotates individual plants randomly for a more natural appearance
|
|
Randomize plant position |
Places plants in random locations rather than in a grid-like array
|
|
Plant Diameter Variation |
Specify whether to vary the plant diameters randomly, and by what percentage
|
|
Plant Diameter Visual Scale |
Visually scales the plant diameter by the factor entered, making plants look wider on the drawing without changing the actual plant diameter value |
|
Plant Height Variation |
Specify whether to vary the plant heights randomly, and by what percentage |
|
Plant Height Visual Scale |
Visually scales the plant height by the factor entered, making plants look taller on the drawing without changing the actual plant height value |
Landscape area settings: Attributes pane
Click to show/hide the parameters.Click to show/hide the parameters.
|
Parameter |
Description |
|
Attributes list |
Lists all geometry that has graphic attributes settings. The class and graphic attributes of each part of the object are displayed. Components display for reference, but their attributes must be set in the Landscape Component Settings dialog box; see Creating landscape area components. Select a line in the list browser and click Edit, or double-click a line, to set attributes for the part, and do any of the following: To control appearance and visibility, select a class from the list of classes present in the drawing, or create a new class. Select <Landscape Area Class> to place the part in the same class as the landscape area object. Set the attributes; see The Attributes palette. You can also use the Attributes palette for existing unstyled landscape areas or for applicable "by instance" parameters. The plant line, plant cloud, plant block, and the first component are synced with the Bed Area and the Attributes palette, until a row is edited here, from the Attributes pane in the Landscape Area Settings dialog box. Edits made here "break" the syncing. To specify a texture for a 3D part, select a texture from the Resource Selector, or click one of the buttons to use no texture, to use the class texture. Set the map type and rotation as needed; see Concept: Texture projection and orientation. For textures on a 3D part, select Follow longest edge to orient the texture along the longest edge of the part. This can prevent the texture from being flipped in a wrong direction. Material fills can only be set for landscape area components. |
|
Make All Attributes by Class |
Sets all fill, pen, line, and texture attributes by class; this option is not available from the preferences when the active class is set to Use at creation |
|
Remove All by Class Settings |
Removes all by class settings for fill, pen, line, and texture attributes; this option is not available from the preferences when the active class is set to Use at creation |
|
Texture Settings |
Edits the textures of existing objects and styles; the settings cannot be edited from the Landscape Area preferences |
Landscape area settings: Tag (Legacy) pane
Use of the Data Tag tool is recommended for labeling landscape areas; see Adding data tags and labels. However, these tag settings are available, if desired.
Click to show/hide the parameters Click to show/hide the parameters
|
Parameter |
Description |
|
Tag Display |
Displays a tag to the right or left of the leader line |
|
Tag Class |
To control appearance and visibility of the landscape area tag, select a class from the list of classes present in the drawing, or create a new class. Select <Landscape Area Class> to place the tag in the same class as the landscape area object. |
|
Tag Line Angle |
Specifies the angle of the leader line. Range: 0–360°. |
|
Tag Text Angle |
Sets the text angle. Range: 0–360°. To display the tag to the left, specify an angle greater than 90° and less than 270°. To display the tag to the right, specify an angle less than 90° or greater than 270°. |
|
Tag Header |
Select the information to display in the first line of the tag; select Set Custom Tag to define a custom tag (see Creating a custom landscape area tag) |
|
Tag Body |
Select the information to display in the main portion of the landscape tag; select Set Custom Tag to define a custom landscape area tag (see Creating a custom landscape area tag) |
|
Display tag line marker |
Displays a marker at the end of the leader line; specify the marker to use by editing the tag class properties (see Setting class properties) |
Object Info palette
Landscape area objects can be edited from the Object Info palette or by clicking Landscape Area Settings from the Object Info palette. Alternatively, right-click the object and select Edit from the context menu (or double-click) and then click Settings. The fields in the Object Info palette are named similarly (but not always identically) to those in the Landscape Area Preferences dialog box, and roughly reflect the order in which settings are entered in the dialog box, for ease of editing. For landscape areas using object styles, the parameters that are set by style display for informational purposes but cannot be edited.
Parameters that are available in a dialog box are described in the tables above. Only the parameters that are different are described here.
Click to show/hide the parameters.Click to show/hide the parameters.
|
Parameter |
Description |
|
Replace, remove, or edit the current style, or create a new plug-in object style for this object; see Changing plug-in object styles from the Object Info palette. Editing a style changes all instances in the file that use the style. |
|
|
Hide style parameters |
Hides the parameters that are set by style; these cannot be edited from the dialog box or Object Info palette |
|
Count |
Displays the number of plants in the landscape |
|
Update Site Model |
Updates the site model. If the file has several site models, only the site model the landscape area is placed on will be updated. |
|
Reset Landscape Area |
Resets the landscape area to follow any changes to site model the landscape area is placed on |
|
Site Model Layer |
To change the connected site model (see Connecting a landscape area with a site model), select the site model's design layer. The landscape area automatically drapes over the site model. The site model must be updated for the landscape area to cut into it. |
|
Simplification Tolerance |
When the landscape area is a site model modifier, enter a positive value to reduce the number of vertices of the object. This may improve the performance when placed over a site model, as the required calculations are reduced. A longer distance simplifies the modifier polygon, reducing the number of source points that modify the site model. A shorter distance increases the number of source points that modify the site model. A value of 0 (zero) does not simplify the modifier. |
|
Area Vertex Count |
Displays the number of vertices created by the landscape site modifier to modify the site model |
|
Vertex parameters |
Edits the vertices of the path object that the landscape is based upon; see Editing vertex-based objects |
|
Render tab |
|
|
Texture |
If the landscape is set to display in 3D as a texture bed, the Texture drop-down list is enabled for the main area texture; the texture set for the top component, when components exist and are set to display, supersedes this texture selection. The texture can be edited with the Attribute Mapping tool; see Direct texture mapping. |
