 Modifying spaces with non-horizontal ceilings and floors
When created, spaces in Vectorworks are assumed to have horizontal top and bottom edges. However, often spaces must have non-parallel or stepped top and bottom faces. Additionally, many localities have different rules about how much a space's reported floor area must be reduced in areas with low ceilings. For standard space areas, these settings are found on the Additional Area Settings dialog box; see Standard Net Area Settings dialog box. Use the Deduction Factors pane on the Detailed Space Area Settings dialog box to to control these calculations; see Detailed space area settings: Deduction Factors pane.
For 3D spaces, use the commands Fit Top of Space to Objects and Fit Bottom of Space to Objects to fit spaces to defined geometry and calculate volume and area accurately.
For 2D spaces, use the command Add Area Modifier to Space to manually add modifiers and specify how much to reduce the calculated area.
Fitting 3D spaces to defined geometry
|
Command |
Workspace: Path |
|
Fit Top of Space to Objects Fit Bottom of Space to Objects |
Design Suite, Architect: AEC > Space Planning Landmark: Landmark > Space Planning Spotlight: Add command to workspace (see Customizing workspaces) Context menu |
These commands automatically extend existing spaces upward or downward to fit to defining geometry such as the site model, roofs, floors, or NURBS surfaces and other 3D solid objects such as 3D polygons and meshes, or to a fixed height value. This displays the space object appropriately in 3D, and also calculates the correct volume and area information.
To fit spaces to defined geometry:
Select the space object to be fitted. To clip the space with specific 3D objects that intersect the space, also select those objects.
Select the command. The Fit Top of Space to Objects or Fit Bottom of Space to Objects dialog box opens.
Click to show/hide the parameters.Click to show/hide the parameters.
|
Parameter |
Description |
|
Space Volume 1/2 |
Select whether to fit the net (space volume 1) and/or gross (space volume 2) space to the object |
|
Top/Bottom Bound defined by |
Select an option to define the top or bottom boundary of the space: Fixed height only: Sets a maximum height for the space boundary according to the Top/Bottom Bound and Top/Bottom Offset settings Constraining Objects only: Clips the space boundary with 3D objects that intersect with the space Fixed height plus constraining Objects: Sets a maximum height for the space boundary and also clips the space with 3D objects that intersect with the space |
|
Top/Bottom Bound |
If a "fixed height" boundary option is selected, select the top or bottom boundary object for the space |
|
Top/Bottom Offset |
If a "fixed height" boundary option is selected, enter a distance to offset the space from the boundary object |
Modifying the area of 2D spaces
|
Command |
Path |
|
Add Area Modifier to Space |
Context menu |
For 2D spaces with low ceilings, manually add one or more enclosed 2D primitive objects (for example, a rectangle or polyline) as modifiers to specify how much to reduce the calculated area.
To modify the area of a 2D space:
Place one or more 2D objects to use as a modifier on the space object. Only the part of the modifier that overlaps the space object is subtracted from the space area. If modifiers overlap each other, both modifiers are fully subtracted from the space area.
Select both the space object and the modifier.
Select the command.
The Add Area Modifier to Space dialog box opens.
From the Subtract from Space list, select the percentage of the modifier's area to subtract from the space's area, or select Subtraction Custom and enter a custom Subtract value. Select whether to apply the modifier to the entire space or to only selected areas of the space; select the areas.
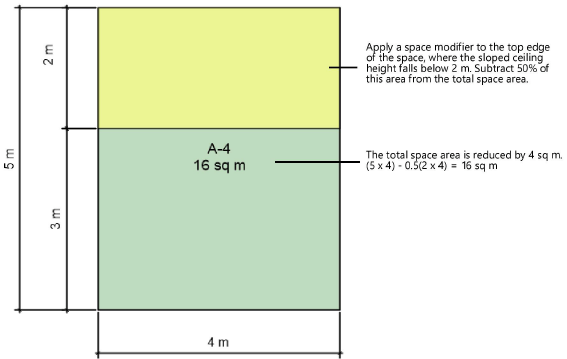
See Changing space modifiers for details about editing the modifier.