 Inserting a
Straight Truss
 Inserting a
Straight Truss
Inserting a
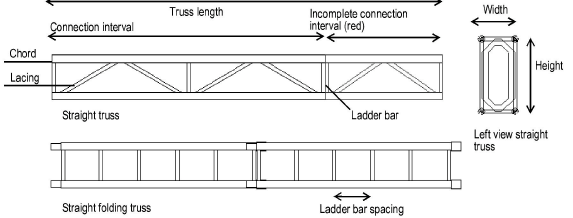
Straight TrussStraight truss parameters are illustrated by the following diagram.


To add a straight truss to the light plot:
1. Click the Straight Truss tool from the appropriate tool set.
● Spotlight workspace: Spotlight tool set
● Designer workspace: Detailing tool set
2. Click in the drawing area where the truss will be located and draw a line to indicate the length of the truss. If this is the first time a straight truss has been placed on the drawing, the Properties dialog box opens. Specify the preferences to use for this tool during this session, and then click OK.
The straight truss properties can be edited later in the Object Info palette.

Trusses are 2D/3D hybrid objects. Complex trusses can increase the time required to render the model in 3D.
Click to show/hide the parameters.
A connection interval shorter than the defined interval length is displayed in red when Highlight is selected.
To use the truss as a lighting position, convert it to a lighting position object; see Creating a Lighting Position Object.
~~~~~~~~~~~~~~~~~~~~~~~~~
