 Editing Hardscape Fills and Joint Patterns
Editing Hardscape Fills and Joint PatternsHardscape fills and joint patterns can be modified directly in the drawing.
The Attribute Mapping tool maps tile, associative hatch, gradient, and image fills, as well as hardscape joint patterns.

To interactively map a hardscape fill or joint pattern:
In Top/Plan view, select a hardscape object with a specified fill or joint pattern.
Click the Attribute Mapping tool from the Basic palette or Visualization tool set.
From the Selected Component list on the Tool bar, select which hardscape component to edit: the Object Fill, Main Joint Pattern, or Border Joint Pattern.
An editing object is placed over the selected component. The origin of the component fill or joint pattern is at the corner of the editing object where the red and green lines meet.
Use the editing object to move, scale, and rotate the selected fill or joint pattern. The fill or joint pattern can also be nudged. For more information on using the Attribute Mapping tool, see Mapping Fills with the Attribute Mapping Tool.
Alternatively, you can move a joint pattern by moving the control point at the joint pattern origin, as described in the next section.
If Spaced Joints is specified for the border joint pattern, the Attribute Mapping tool can be used to move and scale the pattern; spaced joints cannot be rotated.
While the Attribute Mapping tool is the recommended method of editing joint patterns, the joint pattern origin can also be moved with the Selection tool. The joint pattern origin has a control point marked with a locus for identification: a red locus for the main joint pattern, and a green locus for the border joint pattern.
If Spaced Joints is specified for the border joint pattern, no locus or control point display.

To move the origin of a hardscape joint pattern:
In Top/Plan view, click the Selection tool from the Basic palette.
Select the control point at the joint pattern origin and drag it to the desired location.
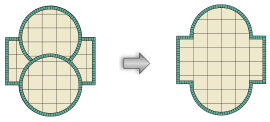
Individual hardscape objects can be joined to create more complex hardscapes whose fills and joint patterns align.
When joining boundary hardscapes with similar fill types, use the Add Surface command; see Add Surface.
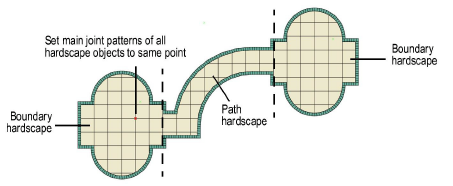
To coordinate the joint patterns of several hardscape objects, configure the hardscape objects with the same settings and drag the origin points of their main joint patterns (marked with red loci) to a common location.
~~~~~~~~~~~~~~~~~~~~~~~~~