Placing Outlets
Placing OutletsThe Outlet tool places an irrigation outlet with parameters from a selected manufacturer, or as a custom outlet with parameters that can be specified after placement.
There are several outlet types available for placement.
● Rotors are large outlets which throw water over long distances as a single stream that rotates around the outlet.
● Spray outlets spray water continuously over the set coverage area. They consist of two components: the body and the nozzle, in various configurations.
● Emitters (drip nozzles) are inserted into drip tubing, and slowly leak water into the soil.
Because emitters do not have a throw radius, when placing them in any multiple-placement mode, the radius parameter and the radius preview indicate the spacing between emitters.
An outlet added to a pipe splits the existing pipe in two.
The following modes are available:

Mode |
Description |
Insert |
Inserts an outlet according to the selected placement mode |
Pickup |
Sets the default outlet settings to match those of a selected existing outlet; see Transferring Outlet Attributes |
Mass Creation |
Places outlets on or within a valid object (pipe or polyline); see Transferring Outlet Attributes |
Outlet |
Opens the Resource Selector to select an outlet resource for placement; double-click a resource to activate it. Select from one of the manufacturer libraries, or select an outlet closest to the type you need from Custom.vwx and set its properties after placement. |
Single Outlet Placement |
Places a single outlet as configured
|
Poly-Vertex Placement |
Places a configured outlet at each clicked polyline vertex
|
Poly-Edge Placement |
Places outlets along the drawn polyline with the Tool Linear/Array Settings specified in the tool preferences
|
Rectangular Array |
Fills the drawn polyline with outlets in a rectangular array with the Tool Linear/Array Settings specified in the tool preferences
|
Triangular Array |
Fills the drawn polyline with outlets in a triangular array with the Tool Linear/Array Settings specified in the tool preferences
|
R (radius) |
Defines the default throw radius of the spray for rotors and spray outlets, or the spacing between emitters. If the outlet came from a manufacturer’s catalog, select one of the available throw Radius values, or select Manual or Manual Arc to specify the radius at placement. For certain outlets, select Manual Strip to place a strip outlet. For outlets only, browse through the radius values in the Tool bar list by pressing the P shortcut key, and browse backwards through the list by pressing Shift +P. For a custom outlet, the throw radius is determined at placement; select Manual Arc to place a circular outlet with the arc manually specified, or Manual Strip to place a strip outlet. |
Arc |
Defines the spray pattern coverage in radial degrees; does not apply to emitters. If the outlet came from a manufacturer’s catalog, select one of the available Arc spray pattern values, or select Manual to specify the spray pattern arc at placement. For a custom outlet, the spray pattern arc is determined at placement; if Manual Arc was selected for the Radius, Manual is preselected here and no other selection is necessary. For Manual Strip outlets, select the location of the outlet along the strip. |
Preferences |
Sets the default preferences for the outlet placement and appearance |

To place outlets on the drawing:
Click the Outlet tool from the Irrigation tool set and click Insert mode from the Tool bar. Click Outlet on the Tool bar. From the Resource Selector, double-click a resource to activate it. Select from one of the manufacturer libraries, or select an outlet closest to the type you need from Custom.vwx and set its properties after placement.
Alternatively, create a polyline and then select the Create Objects from Shapes command to create a drip outlet (see Creating Objects from Shapes).
Click the outlet placement mode from the Tool bar.
Click Preferences from the Tool bar.
The Object Properties dialog box opens. Select the outlet preferences for placement and the default appearance settings. The Outlet tool uses these preferences until they are changed again, or until Pickup mode is selected, which changes the settings to those of a selected existing outlet.
► Click to show/hide the parameters.
Click OK.
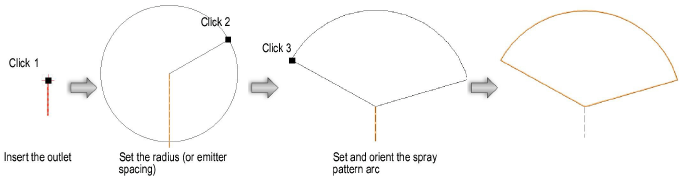
Click once to set the outlet location. If placing the outlet over an existing pipe, drip tubing, or irrigation pipe network, the connecting pipe is highlighted and the outlet is automatically connected to the network.
● For arc outlets, move the cursor and click to set the throw radius. If the outlet was selected from a catalog, the cursor snaps automatically to the predefined radius values specified by the catalog; refer to the Data bar for the radius values. If a custom outlet is being placed or a custom radius defined, move the cursor to specify the radius at placement and click. For emitters, the drawn radius indicates the emitter spacing.
● For strip outlets, click to set the start of the strip, and then move the cursor to set the width and height of the rectangular strip.
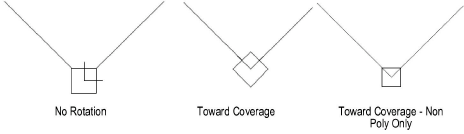
Click again to set the outlet spray pattern arc (if not set by the catalog value) and orientation, or for strip outlets, to finish drawing the strip.
A single outlet has been placed and oriented.
For multiple outlet placement, continue by drawing a line or a polyline, depending on the placement method selected. A dynamic preview of the outlets displays to help with placement. Double-click to place the outlets.
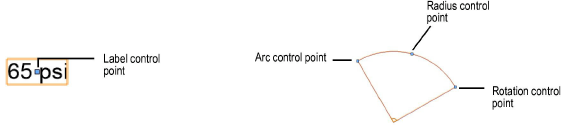
Adjust the position of any pressure and flow labels by dragging the control point. Adjust the radius, arc, and rotation of spray outlets with the coverage control points, when the spray coverage is visible. Catalog data requirements may constrain the allowable adjustments.
The outlet properties can be edited from the Object Info palette.
► Click to show/hide the parameters.
~~~~~~~~~~~~~~~~~~~~~~~~~