The Renderworks camera view settings can be fine tuned in real-time, and the display attributes specified.
To adjust the camera view:
1. Click Fine Tune Camera View from the Object Info palette of a selected camera object.
The Perspective View Controls dialog box opens. Either use the sliders or enter values to adjust the camera settings; changes are reflected automatically in the drawing. To interactively view changes as you move the sliders, render in wireframe or OpenGL render mode.
For Camera Height, Look To Height, and Camera Distance, the slider range is proportional to the displayed value. To expand the slider range, enter a larger value.
![]() Click
to show/hide the parameters.
Click
to show/hide the parameters.
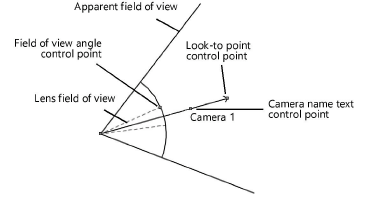
2. A camera object can be copied to insert additional camera views. In addition, the 2D camera display attributes can be set by fill and pen foreground and background colors in the Attributes palette. Control points adjust the field of view angle, the look-to point, and the camera name location.
Fill/pen color attribute |
Parameter |
Fill foreground |
Sets the field of view angle color when the camera height is higher than the look-to height |
Fill background |
Sets the text color for the camera name |
Pen foreground |
Sets the color of the view line connecting the camera to the look-to point, as well as the color of the 3D camera representation |
Pen background |
Sets the color of the angle of view lines |
The divergence between the apparent field of view angle and the lens field of view angle increases as the difference between the camera and look-to heights increases. When the camera and look-to heights are equal, the lens field of view angle line (dashed gray line by default) is not visible.
~~~~~~~~~~~~~~~~~~~~~~~~~