 Workflow: Planting design
Planting design accomplishes just the planting portion of landscape design, although other features, such as hardscapes, water features, and other site amenities may be integrated with planting design. Whether schematic or species-specific, planting design shows what, where, and how plants should be placed.
Depending on the stage of the design process, landscape professionals typically create a conceptual or schematic planting plan first, which serves as the foundation for the decisions made in producing planting plans within the design development and construction document phases. A concept/schematic plan focuses more on placement, form, and function, without getting into specific plant types. For example, a concept design may only show figurative individual plantings, plant groups, and massings, while a more developed planting plan may feature more defined and identified individual plant symbols by themselves, in clusters, and in mono- and multi-species massings. Finally, construction documents show plant layout details such as exact measurements for placement and spacing in areas where precise positioning is critical, as well as other specifics like plant types, quantities, and installation notes.
It’s important to note that design drawings used for presentations may feature illustrative and graphically-rich symbols, while construction documents provide much more graphically basic, yet well detailed and dimensioned, drawings used for installation. Vectorworks offers a suite of complementary tools and commands to allow one file to serve many purposes.
File setup
Proper file setup can make it easier to represent the relationships among various parts of the design, including the increasingly detailed design phases, existing and proposed plants/features, and even the layered heights of the plants in the plan. Using a strategic combination of classes and layers and assigning plants carefully can provide tremendous control over your drawings.
Create a template file, from which you can start new design files or import standard elements into other files. The template can contain the design layers, classes, title block borders, and any custom resources you use on a regular basis.
Set up the design layers and their stacking order to control the display; the design layers should all use the same scale.
Consider your own workflow and deliverables when determining the layer and class structure that will be most useful to you. For example, different layers for upper story, under story, and surface plants provide visibility control and a graphic hierarchy that echoes that of the plants themselves. For a different workflow, you may prefer to set up a different design layer for each planting bed, for ease of reporting to the contractor who will do the planting.
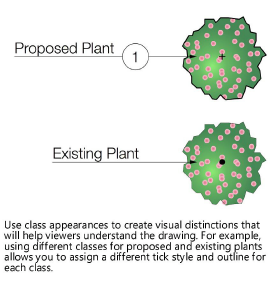
Establish a class organization that will make it easy to control the appearance and visibilities of the planting design throughout its life cycle.
For example, you may choose to establish different classes to create distinct appearances for existing and proposed plants, or for different tag styles to call attention to alternative options, phases, or different scale drawings.
A different workflow may find it more useful to assign different plant types to their own classes to control quantities of different kinds of plants (such as perennials or evergreens), control visibilities, or make it easier to select objects to edit.
Another way to use classes to control the appearance of plants throughout the design process may include using the default classes that focus on plant components such as Bloom, Canopy, Color Fill, Interior Linework, and Outline.

Project sharing
For large projects, select the Project Sharing command to create a shared project file. Users can check out specific layers or objects, edit them in temporary working files, and update the project file with any changes.
Establish plant libraries
Over time, you can amass your own custom plant libraries that are rich in variety and can be efficiently and effectively used for many projects.
You may choose to use the plant catalog or the Vectorworks plant database to begin assembling your library, as both sources contain useful plant data; however, for the most effective use of your resources, you should create custom libraries.
In addition to species-specific plant styles used for final planting plans, you may want to establish a “concept” library, with plant styles that fit into general categories like trees, large shrubs, and so on.
Use 2D and 3D graphics for plant styles to help clients visualize the site’s final appearance. Rather than specific, detailed graphics, focus on creating the general impression of the site. Consider minimizing flowers in graphics, as plants generally do not all bloom at the same time.
Adding species-specific maintenance notes makes it easy to provide a maintenance schedule of the final planting plan.
Survey the site
Import site model source data for the terrain and create a site model.
Document existing trees on the site, by importing existing tree information from a survey file, creating existing trees from loci, or insert them manually using the Existing Tree tool.
At this stage, you may choose to place existing trees on two different design layers, or to assign different graphic qualities, to indicate which existing trees may be removed or transplanted, and which are expected to remain on the proposed plan.
Optionally, use structural grid references lines to define and help maintain proportional relationships among the different elements of the site.
Use planar shapes to indicate areas such as hardscapes, roads, and buildings on the site; these shapes can be converted to other objects later in the design process if needed.
Design the concept
Landscape professionals typically begin a project by creating a conceptual planting plan, which focuses more on general placement, form, and function than on specific plant types and the precise location of individual plants. For example, a concept may only show figurative individual plantings, plant groups, and massings, although it may still be graphically rich enough to give an impression of how the site will look after completion.
For conceptual plans, when the design is very fluid, you may want to draw the whole concept, or at least the proposed plan, on a single design layer and in the same class to make it easy to move objects and maintain a flexible workflow.
As the design becomes more settled, assign objects to the appropriate layer and class to keep order in the drawing and assist with visualization, reporting, and so on.
Use basic planar shapes to define which parts of the site should have which kinds of plants, such as a low-lying wetland area, a grassy field, a copse of trees, planting beds, and so on, without assigning specific plant species.
Create texture beds or use the Landscape Area tool to represent large areas that do not require details, such as lawns and mulch areas.
The Resource Selector, used when inserting a landscape area, provides quick access to basic object styles such as mulch, turf, and even general gardening mixes.
When you are ready to create planting areas that are more specific than the general planar shapes used at the beginning of the project, you can use the Landmark tools to begin to refine the plan. The Hedegrow tool creates a hedgerow composed of mixed plants. The Landscape Area tool creates large planting areas with a general combination of plants, when precise placement of each individual plant doesn’t need to be specified. The Plant Line and Vegetation Line commands allow you to quickly draw undefined plant masses. You can also use the Plant tool’s modes to create plant rows and massing groups of different kinds.
If you have a “concept” plant library, use those plant styles to keep the plan conceptual at this phase. You can replace the conceptual plant styles with specific plant species later.
Depending how many landscape areas you need to create with the same settings, you can either use the Bucket mode of the Landscape Area tool or the Create Objects from Shapes command.
Use the Plant tool to place representative plants as placeholders for big structural plants until specific plant decisions are made.
Use the Heliodon tool to indicate the direction of the sunlight throughout the day/year and to create solar animations to show how the time of the day/year affects the shade areas in the project.
Create detailed drawings
Once the concept is finalized, you can create a more detailed plan with specific plant species and placement information.
Develop a planting palette for the project, with the plant species you expect to use. Import the needed plant styles into the current file using the Resource Manager. Replace the conceptual plant styles with the species-specific styles as needed.
Use the Plant tool to insert additional plants, using the appropriate species-specific plant styles.
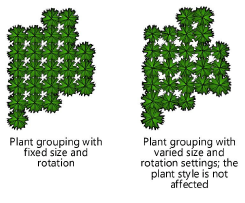
Edit individual plant instances as needed. For natural variation in the appearance of both 2D and 3D views, use the Annotations area of the plant preferences, or the Annotation section of the Object Info palette to vary the visual size and rotation of individual plants within a group.
To create plant tags with the details needed, use either the Data Tag tool (recommended) or the Tag area of the plant preferences. By using the Data Tag tool, you can place the annotations in viewports on sheet layers, rather than in the design layer.
Dimension the drawing for precise placement of planting elements.
Present the plan
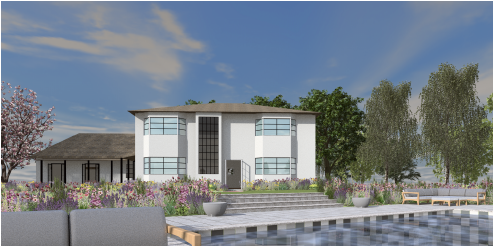
You likely will need to generate attractive graphics to present to a client or potential project donors at any time during the design process.
To create a 3D rendering of the model:
Use the Landscape Area tool with a mix of plant styles that provide the desired appearance to create the effect of full planting beds.
To present impressive-looking trees, use good-quality 3D image props for the plant style 3D graphics, or consider using the RenderMall Plant tool for the presentation graphics.
Use the Foliage tool to create any needed plant features such as greenery trained over a shaped form. Foliage features are appropriate for presentation, but do not appear in plant schedules.
Add backgrounds to the model for context and apply textures to other 3D objects for a realistic or stylized appearance.
Use the Renderworks Camera tool to place cameras at desired locations and set the look-to points. Double-click a camera to activate its view. This allows you to quickly detect any sight-line issues. Click Fine Tune Camera View to adjust the camera's height, pan, focal length, and so on.
When testing camera angles and establishing the views to present, use Shaded rendering mode, which responds to changes much more quickly than a Renderworks mode.
Use a Renderworks mode to render the viewports to control the speed and quality of the final rendering.
Create saved views for easy display right from the Vectorworks file, or to return to the same view after editing the file.
Create viewports from camera views, saved views, or other methods.
Create animations or 3D model views to give the audience the sensation of walking through the space.
Use Vectorworks Cloud Services to process, and share files (some functions available only as a benefit of Vectorworks Service Select).
Documentation
Use preformatted reports to create a worksheet based on the data associated with the plants. Customize the reports to meet a variety of needs, and then save the established reports as resources to be used later. You can customize standard reports to use for all your projects.
Because of all the data that can be associated with plant styles and plant objects, many kinds of reports can be created, including plant schedules with different pricing information for different audiences, detailed schedules broken down per planting bed/area for contractors, and maintenance guides for owners.
Batch publish selected sheet layers with title block borders.