Concept: Best rendering practices
Rendering gives a solid appearance to 3D objects. Solid objects can cast shadows and occlude (hide) objects that are behind them. Rendering is often a memory-intensive and time-consuming process. A progress bar at the bottom of the drawing window shows the time required to process a rendering in Renderworks, Redshift by Maxon, Hidden Line, and Polygon render modes, allowing you to compare render times for different render settings and hardware.
The process for creating a rendering that communicates your design includes working on both the design layer and in sheet layer viewports. The rendering process can be simple or complicated depending on your preferred aesthetic and target audience.
Rendering involves balancing lighting, textures, and render mode/Renderworks style settings. For example, lighting can be used to confirm basic massing and object placement at the beginning of a project. Since textures can change the way lighting interacts with the objects in a rendering, don't wait to add them until the final step. Although we recommend developing the model and rendering in the order outlined in the sections below, creating a rendering is often a matter of repeated checking and adjusting. Modify your model and change rendering options as described below to increase rendering performance and speed.
See the rendering courses on Vectorworks University for related videos: university.vectorworks.net/course/#coursestab
Vectorworks also offers live synchronization links with some real-time rendering and content programs, as described in Real-time rendering synchronization.
Model on design layers
Create a 3D model
Because rendering gives a solid appearance to 3D objects, to create a rendering, you must have a 3D model, not just a 2D plan or collection of planar objects. Vectorworks offers many plug-in objects and symbols that incorporate both 2D and 3D components, so they work equally well in both Top/Plan view and 3D views. Many of these objects, such as building objects, plants, entertainment design objects, and furniture, require a Design Suite product. You can also create custom 3D objects.
Use the highest-level geometry possible to model your objects. It is much better to model an object as an extrude, sweep, Boolean solid, or a NURBS surface than as a mesh or a set of 3D polygons. For extrude and sweep profiles, use polylines, and do not use a sweep segment angle smaller than five degrees. Examine imported geometry for excessive vertices and polygons. The slowest way to model for rendering is to create a detailed object as a set of small, individual 3D polygons.
Eliminate 3D details that are not significant to the rendered image or the indirect lighting. For example, if you model a staircase’s individual bolts and threaded screws, each of these will be contributing unnecessarily to the rendering time. Use classes to hide geometry that doesn't need to be visible in the rendered view.

Strategically use rendering modes/styles
Vectorworks offers several rendering modes, which can create different visual effects, from hidden line to photorealistic to sketch effects. These rendering modes can be used to get a sense of how objects, textures, shadows, and other details will render in a design. The use of Renderworks styles, rather than rendering modes, collects the selected rendering mode and its options, the lighting options, Renderworks camera effects, and the Renderworks background into a single resource that can be quickly used when needed. The selection of render mode or Renderworks style can produce vastly different effects, and, in complex drawings, can require various amounts of time and computer resources. It's important to select the appropriate rendering mode or style for your current activity and project phase.
Use Shaded or Wireframe rendering mode when actively designing on a design layer in a 3D view; these are considered the primary utility modes for efficient and effective work. Shaded is the solid mode designed to be responsive and quickly provide a general impression of textures, colors, shadows, and shapes. Wireframe uses lines to represent object edges and can optionally show fills for planar objects in 3D views.
For rendering modes that provide options, adjust the options throughout the design process, to display different details only when they are needed, and speed up the rendering. For example, for Shaded options, you may choose not to show textures or colors while working on massing. Setting the Quality options to Medium can provide a good balance between detail levels and speed, especially for curves. Temporarily turn Anti-aliasing off if your model looks fine without it. Don't turn on shadows until light objects capable of casting shadows are added to the drawing.
Because Shaded, Renderworks, and Redshift render modes (Renderworks styles only) do not all display the same lighting and texture features, models that use different effects will display differently in each render mode. Periodically create a test render in the render mode you plan to use for your final presentation renderings to check lighting and textures as you continue to design. Depending how much detail you need to show, use a Vectorworks-provided Renderworks style that provides a good balance of speed and quality, such as a Realistic or Redshift fast style.
When working interactively, enable Fullscreen preview for any Custom Renderworks options and Renderworks style you use. The preview reduces the time required for you to determine whether the current view, lighting, and/or render settings meet your needs. When this option is selected, you will see an immediate full-screen preview at a very low resolution that is slow to resolve to final resolution. You can either let the rendering continue or quickly decide to cancel it and change the settings.
Render modes and Renderworks styles can be applied to individual viewports from the viewport's Object Info palette; this can be a more efficient way of comparing modes and styles for presentation than rendering design layers.

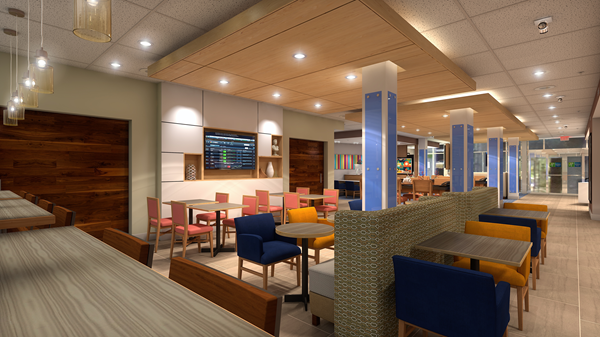
Shaded render mode provides many options to efficiently view design massing and placement while working in a drawing and to present concepts to clients
Light the model
Proper lighting is essential for a good rendering. There are many different ways to light a rendering, some more realistic than others, to meet a variety of needs. Many of the best renderings layer different lighting methods to great effect.
Ambient lighting is the default lighting for drawings. It is not connected to any light object that acts as a source for the light, but just makes the drawing visible.
Try turning on Ambient Occlusion (in the Lighting Options dialog box, and in Renderworks styles), to see if the perception of depth achieves the desired effect without using more complex lighting techniques.
Ambient lighting is useful for interactive design stages and for renderings meant to give a general impression of the space, but it does not cast shadows, and can obscure the contributions of individual light sources. Once you begin to use light objects to light a scene, you should consider turning ambient lighting down or even off.
A heliodon acts like the sun. Set the heliodon to a specific location, date, and time, and it casts sunlight appropriately for that setting. This is an easy way to set the lighting for a daytime exterior scene, but the sunlight can also shine through windows to illuminate interior views. Heliodons can be connected to physical sky Renderworks backgrounds.
The Light tool provides four different kinds of lights that may be useful, individually or in combination, in renderings. These lights can be turned on or off individually, on a design layer or in a viewport, in the Visualization palette. Name each light in the Object Info palette to make lights easy to differentiate and locate in the Visualization palette.
For interior views using indirect lighting, experiment with the number of bounces needed in the Lighting Options dialog box to light the scene appropriately. For efficiency, use the fewest bounces needed and adjust the quality in the Renderworks style or Custom Renderworks settings.
Individual textures can have indirect lighting setting overrides; disable indirect lighting for some textures to reduce the rendering time required.
Convert an existing object to an area light or linear light to create a more diffused light source, such as fluorescent light, a window, or a skylight. These light types contribute significantly to rendering time, so use them sparingly when they are the only way to achieve the needed effect. Adjust the Quality of each area and linear light in the Object Info palette.
Use a Renderworks texture with a glow-type reflectivity shader to mimic neon and other kinds of light sources.
Some types of Renderworks backgrounds can provide environment light for a rendering, in addition to a visible background. Environment lighting can enhance realism by casting appropriate colored light against objects in the model, such as an orange light from a sunset sky. Backgrounds that provide lighting can sometimes be set to help create realistic reflections.
To show shadows, you must select the Shadows option for the rendering mode or Renderworks style in use, and include an appropriate light source, as not all light sources are capable of creating shadows. Shadows can add to rendering time, so if you find that a large file renders too slowly, you should turn off shadows when using light objects that do not cast obvious shadows and when interactively designing.
Individual textures can be set not to cast or receive shadows (see the Shadows options in the Edit Texture dialog box).
The Soft Shadows option creates more realistic renderings by decreasing hard edges, so it is a good option for light sources that create prominent shadows.
Adjust settings such as the brightness and colors for individual light objects.
Apply textures
Because textures can affect the way light bounces in a space, it is useful to apply textures fairly early in the rendering process, and edit both the textures and the lighting as needed while you refine the rendering.
Vectorworks includes many Renderworks textures representing common materials; these are available in the Resource Manager and/or in the Object Info palette for a selected object. You can also create your own Renderworks textures.
Vectorworks partners with third party vendors, such as Arroway, Mosa, and mtextur, to provide access to their texture libraries.
It is also possible to use real-time rendering synchronization with third-party programs that offer extensive content libraries.
Textures can be not only applied but also mapped to individual objects, and often to specific faces of objects.
For early phase renderings, when you want to convey the impression of the finishes without suggesting that the selections are final, consider displaying the surface hatches associated with textures, rather than the fully rendered textures. Surface hatches are also useful when rendering more traditional orthographic views, such as elevations or sections.
Because the interaction between lighting and textures is so complex, individual textures offer settings for indirect lighting and shadows on the Edit Texture dialog box; use these settings to fine tune the quality and performance of a rendering.
Reflective, blurry reflective, blurry transparent, and glow shaders add to rendering time. Use these effects sparingly for most render modes. For wide, shiny highlights, consider using a plastic or metallic reflectivity shader rather than a blurry reflection. Glowing objects need to be sampled more accurately and therefore, they take more time. Use the glow shader for a few, large objects; use the backlit shader for several small fixtures with simple light sources. Consider using a Renderworks style with a Redshift by Maxon type; Redshift typically handles glowing and blurry objects, soft edges, and reflections well. If your hardware supports it, Redshift uses the GPU for processing, so rendering time can be much shorter for complex files with many of these effects.
Glass adds to render times because it has reflective, refractive, and transparent shadow components.
Very clear glass can be set to not cast shadows in the Edit Texture dialog box to save render time. Indirect lighting can be disabled for glass textures in the Edit Texture dialog box, as well, to save time when calculating indirect lighting.
To model a glass object (glass reflectivity shader) with a 3D polygon or other sheet-like 3D object, duplicate and offset the 3D polygon by a small amount so that rays are traced through the glass with both an entering and exiting surface.
For thin panes, like windows, the refractive qualities of glass are not significant, so the index of refraction parameter for the glass can be set to a low value (just above 1).
Often, buildings use glass with a metallic/mirrored energy-efficient coating; in that case, a combination of mirror reflectivity and plain transparency can produce a glass effect that renders faster.
Glass absorption color can be used for very accurate close-ups of items like glassware, but this effect takes longer to render. Glass absorption is also an effective way to render bodies of water.
Blurry (frosted) glass, in particular, can be slow; use blurry glass in a strictly controlled way. Lower blur values render faster.
Test render the 3D model using a Renderworks mode or Renderworks style to see the textures and lighting properly.
Set the views
The term "rendering" often makes people think of 3D perspective views, but plans, elevations, and section views can also be rendered to help clients envision the design. Select the views needed to showcase your model.
For 3D views, use a Renderworks camera to establish views. This makes it easy to modify the view, to use the camera to establish a viewport's view, and to include Renderworks camera effects as part of a Renderworks style for the final rendering.
Set saved views for the views you want to use again, especially the views you will use as the basis for a viewport.
Refine renderings in viewports
Create renderings on sheet layer viewports, not on design layers. This allows you to control the image's size and resolution, and to set render modes/styles, backgrounds, foregrounds, lighting, detail levels, image effects, and so on individually for each viewport, without changing the design layers.
For large and complex files, you can often render in the background while you continue working.
Subsequent design layer changes are reflected in updated viewports and renderings.
Creating and modifying viewports
Much of the rendering's fine-tuning can be completed in the viewport.
Create viewports using saved views, ideally based on a Renderworks camera view, which allows control of additional features. Use the Visualization palette to access and manage individual cameras.
Make multiple copies of a viewport and change some of the render settings and lighting options in each copy. This allows you to compare the renderings side by side and decide which combination of settings is best, or to use each for a different presentation purpose. Alternatively, you can layer copies of the same viewport, with different render styles, to create useful visual effects. For example, you could stack a traditional floor plan view on top of a rendered floor plan, to help end users who aren't accustomed to reading plans understand the space.
Test rendering settings on sheet layer viewports with lower sheet layer resolution values/DPI. Sheet layers can render in the background while you continue working. Sheet layers are set to 72 dpi by default, but for testing, set the dpi value even lower (such as 40). Zoom out of a drawing to reduce the rendered area, or use the Render Bitmap tool with a low dpi setting.
Use the viewport's Object Info palette to change the background and foreground render modes/styles, Renderworks background, lighting options, camera view, camera effects, class and layer visibility, and so on, without affecting either the design layers or other viewports in the file.
Use the Visualization palette to control individual lights in the viewport.
Consider using image effects, if they meet your needs, rather than a more time-intensive render mode.
You may find it effective to use the same viewport for multiple purposes throughout the life cycle of the project, from a white or sketch rendering in early phases to a final photorealistic rendering. You can do this by updating the viewport as the underlying design layer becomes more detailed, and by changing the viewport's properties, including the render mode/style, in the Object Info palette.
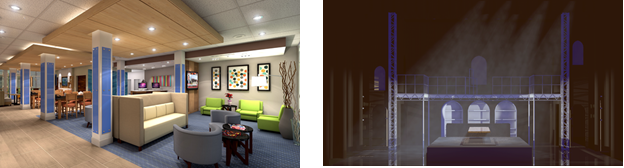
When a viewport is linked to a Renderworks camera, camera effects such as bloom (left) and depth of field (right) can be applied to the rendering
![]()
Processing
Once the adjustments are made, you can process sheet layers on your local machine, or if you have access to Vectorworks Service Select benefits, you can send large renderings and multiple rendering projects to process on Vectorworks Cloud Services; this takes the load off your own computer, so you can continue working.
Post production
After a rendering has been processed, you can adjust image effects settings such as exposure, saturation, color temperature, and soft edges to fine tune the rendering, or live sync/export the file for additional fine tuning in an imaging program.