The Navigation palette
|
Command |
Path |
Shortcut |
|
Navigation |
Window > Palettes |
Ctrl+Shift+N (Windows) Cmd+Shift+N (Mac) |
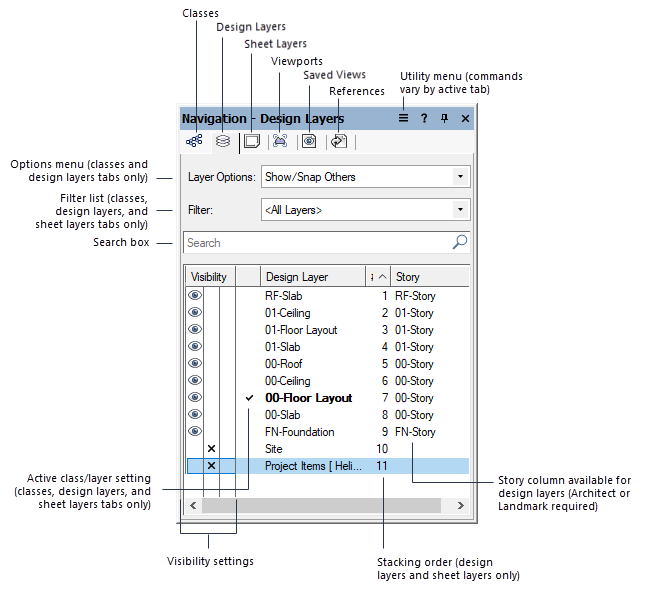
The Navigation palette provides access to classes, design layers, sheet layers, viewports, saved views, and references, similar to the Organization dialog box. However, unlike the Organization dialog box, the drawing area is accessible while the Navigation palette is open.
To use the Navigation palette:
Select the command.
The Navigation palette opens.
Click the desired tab to set the active tab upon opening the Navigation palette. Select Window > Palettes > Save Palette Positions to save the changes. To revert the active tab back to the setting established when a custom workspace was created (in the User Data and Preferences folder), click Reset Saved Settings from the Session pane of Vectorworks preferences (see Vectorworks preferences: Session pane).
Select the appropriate tab: Classes, Design Layers, Sheet Layers, Viewports, Saved Views, or References.
A list of items of that type in the current drawing displays. If a description is entered for a class or layer, the description displays in a screen tip when you position the cursor over the item name; on Windows, click the disclosure arrow on the screen tip to collapse or expand it.
On the Classes, Design Layers, Sheet Layers, Viewports, and Saved Views tabs, use the following options to filter long lists of items.
Filter list: Select a filter for the list (classes, design layers, and sheet layers only).
Search box: Enter text to filter the list by name.
Change the settings for classes, design layers, sheet layers, viewports, saved views, or references as needed.
Click a class or design layer’s Visibility column to set the visibility for objects in that layer. To set the same visibility for all classes or design layers in the list, Option-click (Mac) or Alt-click (Windows) one of the Visibility columns.
Use the context menu options to toggle the display of classes in hierarchical order, or to expand or collapse the class list for better manageability.
If classes are displayed in hierarchical order, click the Visibility column for a class group header and all of its sublevels inherit that visibility setting.
Double-click a class, design layer, or sheet layer to activate it. Alternatively, click the column to the left of the item’s name to activate it.
Double-click a saved view to switch to that view.
Double-click a viewport to switch the active layer to the sheet layer or design layer that contains the viewport, and to select the viewport (if a viewport is in a class with settings that prevent the viewport from being selected, a message displays to indicate that the active class changed to the viewport class).
Select a class or design layer and then select one of the Class Options or Layer Options.
Change the stacking order of a design layer or sheet layer by clicking the number in its # column and dragging it up or down the list.
Double-click a tab in the Navigation palette to open the equivalent tab in the Organization dialog box.
See the following sections for details:
Filtering and tagging classes and layers
Displaying classes in hierarchical order
Changing the design layer stacking order
Changing the sheet layer stacking order
Click the Utility menu on the title bar to access creation and management commands for each tab of the palette, and to control the palette’s display. The available commands are different for each tab.
To manage drawing elements listed on a Navigation palette tab, select a list item and then select the desired command from the Utility menu, or right-click a list item and then select the desired command from the context menu.
|
Menu Command |
Function |
|
Classes tab |
|
|
New |
Select New to open the New Class dialog box. See Creating classes. When a new class is created, it does not automatically become the active class. To quickly add classes to a hierarchical structure, select an existing row at the desired level before creating a new class. The new class name uses the same prefix by default. For example, if the “Arch-Wall-Ext” class is selected when you create a class, Arch-Wall- is the default prefix. |
|
Edit |
Select a class and then select Edit to edit it in the Edit Class(es) dialog box. See Setting class properties. This option is not available when classes are displayed in hierarchical order and a class group header is selected. |
|
Assign Tags |
Opens the Assign Tags dialog box, to add tags to or remove tags from this item. Use tags to define class and layer filters. See Assigning tags. |
|
Duplicate |
Select a class and then select Duplicate to create a copy of it. The name of the duplicate is the same as the original class, with a number added (for example, cabinets 2); if the original name ends in a number, the next available sequential number is used. This option is not available when classes are displayed in hierarchical order and a class group header is selected. |
|
Delete |
Select a class and then select Delete to open the Delete Class(es) dialog box. Specify what to do with the objects currently assigned to the class(es) being deleted (delete them, or reassign them to another selected class). The program moves all objects in the deleted class(es) to the appropriate class, or deletes them, as specified. Shortcut keys for this command are Delete (Windows) and Forward Delete (Mac). This option is not available when classes are displayed in hierarchical order and a class group header is selected. The Dimension and None classes cannot be deleted. These are default classes in every drawing. |
|
Select one or more drawing object and one class; then select Assign to Selection to place the object in the specified class |
|
|
Activate |
Select a class and then select Activate to make that class active for every design layer, viewport, and saved view without class visibility saved. (Enter is a shortcut key for this command.) |
|
Details |
Select Details to open the Organization dialog box to the Classes tab in Details view; double-clicking the Classes tab in the Navigation palette is a shortcut for this command |
|
Visibilities |
Select a class and then select Visibilities to open the Organization dialog box to the Classes tab in Visibilities view (showing Viewport and Saved View visibilities for the class) |
|
Select All |
Choose Select All to select all classes |
|
Hierarchical Display |
Toggles the hierarchical display of classes on or off |
|
When classes are displayed in hierarchical order, displays all classes in the file |
|
|
When classes are displayed in hierarchical order, collapses the list to display only top-level classes (those with no dash in the name) and class group headers |
|
|
Design Layers tab |
|
|
New |
Select New to open the New Design Layer dialog box. When a new layer is created, it becomes the active layer. |
|
Edit |
Select a layer and then select Edit to edit it in the Edit Design Layers dialog box. See Setting design layer properties. |
|
Assign Tags |
Opens the Assign Tags dialog box, to add tags to or remove tags from this item. Use tags to define class and layer filters. See Assigning tags. |
|
Duplicate |
Select a design layer and then select Duplicate to create a copy of it. The name of the duplicate is the same as the original layer, with a number added (as in floorplan-2); if the original name ends in a number, the next available sequential number is used. |
|
Delete |
Select a design layer and then select Delete; when prompted, click Yes to confirm the deletion. Shortcut keys for this command are Delete (Windows) and Forward Delete (Mac). When a design layer is removed from the drawing, all objects in that layer are also removed. |
|
Assign to Selection |
Select one or more drawing object and one layer; then select Assign to Selection to place the object on the specified layer |
|
Activate |
Select a layer and then select Activate to switch to that design layer. (Enter is a shortcut key for this command.) |
|
Update Reference |
(Layer import referencing method only) This option is available if a design layer has been referenced into this file. The referenced layer name displays in italics. Position the cursor over the layer name to display a screen tip with the full layer name and the source file name; on Windows, click the disclosure arrow on the screen tip to collapse or expand it. Select a referenced layer and then select Update Reference to update this file with layer information from the master file. See Concept: Workgroups and referencing. |
|
Details |
Select Details to open the Organization dialog box to the Design Layers tab in Details view; double-clicking the Design Layers tab in the Navigation palette is a shortcut for this command |
|
Visibilities |
Select a layer and then select Visibilities to open the Organization dialog box to the Design Layers tab in Visibilities view (showing Viewport and Saved View visibilities for the layer) |
|
Check Out |
Available if this is a shared project. Select a layer and then select Check Out to check out the layer for editing. The layer name displays in blue when it is currently checked out. See Layers tab. |
|
Release |
Available if this is a shared project. Select a layer and then select Release to release a checked out layer so that other project users can edit it. See Layers tab. |
|
Administrative Release |
Available if this is a shared project, and you have administrative permission. Select a layer and then select Administrative Release to release a layer checked out by another user. See Layers tab. |
|
Select All |
Choose Select All to select all design layers |
|
Sheet Layers tab |
|
|
New |
Select New to open the New Sheet Layer dialog box. When a new layer is created, it becomes the active layer. |
|
Edit |
Select a sheet layer and then select Edit to edit it in the Edit Sheet Layers dialog box. See Setting sheet layer properties. |
|
Assign Tags |
Opens the Assign Tags dialog box, to add tags to or remove tags from this item. Use tags to define class and layer filters. See Assigning tags. |
|
Duplicate |
Select a sheet layer and then select Duplicate to create a copy of it. The Sheet Title of the duplicate is the same as the original layer. The Sheet Number of the duplicate is the same as the original layer, with a number added (as in details-2); if the original Sheet Number ends in a number, the next available sequential number is used. |
|
Delete |
Select a sheet layer and then select Delete; when prompted, click Yes to confirm the deletion. Shortcut keys for this command are Delete (Windows) and Forward Delete (Mac). |
|
Activate |
Select a layer and then select Activate to switch to that sheet layer. (Enter is a shortcut key for this command.) |
|
Details |
Select Details to open the Organization dialog box to the Sheet Layers tab in Details view; double-clicking the Sheet Layers tab in the Navigation palette is a shortcut for this command |
|
Check Out |
Available if this is a shared project. Select a layer and then select Check Out to check out the layer for editing. The layer name displays in blue when it is currently checked out. See Layers tab. |
|
Release |
Available if this is a shared project. Select a layer and then select Release to release a checked out layer so that other project users can edit it. See Layers tab. |
|
Administrative Release |
Available if this is a shared project, and you have administrative permission. Select a layer and then select Administrative Release to release a layer checked out by another user. See Layers tab. |
|
Select All |
Choose Select All to select all sheet layers |
|
Viewports tab |
|
|
New |
Select New to open the Create Viewport dialog box. For sheet layer viewports, see Creating a sheet layer viewport from a design layer. For design layer viewports, see Creating design layer viewports. |
|
Edit |
Select a viewport and then select Edit to edit it in the Properties dialog box; see Viewport properties |
|
Duplicate |
Select a viewport and then select Duplicate to create a copy of it. The name of the duplicate is the same as the original viewport, with a number added (as in details-2); if the original name ends in a number, the next available sequential number is used. The Drawing Title of the duplicate is the same as the original viewport. If the original viewport has a drawing label, the Drawing Number of the label in the duplicate viewport is the next available sequential number. The duplicate viewport is placed directly on top of the original, in the original sheet layer. |
|
Delete |
Select a viewport and then select Delete; when prompted, click Yes to confirm the deletion. Shortcut keys for this command are Delete (Windows) and Forward Delete (Mac). |
|
Activate |
Select a viewport and then select Activate to switch to that viewport’s sheet layer and select that viewport (if a viewport is in a class with settings that prevent the viewport from being selected, a message displays to indicate that the active class changed to the viewport class). (Enter is a shortcut key for this command.) |
|
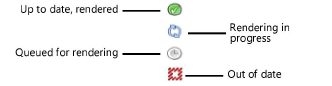
Update |
Select one or more sheet layer viewports, and then select Update to render the viewports with their foreground and background render settings. (Alternatively, select View > Update Selected Viewports.) When the Renderworks render mode is selected, the viewports render in the background once the geometry has been processed (see Rendering in the background). Icons in the Navigation palette indicate the render status of the viewports.
|
|
Cancel Update |
When one or more selected sheet layer viewports are in the process of updating, or in the render queue, Cancel Update cancels the current render and any pending rendering. (Alternatively, select View > Cancel All Viewport Updates.) |
|
Details |
Click Details to open the Organization dialog box to the Viewports tab in Details view; double-clicking the Viewports tab in the Navigation palette is a shortcut for this command |
|
Visibilities |
Select a viewport and then select Visibilities to open the Organization dialog box to the Viewports tab in Visibilities view (showing Class and Design Layer visibilities for the viewport) |
|
Check Out |
Available if this is a shared project. Select a viewport and then select Check Out to check out the viewport for editing. The viewport name displays in blue when it is currently checked out. See Checking out and releasing objects. |
|
Release |
Available if this is a shared project. Select a viewport and then select Release to release a checked out viewport so that other project users can edit it. See Checking out and releasing objects. |
|
Administrative Release |
Available if this is a shared project, and you have administrative permission. Select a viewport and then select Administrative Release to release a viewport checked out by another user. |
|
Select All |
Choose Select All to select all viewports |
|
Saved Views tab |
|
|
New |
Select New to open the Save View dialog box. See Creating saved views. |
|
Edit |
Select a saved view and then select Edit to edit it in the Edit Saved View dialog box. See Editing saved views. |
|
Duplicate |
Select a saved view and then select Duplicate to create a copy of it. The name of the duplicate is the same as the original view, with a number added (as in deckview-2); if the original name ends in a number, the next available sequential number is used. |
|
Delete |
Select a saved view and then select Delete; when prompted, click Yes to confirm the deletion. Shortcut keys for this command are Delete (Windows) and Forward Delete (Mac). |
|
Activate |
Select a saved view and then select Activate to switch to that view. (Enter is a shortcut key for this command.) |
|
Activate in new pane |
Select a saved view and then select Activate in new pane to display the saved view in a new floating pane |
|
Redefine |
Select a saved view and then select Redefine to open the Redefine Saved Views dialog box. See Redefining saved views. |
|
Details |
Select Details to open the Organization dialog box to the Saved Views tab in Details view; double-clicking the Saved Views tab in the Navigation palette is a shortcut for this command |
|
Visibilities |
Select a saved view and then select Visibilities to open the Organization dialog box to the Saved Views tab in Visibilities view (showing Class and Design Layer visibilities for the saved view). The active class/layer and class/layer options can also be changed here. |
|
Select All |
Choose Select All to select all saved views |
|
References tab |
|
|
New |
Click New to open the Open File dialog box. For layer import references, see Adding and editing reference files. For design layer viewport references, see Creating a referenced design layer viewport. |
|
Edit |
Select a referenced file and click Edit to open the Edit Reference dialog box. For layer import references, see Adding and editing reference files. For design layer viewport references, see Creating a referenced design layer viewport. |
|
Delete |
Select a reference and click Delete. In the Delete Reference dialog box, specify what to do with the items in the file that are currently referenced. See Deleting references. |
|
Update |
Select a referenced file and click Update to update this document with references from the file |
|
Update All |
Click Update All to update all of the references in this document |
|
Open |
Select a referenced file and click Open to open the referenced file. Referenced PDF or image files are opened with the default application for the file type. This command is not available when more than one referenced file is selected. |
|
Details |
Select Details to open the Organization dialog box to the References tab in Details view; double-clicking the References tab in the Navigation palette is a shortcut for this command |
|
Select All |
Choose Select All to select all references |
|
Tab visibility commands (available on Utility menu only) |
Toggle the visibility of individual tabs on and off; see Controlling the visibility of palettes and tabs. The visibility toggles for detached tabs is available on their individual palettes, not the home palette. |
|
Dock [tab name] here/Dock all Tabs here (available on Utility menu only) |
Returns the selected detached tab, or all detached tabs, to the palette; see Detaching and returning palette tabs |