Worksheet commands
The main menu is at the top of the worksheet window. Many of the main menu commands are also available from context menus. Right-click on a worksheet row number, column letter, or cell to open a context menu.
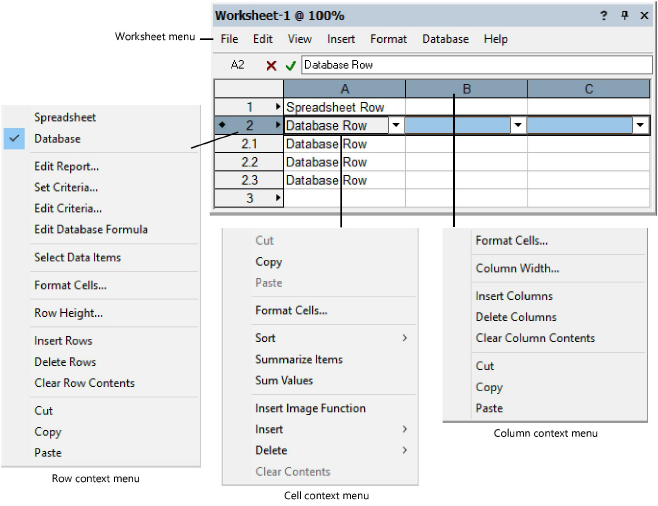
Worksheet menu
Click to show/hide the commands.Click to show/hide the commands.
|
Command |
Description |
|
File menu |
|
|
Recalculates all formulas in all worksheets, whether open or closed. This function can also be accessed from the context menu of the worksheet image (on the drawing); alternatively, right-click on the worksheet object in the drawing and select Recalculate All Worksheets from the context menu. |
|
|
Recalculate Active Worksheet |
Recalculates the selected worksheet only. This function can also be accessed from the context menu of the worksheet image (on the drawing); alternatively, right-click on the worksheet object in the drawing and select Recalculate Selected Worksheet from the context menu, or click Recalculate from the Object Info palette of a selected worksheet. |
|
Worksheet On Drawing |
Places the selected worksheet on the drawing for display and printing |
|
Import Worksheet |
Opens a dialog box to import data into the current worksheet; see Importing worksheets |
|
Export Worksheet |
Opens a dialog box to export data from the current worksheet; see Exporting worksheets |
|
Opens the Worksheet Preferences dialog box. Header and Footer text fields and the Margin settings apply to printed worksheets only. Select Show Grid to display the worksheet gridlines. Select Print Tabs to print worksheet column and row headers. Select Print Database Headers to print database header rows. Select Auto-recalc to recalculate all worksheet arithmetic functions when cells are edited. Specify the Images DPI for worksheets with images (Vectorworks Design Suite product required). Resolutions higher then 150 DPI may increase file size significantly enough to affect performance. Click Font to specify the worksheet default font and size. |
|
|
Printer Setup |
Opens the Printer Setup dialog box. This is almost identical to the standard Printer Setup dialog box, with the addition of Scaling options to help fit the worksheet on the printed page. Select how to fit the worksheet to the page; if Custom Scale is selected, specify the scale. All scaling is done symmetrically and maintains the aspect ratio. The setting is saved for each worksheet palette. Settings in this dialog box affect only the printer information for the worksheet. |
|
|
Opens the Print dialog box, to print the current worksheet. This is the only way to print a worksheet unless the worksheet is included as a part of the drawing. |
|
Edit menu |
|
|
Undo |
Undoes the last worksheet change; execute the command multiple times to undo multiple actions |
|
Redo |
Reverses the last Undo command; execute the command multiple times to redo multiple undo actions |
|
Cut |
Removes the contents of selected cells, temporarily storing the contents in the clipboard |
|
Copies the contents of selected cells to the clipboard, where they are temporarily stored; the original contents remain in the worksheet |
|
|
Places cell contents stored in the clipboard into the current cell or range of cells |
|
|
Clear Contents |
Deletes the contents of the selected cells |
|
Delete Rows |
Deletes the selected rows from the worksheet. Use caution when deleting a row. Deleting cells that are part of a formula may change the values returned by the formula. |
|
Delete Columns |
Deletes the selected columns from the worksheet. Use caution when deleting a column. Deleting cells that are part of a formula may change the values returned by the formula. |
|
View menu |
|
|
Database Headers |
Toggles between displaying and hiding all worksheet database header rows in the worksheet window. |
|
Grid Lines |
If Pen attributes are applied to the worksheet object (from the Attributes palette), toggles between displaying and hiding grid lines between the rows and columns of the worksheet, in the worksheet image on the drawing. You can also apply border formatting between rows and columns with the Format > Cells command. If you do so, turn off the Grid Lines option. See Formatting worksheet cells. |
|
Zoom |
Increases or decreases the zoom percentage by preset levels from 50% to 300%; the current zoom level displays in the worksheet title bar. Select a zoom level from the Worksheet menu, or roll the mouse wheel while holding Ctrl (Windows) or Option (Mac) to increase or decrease the zoom level by increments of 10% (regardless of the number of lines you assigned the mouse to scroll in the mouse setup). This feature will not work properly if standard scrolling is disabled in the mouse setup. For example, if the mouse’s scrolling size is set to “none,” mouse zooming in the Vectorworks program is disabled. (The specific settings required for this feature depend on the type of mouse being used.) |
|
Insert menu |
|
|
Rows |
Inserts rows in the worksheet, above the selected rows. The number inserted depends on how many rows in the worksheet are highlighted at the time the command is selected. Use caution when inserting rows. Depending on the type of cell references used in formulas, inserting rows could change the values returned by a formula. To add rows to the bottom of the worksheet, click and drag the bottom right corner of the worksheet. |
|
Columns |
Inserts columns in the worksheet, to the left of the selected columns. The number inserted depends on how many columns in the worksheet are highlighted at the time the command is selected. Use caution when inserting columns. Depending on the type of cell references used in formulas, inserting columns could change the values returned by a formula. To add columns to the right side of the worksheet, click and drag the bottom right corner of the worksheet. |
|
Function |
Opens the Select Function dialog box; select a function to be inserted in the formula (see Entering formulas in worksheet cells) |
|
Criteria |
Opens The Criteria dialog box to select search criteria to insert in a formula |
|
Image Function (Design Suite product required) |
Inserts the image function in the formula for the current cell; see Inserting images in worksheet cells |
|
Format menu |
|
|
Cells |
Opens the Format Cells dialog box, for setting the format and appearance of selected cells; see Formatting worksheet cells |
|
Opens the Column Width dialog box. Set the width value of selected cells in the specified units. Click Standard Width to use the default width. The width of multiple selected columns can be adjusted at one time. |
|
|
Opens the Row Height dialog box. Set the row height to automatically fit the selected cell contents, or set a specific row height in the specified units. The height of multiple selected rows can be adjusted at one time. |
|
|
Database menu |
|
|
Spreadsheet |
Converts a database header row into a row of spreadsheet cells. This deletes all sub-rows and the information contained within them. Any formulas that were defined in the columns of the header row remain intact. This command has no effect on spreadsheet cells. |
|
Database |
Converts a row of spreadsheet cells into a database header row and opens The Criteria dialog box. This command has no effect on database rows. |
|
Create/Edit Report |
Opens the Create Report (spreadsheet row) or Edit Report (database header row) dialog box, to enter object selection criteria and data for a report; see Creating reports |
|
Set Criteria |
Opens The Criteria dialog box for setting new criteria that will be used to generate the database sub-rows (database header row only) |
|
Edit Criteria |
Opens The Criteria dialog box for editing the criteria that was used to generate the database sub-rows (database header row only) |
|
Edit Database Formula |
Displays the formula of the database row in the formula bar, for editing. If the row is a spreadsheet row, it is converted into a database row. |
Row context menu
Most of the commands are also available on the Worksheet menu. The following commands are available only on the context menu.
Click to show/hide the commands.Click to show/hide the commands.
|
Commands |
Description |
|
Select Data Items |
Selects all objects on the drawing that meet the criteria for the database row (database header row) |
|
Select Item |
Selects an individual database object in the drawing (database sub-row) |
Cell context menu
Most of the commands are also available on the Worksheet menu. The following commands are available only on the context menu.
Click to show/hide the commands.Click to show/hide the commands.
|
Command |
Description |
|
Sort |
Sorts the database sub-rows in ascending or descending order, according to the contents of the clicked column. The button on the database header cell displays an up or down arrow, along with a number that indicates the sort precedence for this column. The precedence is determined by the order in which you set the sorts. In each group of sub-rows, up to 20 columns can have a sort applied. This setting has no effect on image cells (Vectorworks Design Suite product required). |
|
Summarize Items |
Summarizes the database sub-rows according to the contents of the clicked column. Sub-rows that have identical items in this column are grouped together in a single row. The button on the database header cell displays a If all of the summarized sub-rows have the same value for one of the other columns, that value displays; otherwise “---” displays to indicate that the sub-rows have different values for that column. This setting has no effect on image cells (Vectorworks Design Suite product required). |
|
When rows are summarized, select this option for any columns whose values should be summed. The button on the database header cell displays a + symbol. For example, you might have a window schedule that sorts and summarizes the data by the Window ID column. Select Sum Values for the Price column to show the combined price of all windows with a particular ID. This setting has no effect on image cells (Vectorworks Design Suite product required). |
|
|
Pick Value from List (Design Suite product required) |
If the cell is in a database sub-row, and the column lists a field that only allows certain pre-defined values, use this option to edit the object’s data. For example, you might want to change the sill style for several window objects from the window schedule. Select the sill cells for the objects to be changed, and right-click. Select a different sill type from the list of options to change both the worksheet and the objects’ data records. |