The Properties palette
|
Command |
Path |
Shortcut |
|
Properties |
Window |
Ctrl+Shift+Y (Windows) Cmd+Shift+Y (Mac) |
From the Properties palette, you can view and edit the parameters of selected fixtures, objects, or layers. The available parameters depend on the items selected. Depending on the parameter, a field may be edited, a value toggled, or a dialog box opened.
You can use the mouse wheel or arrow keys to change numerical parameter values by small increments; for larger increments, use the Page Up/Page Down keys.
To open the Properties palette:
Select the command.
Individual parameters are categorized by function. Click the disclosure arrows to expand the categories. Press the Alt key (Windows) or the Option key (Mac) when clicking a disclosure arrow to expand or collapse all items in that category.
Use the scroll bar on the Properties palette to navigate the list, or scroll with the Page Up/Page Down and arrow keys.
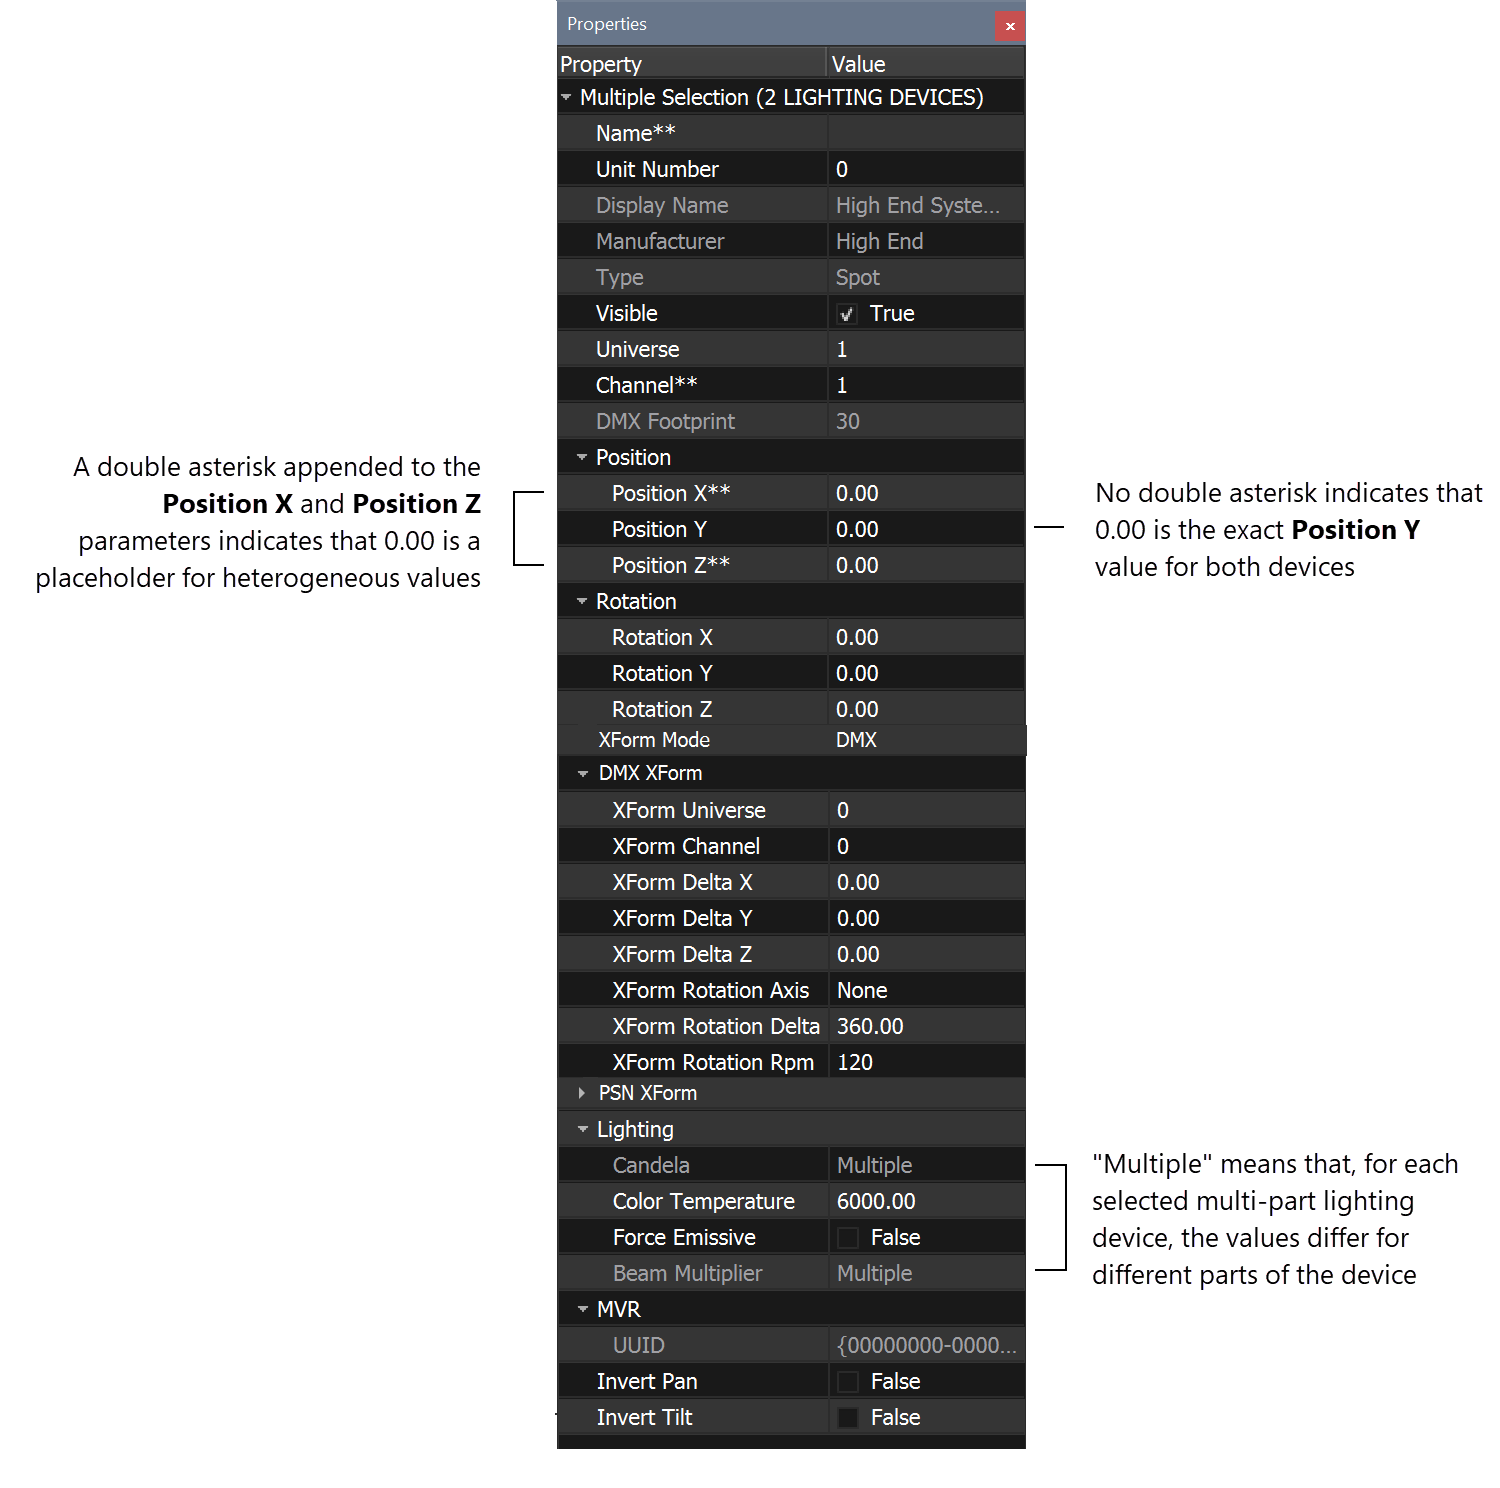
Parameters for a multiple selection of multi-part lighting devices
When multiple items are selected, the exact parameter values display only if they are identical for all selected items. When a value differs, this is indicated by a double asterisk (**) after the parameter name, followed by a blank field or a value of 0.00.
A parameter value of "Multiple" may display if one or more multi-part lighting devices are selected. "Multiple" indicates that the parameter value is not identical for all parts of the lighting device.
Global parameters
When no scene items are currently selected, the global scene parameters display in the Properties palette. To edit these parameters, select ROOT from the Scene Graph palette. The global parameters can also be edited from the Document Preferences dialog box.
The global parameters that display in the Properties palette depend on whether the document preferences are shown in Basic or Advanced mode. If Basic mode is active, the global parameters match the Basic document preferences. If Advanced mode is active, the global parameters match the Advanced document preferences.
Click to show/hide the parameters.Click to show/hide the parameters.
|
Global parameter |
Description |
|
Globals |
See Basic document preferences or Advanced document preferences for parameter descriptions |
|
High Precision |
Enables highly accurate renderings. Deselect the check box to quickly render large files; the check box must be deselected each time you open a .v3s file. Some artifacts may appear. Use this setting primarily for testing. |
Object and fixture parameters
The parameters that display in the Properties palette depend on the type of items selected. Some parameters are available for both objects and fixtures (lighting devices, projectors, and lasers), while others are available exclusively for objects, lighting devices, projectors, or lasers. Some of these parameters are also available for layers in the Scene Graph palette (for more information on layers, see Organizing the scene contents).
Click to show/hide the parameters.Click to show/hide the parameters.
|
Parameter |
Description |
Availability |
|
Name |
Displays the lighting device's channel number or the name of the laser, projector, object, or layer |
Objects, fixtures, and layers |
|
Unit Number |
Displays the fixture's unit number |
Fixtures |
|
Display Name |
Displays the fixture's make and model; this field cannot be edited |
Fixtures |
|
Manufacturer |
Displays the fixture manufacturer; this field cannot be edited |
Fixtures |
|
Type |
Displays the fixture type; this field cannot be edited |
Fixtures |
|
Visible |
Indicates that the fixture is visible in the scene; deselect to make the fixture invisible |
Fixures and layers |
|
Fixture Number |
Displays the fixture number corresponding to the laser projection zone configuration selected in the Pangolin BEYOND® software |
Lasers |
|
Universe |
Displays the universe assigned to the lighting device or projector |
Lighting devices, projectors |
|
Channel |
Displays the DMX address assigned to the lighting device or projector |
Lighting devices, projectors |
|
DMX Footprint |
Displays the number of control channels used by the lighting device or projector; this field cannot be edited |
Lighting devices, projectors |
|
Cast Shadows |
Controls the display of shadows for specific objects and layers, so you can override the global shadow preference when needed. Set the global shadow behavior from the Render shadows setting on the Basic: Graphics tab or Advanced: Graphics tab. Use Parent Setting: Uses the same Cast shadows setting that is specified for the closest "parent" layer in the Scene Graph palette. This option is selected for all objects and layers by default, so the ROOT layer setting (controlled by the Render shadows preference) is applied globally. Cast Shadows: Toggles shadows on, even when you deselect the Render shadows preference. Do Not Cast Shadows: Toggles shadows off, even when you select the Render shadows preference. |
Objects and layers |
|
Position |
|
Objects, fixtures, and layers |
|
Position X |
Sets the item's position on the X axis in inches. Positive values move right; negative values move left. |
Objects, fixtures, and layers |
|
Position Y |
Sets the item's position on the Y axis in inches. Positive values move up; negative values move down. |
Objects, fixtures, and layers |
|
Position Z |
Sets the item's position on the Z axis in inches. Positive values move away from the camera; negative values move toward it. |
Objects, fixtures, and layers |
|
Rotation |
|
Objects, fixtures, and layers |
|
Rotation X/Y/Z |
Sets the item's rotation on the X/Y/Z axis in inches. Positive values rotate clockwise; negative values rotate counter-clockwise. |
Objects, fixtures, and layers |
|
Scale |
|
Objects and layers |
|
Scale X/Y/Z |
Sets the scale of the object in its local X-/Y-/Z-axis coordinate direction |
Objects and layers |
|
XForm Mode |
Sets the type of transforms: DMX, PSN, or None. Select None when you want to keep the transform parameters configured, but temporarily disabled. |
Objects, fixtures, and layers |
|
DMX XForm |
Moves, rotates, and scales selected items in the scene, or all items in the selected layer. See DMX transforms for more information. Lighting devices cannot be scaled by DMX transform. |
Objects, fixtures, and layers |
|
PSN XForm |
Moves and rotates selected items in the scene, or all items in the selected layer. See PSN transforms for more information. |
Objects, fixtures, and layers |
|
Material |
|
Objects |
|
Color |
Displays the RGB color assigned to the object |
Objects |
|
Texture |
Displays the image file, video file, or video input assigned to the object. Click the button next to the texture field to select a file. Click X to remove the file. For more information on adding video to textures, see Assigning textures. |
Objects |
|
Use Alpha Channel |
Uses the alpha channel from the Texture as the rendering mask |
Objects |
|
Texture Scale |
Sets the texture size on an object. For example, a scale value of 2 doubles the size of the texture. |
Objects |
|
Texture Offset H/V |
Shifts the start location of the texture horizontally or vertically |
Objects |
|
Brightness |
Controls the brightness of the texture by adjusting the comparative luminance of each pixel in the texture image; this is useful for video screens |
Objects |
|
Specular Texture |
Uses a color image to control the color and intensity of the object's reflectivity, depending on the amount of surface detail and the Specular Power. Click the button next to the texture field to select a texture image file. Click X to remove the file. |
Objects |
|
Specular Power |
Controls the sharpness of the object's highlights and environment reflections. Lower values create blurry reflections (good for carpet), while higher values create sharper reflections (good for metal). |
Objects |
|
Normal Texture |
Uses a color image to simulate the lighting of small surface irregularities. RGB colors on the object surface correspond to XYZ values, to indicate the direction that light reflects off the object. Click the button next to the texture field to select a texture image file. Click X to remove the file. Vision uses tangent space normal maps. |
Objects |
|
Bump Texture |
Uses a grayscale image to simulate surface contours, such as brick work, for an embossed appearance. Bump textures can provide a greater sense of depth than normal textures, but performance may decrease. Click the button next to the texture field to select a texture image file. Click X to remove the file. |
Objects |
|
Alpha Texture |
Uses an image mask to simulate surface transparency or opacity. White areas appear opaque and black areas appear transparent. Click the button next to the texture field to select a texture image file. Click X to remove the file. |
Objects |
|
Force Emissive Mesh |
Makes a texture image glow even when the ambient lighting is low. This is a good setting for video screens and LED tape. |
Objects |
|
Emissive |
|
Objects |
|
Lighting Device Type |
Converts geometry into a DMX-controlled emissive lighting device, such as a glowing sphere. The brightness of RGB colors is controlled by separate channels. |
Objects |
|
Lighting Device Candela |
Sets the maximum output of the emissive lighting device, controlling how brightly it glows |
Objects |
|
Lighting Device Universe |
Displays the universe assigned to the emissive lighting device |
Objects |
|
Lighting Device Channel |
Displays the channel assigned to the emissive lighting device |
Objects |
|
Lighting |
|
Lighting devices, projectors |
|
Candela |
Sets the maximum output of the lamp. Increase the value to make both the beam and the surface lights brighter. Perceived brightness also depends on the beam and field angles of the lighting device, the dimmer, and other components of the light train. |
Lighting devices, projectors |
|
Color Temperature |
Sets the temperature of emitted light. At 6000K, the light appears white. Larger values make the light appear cooler (blue), and smaller values make the light appear warmer (amber). |
Lighting devices, projectors |
|
Force Emissive |
Converts the lighting device to an emissive; the lens glows, but the lighting device does not emit beams, create surface lights, or cast shadows. This is a good setting for blinders, LED lighting devices, and performance-intensive multi-part lighting devices. (Although you can use this parameter for projectors, this would be unusual.) Emissive lighting devices can significantly improve performance. |
Lighting devices, projectors |
|
Beam Multiplier |
Multiplies the brightness of the beam without affecting surface lights. This is not a real-world fix; adjust the beam by other parameters if possible. |
Lighting devices, projectors |
|
Gobo Wheels |
Select a gobo image for the lighting device to project. Click the button next to the slot number to select the image file for the slot. Click X to remove the file. |
Lighting devices |
|
Color Wheels |
Select a color for each slot in the lighting device's color wheel. Click the button next to the color definition. The Color Picker dialog box opens. Color libraries from common manufacturers are listed in the Number column. Expand the list by clicking the disclosure arrows. Select a standard color from a manufacturer, or choose a color from the color picker. The Preview displays the selected color. The Hue, Saturation, and Luminance values, as well as the Red, Green, and Blue values, display. |
Lighting devices |
|
Projection |
|
Projectors |
|
Source Input |
Select a file for the projector; click X to remove the file. Alternatively, right-click on a projector and select Assign Video Input, or Reset Video Input to select a different video source. |
Projectors |
|
Test Image |
Temporarily projects an image to assist with setting up the projector |
Projectors |
|
Floor Mounted |
Determines whether the projector is floor mounted or attached to the ceiling |
Projectors |
|
Auto Aspect Ratio |
Matches the projector's aspect ratio to the source |
Projectors |
|
Aspect Ratio |
Forces the projected video to the specified aspect ratio |
Projectors |
|
Keystoning |
A keystoning workflow allows you to properly adjust the projected image to the borders of the screen surface by temporarily manipulating the output light and shape. |
Projectors |
|
Keystone Color |
Select the color to use while keystoning |
Projectors |
|
Keystone Mode |
Select the keystone workflow: None: Turns off keystoning Vertical: For simple keystoning cases, select this option Four corner: Opens the Four Corner Keystone dialog box, for advanced keystoning by drag-and-drop |
Projectors |
|
Vertical Keystone (Vertical Keystone Mode) |
Specify the vertical keystoning value |
Projectors |
|
MVR |
|
Objects, fixtures, and layers (MVR only) |
|
UUID |
Displays the item's unique ID for tracking by MVR; see Merging files |
Objects, fixtures, and layers (MVR only) |
|
Invert Pan |
Inverts the lighting device's pan |
Lighting devices |
|
Invert Tilt |
Inverts the lighting device's tilt |
Lighting devices |
![]()