 Creating landscape areas
|
Tool |
Workspace: Tool set |
|
Landscape Area
|
Design Suite: Site Planning Landmark: Softscape |

Landscape areas are defined regions of plant combinations. These can be useful for conceptual landscape planning, for adding linear hedgerows, or for specifying large planting or reforestation areas with plant symbols drawn in a representative way according to spacing or percentage values. Plant information from a landscape area is based on plant symbol data, and can be included in plant list worksheets. A landscape area style always consists of at least one component, but you can add as many as required to represent the build-up of the object. These components display in section views and can be cut into the site model. You can also decide not to show them and instead show the bed area as a texture bed on the site model. Components can be created using material resources for an efficient BIM for landscape workflow.
When placed over a site model, a landscape area can conform to and drape realistically over the site model's terrain. A landscape area's components can also cut into the site model. Conforming with a site model may change the landscape area's area and plant quantities, as compared with the results for a flat polyline. See Connecting drawing objects to the site model for more information. Landscape areas, with the exception of hedgerows, can also interact with the curb object, for example a curb that provides edging, either by being aligned with a curb that acts as a site modifier, or by having a curb associated with the landscape area.
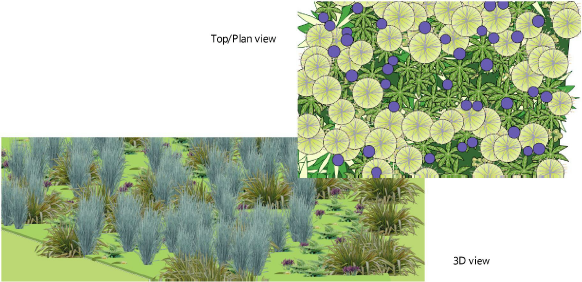
A landscape area can also be created without plant information specified, for use as a general ground cover or mulch area with a label showing the total area required.
Landscape areas or hedgerows are created with the Landscape Area tool. Alternatively, create a landscape area or hedgerow by drawing a closed 2D shape and then selecting the Create Objects from Shapes command (see Creating objects from shapes). You can also pick up the attributes and settings of an existing landscape area/hedgerow object, and apply them to geometry or use them to create a new landscape area.
|
Mode |
Description |
|
Vertex
|
Draws a landscape area using the selected polyline creation options and the current preference settings |
|
Pick Up
|
Picks up the settings and attributes of an existing landscape area/hedgerow and makes those the default preference settings for subsequently created objects |
|
Convert
|
Converts an existing polyline, polygon, rectangle, circle, or arc to a landscape area or hedgerow, and applies the current preference settings |
|
Landscape Area Style |
Opens the Select Landscape Area Style dialog box to select a resource for placement |
|
Landscape Area
|
Creates a landscape area within the drawn path or closed 2D shape |
|
Hedgerow
|
Creates a linear hedgerow along the object's path polyline. The legacy tool, Hedgerow, also creates hedgerows, but it will be phased out over time since the options provided by the Landscape Area tool in Hedgerow mode are much more flexible. |
|
Polyline creation options (Vertex mode) |
Selects the method for drawing the object's path polyline; see Creating polylines |
|
Preferences
|
Opens the Landscape Area Preferences dialog box to set the default preferences for landscape areas/hedgerows |


To create a landscape area:
Click the tool.
Do one of the following to establish the landscape area's parameters:
Click the Landscape Area Style on the Tool bar to open the Select Landscape Area Style dialog box. Click a resource to edit it. Click Select to choose it.
Click to show/hide the parameters.Click to show/hide the parameters.
|
Parameter |
Description |
|
Unstyled with Default Settings |
Makes the selection unstyled, with the default settings from the Landscape Area Preferences dialog box |
|
Search |
Enter text in the search box to filter the list |
|
Saved Settings Options |
See Using saved sets to save and apply saved settings |
|
Filters |
Select one or more filters for the list; when a filter is set for one of the categories, a red asterisk displays on the filter label. Click Clear All Filters to delete the selected filters. |
|
Parameter pane |
Click a style to open its parameters in the panel on the right, and then adjust any by instance settings as needed before placement. A selected set of parameters is available; to set others, click Preferences on the Tool bar, and see Landscape area settings. If the dialog box is reduced in size, the panel slides in and covers part of the dialog box, so it fits on the screen. |
|
Unstyled |
Makes the selection unstyled and preserves the current settings, all set by instance |
|
New Style |
For an unstyled instance, opens the Edit Landscape Area Style dialog box to create a new style; see Landscape area settings |
|
Duplicate |
Copies the selected style |
|
Edit Style |
Opens the Edit Landscape Area Style dialog box to edit the style itself; editing the style affects all landscape areas in the file that use the style |
Click Preferences to open the Landscape Area Preferences dialog box and specify the tool’s default parameters. See Landscape area settings.
It is helpful to begin with a style resource and customize it. Alternatively, leave the default selection of an unstyled landscape area to set all of the parameters from scratch; see Concept: Plug-in object styles. If you do not select a landscape area style, the Landscape Area Preferences dialog box opens automatically to set the parameters.
To obtain the settings from an existing landscape area, click Pick Up mode from the Tool bar and then click on the landscape area that is the source of the settings.
To use a style that's already in the file, in the Landmark Style Manager (see Landmark Style Manager), click the Menu icon  beside the style to use, and select Place This Landscape Area Style. The Landscape Area tool is activated, with the style selected for immediate placement in the drawing.
Do one of the following to create the landscape area:
Click Convert mode from the Tool bar, click Landscape Area mode or Hedgerow mode, or select a style from the Resource Selector, and then select an existing polyline, polygon, rectangle, circle, or arc to convert into a landscape area. The settings are automatically applied to create the new landscape area.
Click Vertex mode; click Landscape Area mode or Hedgerow mode, and then click the appropriate polyline creation mode in the Tool bar to select the boundary creation method of the landscape area; see Creating polylines.
For Vertex mode, click to set the landscape area's start point.
Click to set the end of the segment and the beginning of the next. Continue drawing segments in this manner until the landscape area object is complete.
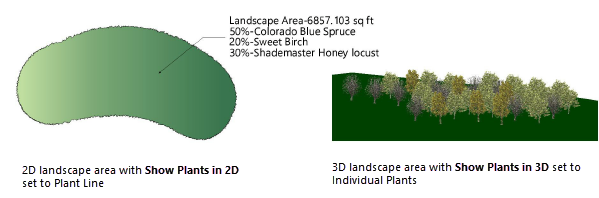
Optionally, to save the landscape area preferences as a style, select New Plug-in Style from Unstyled Plug-in from the Style list on the Object Info palette, or right-click on the landscape area and select New Plug-in Style from Unstyled Plug-in from the context menu. The landscape area style is saved as a resource in the file, and displays in the Resource Manager and in the Landscape Area Style Resource Selector on the Tool bar.
