PBR texture properties
Textures share a set of general options. All PBR textures share a set of general options, a basic set of OpenPBR properties divided into six groups. In addition, there is an extended set of advanced OpenPBR properties, and three additional groups of properties. At the top of the Edit Texture dialog box, select whether to view and edit only the Basic properties, All properties, or only the ones that were Modified from the PBR default for the current texture. When Basic or All is selected, the modified properties display in bold.
Texture properties, listed in the tables below, can be set by the parametric values that display when they are selected, or by using an image you can upload. Groups of properties and individual properties indicated by (RS) display fully only in Realistic RS render styles; in other render modes/styles, such as Shaded or Realistic, these properties may display only partially or not at all. The preview pane on the right of the Edit Texture dialog box updates automatically to reflect edits; select a different preview Object if needed to emphasize different aspects of a texture. See Creating a texture for more information about the Edit Texture dialog box.
Many textures require only one or two property settings; for example, a metal texture can be created from only the two Base properties found in the Basic group, by setting the metalness to 1.0 and defining the desired color. However, more elaborate textures can be created from a combination of property settings.
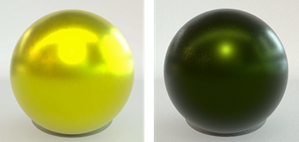
Previews of textures that use only the Base Color and Metalness parameters, with only the Color changed
To create a texture resembling a legacy Renderworks texture, set only the properties that correspond to the four shader types and parameters used by that texture type. See Legacy Renderworks textures for the four legacy shader types. Broadly speaking, color shaders map to base PBR properties, reflectivity shaders to specular properties, transparency shaders to transmission properties, and bump shaders to geometry properties. When editing a legacy texture, the legacy properties display in the Edit Texture dialog box; you may find it easier to create a new legacy texture from an existing one than to map the legacy properties to the PBR properties yourself.
Texture properties: General Options
All textures share these general options.
Click to show/hide the parameters.Click to show/hide the parameters.
|
Parameter |
Description |
|
Shadows |
Allows objects with this texture to cast and/or receive shadows (if the render mode's current settings are set to display shadows) |
|
Indirect Lighting Options |
Opens the Indirect Lighting Texture Options dialog box, to set overrides for the texture when the model is rendered with indirect lighting (see Setting lighting options). Specify how the texture will receive and emit light, and whether the texture will be used as a portal for light transfer, such as exterior windows. The Portal setting works only with Renderworks modes/styles, and affects only renderings that use both indirect lighting and physical sky or panoramic image backgrounds for lighting. |
|
Surface Hatch |
Displays the name of the current surface hatch resource, for use in hidden line rendering with surface hatches. Surface hatches are an aspect of textures that can display similar planar hatches in 2D. |
|
Edit Surface Hatch |
Opens the Edit Surface Hatch dialog box, to select the surface hatch to associate with the texture, and to align and register the surface hatch and texture (see Editing surface hatches) |
Texture properties: Basic
Click to show/hide the parameters.Click to show/hide the parameters.
|
Parameter |
Description |
|
Base |
Base establishes the main color or image texture, the main surface appearance. Base color maps are also called diffuse or albedo maps in other apps and content files. |
|
Color |
Sets the main visible color of a matte finish. For matte finishes such as paint, plaster, wood, or fabric, this is the material color; for metallic finishes, this is the color of the shiny metal. |
|
Metalness |
Changes the surface appearance between a painted, stone, plastic, or metallic finish. Low values give a soft, diffuse look, and higher values a mirror-like, metallic sheen. Set to 1.0 for shiny metals. |
|
Specular |
Specular settings control the sheen, the surface highlights and glossy reflections. These settings are important; a key principle of PBR textures is that all but the most matte materials have some shine. |
|
IOR (Index of Refraction) |
Controls how reflective the surface looks when viewed straight on versus at an angle, adjusting the overall sense of sheen intensity. Also controls refraction when using transmission properties for transparent objects and influences the reflective contrast of (advanced property) thin-film iridescence. |
|
Roughness |
Controls how sharp or blurry surface reflections appear; low values produce crisp reflections as on a polished or lacquered surface, whereas high values spread reflections into a broad soft glow, as on a brushed or satin surface. Also controls transmission blurriness; set to 0.0 for clear glass or greater than 0 for frosted glass. |
|
Weight |
Controls the brightness of surface highlights. High values produce high gloss as for polished or lacquered surfaces; low values create a near matte surface with subtle highlights. |
|
Transmission |
Transmission settings control object transparency; they are needed only for transparent or translucent objects |
|
Color |
Sets the visible tint of light passing through a material; use it to created tinted glass or blue water. Lighter colors are most often used for glass; darker colors can make the texture almost opaque. |
|
Weight |
Controls a texture's transparency. A setting of 0 creates an opaque surface, and higher numbers create greater transparency as for glass panels. |
|
Coat |
Coat settings add a second surface of reflection to simulate lacquer or varnish; they are needed if the base material is painted on top with a clear coat like a lacquer |
|
Roughness |
Controls whether the topcoat looks glossy or satiny. Low values provide a smooth surface, whereas high values blur the reflections into a satin or matte finish while leaving the base material unchanged. |
|
Weight |
Higher values produce a shinier layer over the base finish, as seen on polished parquet flooring or high-gloss cabinetry |
|
Emission |
Emission settings create a light glow effect |
|
Color |
Sets the color of the light emitted by the surface, such as warm white for lighting panels, cool white for display screens, or any color for neon signage and decorative glow effects |
|
Luminance |
Makes the surface glow and emit light, like a backlit panel, LED strip or illuminated signage. Higher values (measured in nits) increase the value of the glow and the light cast onto surrounding surfaces. |
|
Geometry |
Geometry settings control the image bump or displacement for a 3D effect |
|
Opacity |
This setting, which is useful for perforated panels, mesh screens, or patterned facades, controls where the material is visible on the surface. Use a gray scale image for masking in the alpha channel. Black pixels are transparent, and white pixels are opaque. |
|
Bump/Normal |
Adds bumps without extra geometry, as for brick mortar joints, wood grain, hammered metal, or a fabric weave of flat surfaces. Gray scale height maps can be used for simple bumps, or full RGB normal maps provide the best accuracy. |
|
Displacement |
Uses a texture to physically push a surface in and out, creating 3D relief on surfaces and raised silhouette edges. This setting is useful for raised brick courses, carved details, and deeply embossed patterns that require accurate shadows from every viewing angle. Using this property adds to the required render time, especially when applied to many small polygons or many small repeats in the model. |
Texture properties: Advanced
The advanced properties, available when you select to display All properties, include the basic properties described above, plus the additional properties listed below.
Click to show/hide the parameters.Click to show/hide the parameters.
|
Parameter |
Description |
|
Base |
|
|
Diffuse Roughness |
Controls how clear or powdery the base color looks. Low values give a smooth, matte finish, and high values give a chalky, velvety appearance. |
|
Weight |
Controls the overall visibility of the material's surface color and finish. A setting of 0 makes the surface appear black with no visible finish. A setting of 1.00 displays the material's complete look. |
|
Specular |
|
|
Color |
Tints the color of shiny effects on the texture's surface. Leave this setting white for most architectural finishes. Adjust the color to create iridescent or color-tinted gloss effects. |
|
Roughness Anisotropy |
Stretches highlights into elongated streaks in one direction across the texture surface, like brushed or directionally sanded metal. A setting of 0 leaves highlights rounded and even. |
|
Transmission |
|
|
Depth |
Controls how quickly the tint builds up with material thickness. Thin areas can appear nearly clear, while thicker sections show the full color. |
|
Dispersion Abbe Number |
Fine tunes how wide or tight rainbow fringing appears. Low values produce vivid, wide color separation as in cut crystal. Gemstones like diamonds display correctly with a setting of 55. Most architectural glazing requires a setting between 58 and 68. |
|
Dispersion Scale |
Controls the rainbow fringe visible at the edges of glass or crystal. High values produce stronger color splitting. Set to 0 for plain flat glass with no fringing. |
|
Scatter |
Adds a cloudy or milky appearance to a translucent material like alabaster panels or resin. Higher values increase the hazy, diffuse glow. |
|
Scatter Anisotropy |
Controls the direction of the hazy glow inside a texture. Positive values push the glow deep, whereas negative values create a softer back-lit appearance closer to the surface. |
|
Subsurface |
Subsurface settings create special effects for materials such as jade, marble, wax, and so on |
|
Color |
Sets the warm or cool inner glow visible when light shines into or through the surface |
|
Radius |
Controls how far the inner glow spreads across the surface. Lower values keep the glow tight near the lit area, while larger values create a wide halo of light bleeding through inner sections of the texture. |
|
Radius Scale |
Creates natural color variations in the inner glow by letting warm tones reach deeper than cool tones, producing a rosy or amber warmth typical of marble and other materials |
|
Scatter Anisotropy |
Controls whether the inner glow stays near the light entry point or spreads through the material. Higher values push the glow deeper, while lower values produce a soft, even surface luminosity. |
|
Weight |
Blends the surface between a solid opaque look and a soft, translucent inner glow. Higher values allow light to penetrate and scatter beneath the surface. This setting is designed for opaque or nearly opaque materials such as marble slabs, onyx panels, or heavy fabrics stretched over frames. The Transmission settings are appropriate for more transparent materials. |
|
Coat |
|
|
Color |
Tints the clear topcoat itself. Leave this setting clear for standard lacquers, but add a slight amber for an aged varnish or a slight tint for effects on feature walls or furnishings. |
|
Darkening |
Simulates a wet look effect, as in a freshly oiled or varnished surface. Higher values make the base look richer and darker. |
|
IOR (Index of Refraction) |
Adjusts how shiny and prominent the clear top coat appears, regardless of the base material's transparency or reflection settings. Higher values provide a glossier effect. |
|
Roughness Anisotropy |
Stretches the top coat's reflections into directional streaks, simulating a directionally polished or brushed surface |
|
Fuzz |
Fuzz effects are used mainly for fabrics, but can also be useful for dust |
|
Color |
Sets the color of the fine surface texture or surface sheen. For fabric, match to the thread color. For stone or concrete, use a light neutral color to suggest surface dust or a micro texture. |
|
Roughness |
Controls how tight or fluffy the surface sheen appears. Low values give a silky, tight appearance, while high values produce a softer, dustier look as on aged concrete or suede. |
|
Weight |
Adds a soft, fiber-like surface sheen. Higher values strengthen the velvety glow. Set to 0 for hard, smooth surfaces. |
|
Thin Film |
Thin film is a special effect that shows a rainbow like gradient from overheated metals like engine exhaust pipes |
|
IOR (Index of Refraction) |
Fine tunes the intensity and hue range of the iridescent shimmer. Adjust along with Thickness to produce the proper visual character for the coating being represented. |
|
Thickness |
Shifts the hue of the iridescent shimmer. The visible color ranges between roughly 0.1 and 1.0 micrometers. Soap bubbles and oil slicks measure around 0.25-0.6 micrometers, and anodized aluminum and titanium cladding around 0.3-0.8 micrometers. Values outside this range fade the iridescent effect. |
|
Weight |
Adds a rainbow color-shifting shimmer to the surface. Higher values make the shimmer more vivid. |
|
Geometry |
|
|
Thin Walled |
Treats this surface as a thin sheet with no interior volume, enabling accurate two-sided and back-lit transparency. Use this setting for glass panes, thin plastic shells, paper, fabric, or sheet metal. |
|
Tangent |
Sets the reference direction for surface detail and directional effects, as with turned brushed metal patterns. Adjust if normal maps or brushed textures appear rotated or misaligned on curved surfaces. |
|
Coat Normal |
Adds fine detail only to the clear topcoat layer, leaving the base material unchanged. This setting is useful for simulating micro scratches or texture such as orange peel in a varnish or resin. |
|
Coat Tangent |
Sets the reference direction for the topcoat's surface detail, ensuring directional scratches or brushed textures align correctly across the surface |
|
Bevel Edges |
Softens sharp-cornered edges, producing chamfered edges on corners of furniture, architectural, trim and so forth, without requiring any changes to the geometry. This is a subtle effect, not a substitute for filleting or chamfering the model. The radius should be suitably small relative to the object's size. |
