|
Command |
Path |
Shortcut |
|
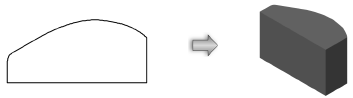
Extrude |
Model |
● Ctrl+E (Windows) ● Cmd+E (Mac) |
The Extrude command changes 2D objects into 3D objects with a height. The type of object and its attributes determine the type of extrude that is produced. Lines are extruded as flat planes, while all other objects are extruded as wireframe 3D objects. While more than one object can be extruded at a time, grouped objects must first be ungrouped in order to be extruded. Objects that are locked must first be unlocked in order to be extruded.
Objects are extruded into the current viewing projection, so the extrusion direction is dependent on the current view. They can be rotated afterwards if desired. See Rotate tool or Preset rotation angles. The extruded object height can be edited interactively with the Reshape tool; see Reshaping extruded objects and solid primitives for more information.
When you extrude multiple objects at the same time, they are turned into a single 3D group of objects. To edit an individual object, either ungroup the set or use the Edit Extrude command to access the individual objects.
The Push/Pull tool and Push/Pull mode of planar object tools can also be used to create extruded objects from planar objects; see Direct modeling with the Push/Pull tool and Push/Pull mode of planar tools.
To extrude an object:
1. Select the 2D object to extrude.
2.Select the command.
The Create Extrude dialog box opens.
3.Enter the Extrusion height and specify any change in size along the X and Y axes.
|
|
Click here for a video tip about this topic (internet access required). |
~~~~~~~~~~~~~~~~~~~~~~~~~
