 Adding trusses to an existing system
|
Mode |
Tool |
Tool set |
|
Auto Connect
|
Truss
|
Rigging |
One or more truss objects can be connected to an existing truss system. The new truss is automatically inserted at the same hanging angle as the existing system, even if a different placement mode or hanging angle is specified.
To add trusses to an existing system:
Click the tool, and then click Truss symbol on the Tool bar to select a resource from the Resource Selector. If a symbol is not selected, the Select Symbol dialog box opens automatically to select one.
If a truss symbol is accidentally inserted by the Symbol Insertion tool, the truss functionality will not be present. When correctly inserted, the Object Info palette displays “Truss” for the selected truss.
If the selected truss has insufficient data for proper calculations, the Truss Properties dialog box opens; see Setting custom truss parameters.
Click the insertion mode.
Distributed Insertion mode only works for straight trusses.
Enable Auto Connect mode; see Concept: Creating a connected rigging system for more information.
Move the mouse to hover over an existing truss; valid connections are highlighted.
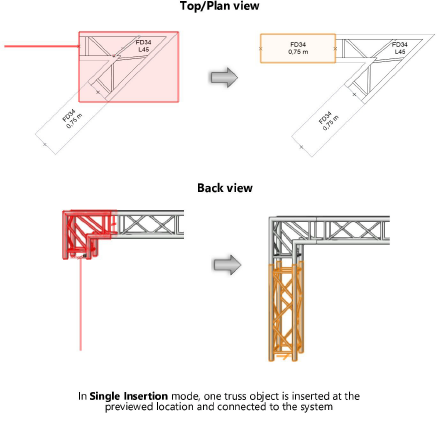
Depending on the type of truss and the view, various insertion options are previewed. For example, connecting a three-way corner truss will show different options from connecting a four-way truss, and Top/Plan view will provide different previews from 3D insertion. Connecting to a vertical truss depends on the current view. In Top/Plan view, trusses can only be added to the top end of an existing truss; in 3D views, trusses can be added to the top or bottom end.
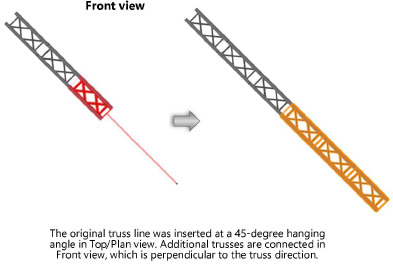
Connecting trusses at a custom hanging angle also depends on the current view. For best results, set a view that is perpendicular to the truss direction, and use Orthogonal projection.
If no highlighting occurs with Auto Connect enabled, there may be a connection already in place, or the trusses may not be compatible connectors.
When the desired location is highlighted, do one of the following to insert the truss:
In Single Insertion mode, click to place a single truss object and connect it to the system.
In Distributed Insertion mode, drag the mouse to draw the guideline, and click to end it. Truss objects are placed along the full length of the line and connected to the system.
If the line length is not an exact multiple of the selected truss length, an additional truss is added to complete the line, resulting in a longer truss line.
The parameters can be edited later from the Object Info palette (see Truss properties).
Once a truss is placed in the drawing, it can be added to an existing system. Click and drag the truss to the desired connection point on the system. To copy an existing truss and add the copied truss to a system, press Ctrl (Windows) or Option (Mac) while click-dragging.
