 Placing a new truss line
|
Tool |
Tool set |
|
Truss
|
Rigging |
You can start a new truss line by placing one or more truss objects on a specified guideline.
To start a truss line:
Click the tool, and then click Truss symbol on the Tool bar to select a resource from the Resource Selector. If a symbol is not selected, the Select Symbol dialog box opens automatically to select one.
If a truss symbol is accidentally inserted by the Symbol Insertion tool, the truss functionality will not be present. When correctly inserted, the Object Info palette displays “Truss” for the selected truss.
If the selected truss has insufficient data for proper calculations, the Truss Properties dialog box opens; see Setting custom truss parameters.
Click the insertion mode.
Distributed Insertion mode only applies to straight trusses.
Click the placement mode, to set the hanging angle. If Custom Placement is selected, specify the Hanging Angle.
If placing multiple trusses, proceed to step 5. If placing a single truss, click to start the guideline. Move the mouse to set the truss rotation. Click again to end the guideline and insert the truss.
In Single Insertion mode, one truss object is placed on the guideline, no matter its length. You can use this line to position the truss relative to another object. For example, to align the truss with a corner of the stage, draw a line from the truss to the stage corner. The guideline disappears when the truss is placed.
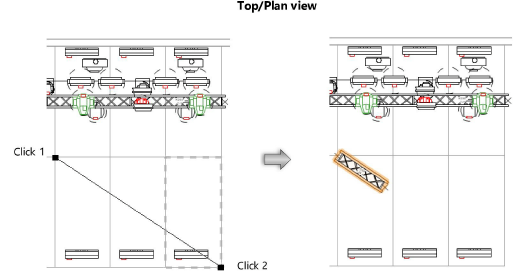
In Distributed Insertion mode, click to start the guideline. Move the mouse to set the truss rotation. Click again to end the guideline; truss objects are placed along the full length of the line.
If the line length is not an exact multiple of the selected truss length, an additional truss is added to complete the line, resulting in a longer truss line.
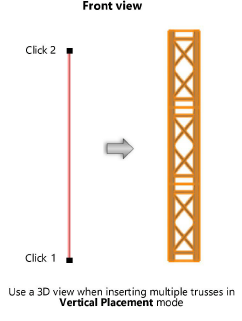
Placing a vertical truss line depends on the current view. In Top/Plan view, only one truss is inserted on a vertical line. In a 3D view such as Front, Back, Left, or Right, multiple trusses can be inserted on a vertical line. For best results, use Orthogonal projection.
The parameters can be edited later from the Object Info palette (see Truss properties).
