 Inserting curtains and borders
|
Mode |
Tool |
Workspace: Tool set |
|
Modes for the Polyline tool |
Soft Goods
|
Design Suite: Detailing Spotlight: Event Design |

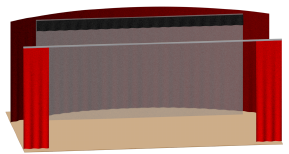
The Soft Goods tool creates a curved or straight stage curtain or truss border. To draw a curtain, either use the Soft Goods tool, or create a closed 2D shape and then select the Create Objects from Shapes command (see Creating objects from shapes).
To display hanging points for soft goods objects, enable Hanging Point Classes in the Braceworks preferences (see Braceworks preferences).

|
Mode |
Description |
|
Polyline creation options |
Selects the method for drawing the polyline upon which the object is based; see Creating polylines |
|
Soft Goods Style |
Opens the Resource Selector to select a resource for placement; double-click a resource to activate it |
|
Preferences
|
Sets the default parameters that are used for each new curtain or truss border |

To create a curtain or border:
Click the tool and mode.
The Corner Vertex or Point on Arc modes are recommended. For more information on the polyline drawing modes, see Creating polylines.
Do one of the following:
Click Soft Goods Style on the Tool bar to select a resource from the Resource Browser.
Click Preferences to open the object properties dialog box and specify the tool's default parameters; select either Curtain or Border from the Function list.
The parameters can be edited later from the Object Info palette.
Click to show/hide the parameters.Click to show/hide the parameters.
|
Parameter |
Description |
|
Style |
Replace, remove, or edit the current style, or create a new plug-in object style for this object. Editing a style changes all instances in the file that use the style. |
|
Hide style parameters (Object Info palette only) |
Hides the parameters that are set by style; these cannot be edited from the dialog box or Object Info palette |
|
Function |
Select either Curtain or Border (for pipe-and-drape assembles, see Inserting pipe-and-drape assemblies) |
|
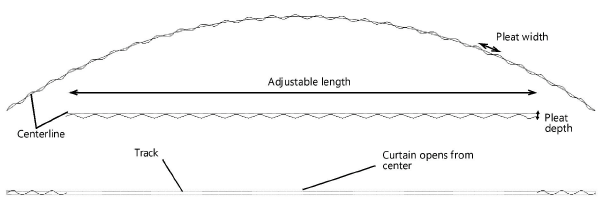
Adjustable Length |
Specifies the length of a straight curtain or border |
|
Height |
Indicates the height of the curtain or border |
|
Height Relative To |
Specifies whether the height is relative to the top trim or bottom trim; if the height is changed, the selected trim reference is maintained |
|
Top Trim |
Displays the height at the top of the curtain or border, taking into account the height of the curtain and its elevation |
|
Bottom Trim |
Displays the height of the bottom of the curtain or border (the distance from the floor) |
|
Show centerline |
In Top/Plan view, displays the curtain center line or the border reference line |
|
Show Markers |
Places an indicator at the start, end, or both ends of the curtain |
|
Supports |
|
|
Add pipe |
Draws a pipe with the curtain; the length of the pipe is the same as that of the curtain |
|
Color |
Displays the support pipe color or texture specified on the 3D Options dialog box, Hardware pane |
|
Add track |
Draws the curtain track |
|
Width |
Sets the width of the curtain track |
|
Color |
Displays the track color or texture specified on the 3D Options dialog box, Hardware pane |
|
Show Traveler Pull |
Shows the traveler pull on the left or right of the track, or hides the traveler pull |
|
Center Overlap |
If Open From is set to Center, enter the overlap |
|
Add solenoids |
Adds curtain release solenoids |
|
Ends Inset |
Indicates the distance from the ends of the curtain where the first solenoid is placed |
|
Target Spacing |
Enter the desired spacing between the solenoids |
|
Actual Spacing |
Displays the resulting solenoid spacing |
|
Total Solenoid Count |
Displays the total number of solenoids placed |
|
Open From |
Select whether the curtain has an opening, and its position; for a center opening, specify the Center Overlap |
|
Width |
When a curtain opening has been selected, specifies the width of the opening |
|
Show ghost curtain |
Displays the open section of the curtain with dotted lines in Top/Plan view |
|
Reverse side |
For borders, switches the curtain to the other side of the center reference line |
|
Running Length |
For curved and/or multiple segment curtains, shows the total curtain length |
|
Stock Drape Width |
Specifies the width of an individual drape panel |
|
Minimum Overlap |
Indicates the total distance of curtain overlap for adjacent drape panels |
|
Vertical Tied Fullness % |
Sets the overlap percentage at each curtain tie, and affects the Total Drape Count |
|
Total Drape Count |
Displays the number of drape panels required based on the specified stock drape width |
|
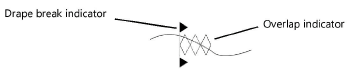
Show drape breaks |
Places markers where each drape ends and the next one starts |
|
Show overlap |
Indicates where the drapes overlap
|
|
Drape Clips |
Enter data about drape clips, if needed |
|
Sandbags |
Enter data about sandbags, if needed |
|
Simple 2D |
Simplifies the Top/Plan view of the curtain or border, showing it as a line |
|
Simple 3D |
Simplifies the 3D view of the curtain or border, showing it as a flat surface |
|
Pleat Width (Visual Only) |
Indicates the distance between pleats |
|
Pleat Depth (Visual Only) |
Indicates the depth of the curtain pleats |
|
Flip pleats (visual only) |
Switches the positive and negative portions of the pleats |
|
Adjust Starting |
For borders, offsets the starting point of the border |
|
Adjust Ending |
For borders, offsets the ending point of the border |
|
3D Options |
Opens the 3D Options dialog box, for setting the appearance of the curtain in 3D; see Setting soft goods 3D display options |
|
Current Drape Option |
Displays the currently selected 3D curtain option from the 3D Options dialog box |
|
Materials and Finishes |
|
|
Main Material Type |
Enter notes about the curtain/border main material (does not affect the curtain appearance) |
|
Color |
Enter notes about the main curtain/border color (does not affect the curtain appearance) |
|
Raw Width |
Displays the main material's raw width |
|
Lining Material Type |
Enter notes about the curtain/border lining material (does not affect the curtain appearance) |
|
Raw Width |
Displays the lining material's raw width |
|
Top Finish |
Select the finish for the top of the curtain or border |
|
Spacing |
Sets the spacing for tie, hook, or grommet finishes |
|
Bottom Finish |
Select the finish for the bottom of the curtain or border |
|
Pipe Note |
When Bottom Finish includes a pipe, enter data about the pipe, if needed |
|
Sides Finish |
Select the finish for the sides of the curtain or border |
|
Vertical Sewn Fullness % |
Specifies the curtain or border vertical fullness information (does not affect curtain appearance) |
|
Horizontal Sewn Fullness % |
Specifies the curtain or border horizontal fullness information (does not affect curtain appearance) |
|
Weights |
The weight is calculated based on the soft goods height, length, materials, fullness, and attachment methods. Calculated weights are approximate and may vary based on specific manufacturer specifications; you should verify the final total weight. For users with a Braceworks license, calculated weights are considered as a distributed load by Braceworks. The settings in this section and the Top Finish, Spacing, Bottom Finish, Side Finish, Vertical Sewn Fullness, Horizontal Sewn Fullness, Height, and the track options and length are used to calculate the overall length of the curtain/border. |
|
Use raw specifications |
Select to automatically update the weight when the height, length, raw materials and their weights, and/or attachment method is changed |
|
Calculation Reference |
When Use raw specifications is selected, select the measurement unit to use for weight calculation |
|
Main Specified Raw |
When Use raw specifications is selected, enter the weight of the main raw material, per the Calculation Reference selection |
|
Lining Specified Raw |
When Use raw specifications is selected, enter the weight of the lining raw material, per the Calculation Reference selection |
|
Raw Materials Options |
When Use raw specifications is selected, opens the Raw Materials Options dialog box to enter the weight of soft goods parts that change infrequently; see Raw materials options. Raw materials options for the soft goods styles are controlled as a group. If Raw Materials Options is set by style, the dialog box is inaccessible and the settings cannot be changed for individual instances. If Raw Materials Options is set by instance, all settings can be changed. |
|
Raw Total Weight |
Displays the calculated weight based on the current soft goods settings |
|
Raw Distributed Weight |
Displays the calculated weight based on the current soft goods settings |
|
Safety Margin % |
Enter the acceptable safety margin for the weight calculation |
|
Final Total Weight |
When Use raw specifications is selected, displays the calculated weight based on the current soft goods settings. When Use raw specifications is deselected, enter a weight; the Final Distributed Weight is automatically calculated. |
|
Final Distributed Weight |
When Use raw specifications is selected, displays the calculated weight based on the current soft goods settings. When Use raw specifications is deselected, enter a weight; the Final Total Weight is automatically calculated based on this value and the length of the soft goods object. |
|
Position |
Displays the name of the associated rigging object, if the curtain or border is attached. Optionally, attach this object to a rigging object, or change the rigging object association, by entering the Position Name of the rigging object. Delete the name to break the association. For other methods to attach loads, see Making the attachment. |
|
Purpose |
Enter notes about the object's purpose |
|
Container ID |
Enter notes about the object's container ID, such as hamper or road case number |
|
Vendor |
Enter notes about the object's vendor |
|
Cost |
Enter notes about the object's cost |
|
Note |
Enter any miscellaneous information required, such as stock number or other data |
|
Text Options |
Opens the Text Options dialog box, to enable the display and format the text of labels; see Formatting soft goods object labels |
|
Default Text Positions |
Text labels can be moved by dragging their control point; this option returns them to their default locations |
|
Opens the Parts Classes dialog box, to specify class naming for the various parts of the soft goods object. This allows parts of the soft goods to be set to visible, grayed, or invisible. Use the standard class, select a class from the list of classes present in the drawing, or create a new class. Select <Soft Goods Class> to place the soft goods element in the same class as the soft goods object. Class Prefix: Specifies an optional default root class naming standard for all soft goods parts; click Assign Default Classes With Prefix to begin all soft goods class names with the prefix, so that they are sorted together. Assign Default Classes With Prefix: Sets the class names for all soft goods elements to the standard, using the Class Prefix if there is one. Soft goods parts: For each part of the soft goods object, specifies the class name standard; the class names shown here are applied to the parts. Parts classes for the soft goods styles are controlled as a group. If Parts Classes is set by style, the dialog box is inaccessible and the settings cannot be changed for individual instances. If Parts Classes is set by instance, all settings can be changed. |
|
|
Update (Object Info palette only) |
Updates the object |
|
Load Information |
A soft goods object is considered to be a distributed load in Braceworks calculations; the curtain line needs to be parallel to the rigging object. Load information is used for Braceworks calculations and reports (Braceworks required). |
|
Include in Calculations (Braceworks required) |
Includes the soft goods object in Braceworks calculations; deselect to exclude the object from participating in structural calculations |
|
Load Group Name |
The load category is always Scenery for soft goods objects |
|
Load ID |
Enter a unique ID for the load for informational use in reports |
|
Load Name |
Identifies the object in load calculations |
|
Distributed Weight |
Enter the distributed weight of the soft goods object; changes here also affect the Total Weight value |
|
Total Weight |
Enter the total weight of the object |
|
Vertex Parameters |
Edits the vertices of the path object that the curtain is based upon; see Editing vertex-based objects |
Click to set the soft goods object’s start point.
Click to set the end of the segment and the beginning of the next. Continue drawing segments in this manner until the curtain or border object is complete, and then double-click.
Once created, the soft goods object can be reshaped by double-clicking on it. The Reshape tool is automatically activated, to reshape the object directly in the drawing.
Optionally, create a style resource for the object (see Standard plug-in object styles without catalog options).
Raw materials options
When Use raw specifications is selected for the soft goods object, specify the weights for certain curtain and border parts. These weights are considered for automatic weight calculations.
Click to show/hide the parameters.Click to show/hide the parameters.
|
Parameter |
Description |
|
Calculation Reference |
Select whether to enter values as distributed weights or total weights in the units indicated; the alternative distributed/total weight is automatically calculated based on the object's settings. |
|
Parts list |
Only parts that are included in the soft goods object's current settings are available; unused parts are greyed, and the weight cannot be entered or used for calculation. Parts include top pipe, bottom pipe, track, track rollers, chain, lead tape, rope ties, "S" hooks, snap hooks, twill ties, tensioning lines, webbing, hook and loop, and single solenoid (distributed weight only). |
