Pen attributes
Pen attributes can be applied to any type of planar object that has lines, including walls and plug-in objects. Pen attributes apply to object outlines, and can be a solid or pattern line of any thickness and color. There is also an option to apply no outline to the object. Alternatively, apply a standard or custom line type resource, to add graphic elements to a line. Line types are resources that can include dashes, text, or any 2D object. Complex line types can be applied as they are or mapped and otherwise adjusted for their use on an individual object. You can also create custom line type resources, as described in Defining and editing line types.
To apply color to text objects, select the Solid pen style, and set the appropriate color.
Applying pen attributes
To apply pen attributes to an object:
Select the object.
Do one of the following:
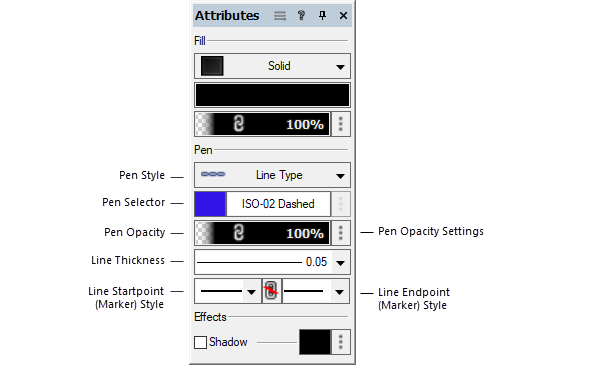
Select the Pen Style (solid, pattern, or line type) from the Attributes palette. To change to a different pen of the type selected, click the Pen Selector. For a line type pen style, from the Resource Selector, double-click a resource to apply it.
For a line type pen style, from the Resource Manager, either right-click on the resource, and select Apply from the context menu, double-click on the resource, or drag the resource onto an object to apply it.
Attributes can also be applied by class settings (see Setting class attributes) or transferred with the Eyedropper tool (see Transferring attributes).
Line types cannot be applied to worksheet objects.
Adjust the pen style colors and patterns as described in the appropriate topic:
Solid pens: see Applying colors.
Pattern pens: Click the Pen Selector area to select the pattern and then apply the background and foreground colors as described in Applying colors. To create a custom pattern for use in the current file, see Creating custom patterns for fill and pen styles.
Line type pens: see Mapping line types.
Optionally, adjust the pen's opacity (see Opacity attributes) by doing one of the following:
Click on the percentage number and enter a value.
Click in the opacity box and drag to set the desired percentage; release the dragger to see the opacity update on the selected object.
To use the class pen opacity, click the Opacity Settings button and select Use class pen opacity.
To link the object's pen opacity to the fill opacity, click the Opacity Settings button for the fill, and select Link pen opacity. When the fill opacity and pen opacity are linked, the percentages are set to the same value, and a link icon displays in the opacity areas.
Select the pen's line thickness from the Line Thickness list. See Line thickness attributes for information about editing the list or creating a custom line thickness for a selected object.
Select the line startpoint and endpoint styles, if any. To always use the same style for both ends of the object, click the Marker Link Toggle button; whenever the marker style of one end is changed, the other end’s marker style automatically changes to match. See Marker attributes and Editing the marker list for more information.
