 Creating labels for printing
|
Command |
Workspace: Path |
|
Create Labels |
Design Suite: Entertainment > Lighting Reports Spotlight: Spotlight > Lighting Reports ConnectCAD: ConnectCAD > Documentation |
Using data from any database worksheet report or non-database worksheet in the current document, Vectorworks can automatically create ready-to-print labels on a page for Spotlight and/or ConnectCAD objects (cables, equipment, and devices). The label format defines the page layout; it reads the data from the worksheet report and draws a label for each worksheet report row.
Labels can display text, graphics, barcodes, and/or QR codes, all of which can be fixed objects or dynamic placeholders that vary for each label; each linked object gets its content from a specific worksheet column defined by the column index number. Numbers can be displayed in the standard resistor color code so that they can easily be read from a distance.

Normally, the drawing should be checked before creating the worksheet report to find and resolve any circuit issues, so that the labels are up to date (see Checking the drawing).
To create labels for printing:
Create a worksheet report (see Creating ConnectCAD reports and Creating worksheets).
Select the command.
The Cable Labels dialog box opens. Select a worksheet to use as a source of label data, and select a label format from the list of preformatted styles.
Click to show/hide the parameters.Click to show/hide the parameters.
|
Parameter |
Description |
|
Data Source |
|
|
Worksheet |
Select the data source (database worksheet report or non-database worksheet) for the labels. Database headers are displayed in the order that they occur in the worksheet. Click the disclosure arrow to display any database rows. Database rows are labeled by extracting the plug-in object name from their criteria so you can choose the correct database. If a plug-in object name does not exist, then the record, class, or layer is used. |
|
Label Format |
|
|
Select Label Format |
Displays the label formats available in the Vectorworks file, descriptions of the formats, and the types of Spotlight and/or ConnectCAD objects that the labels are created for. A check mark in the Use column indicates that the format will be used. |
|
Preview |
Displays a preview of the label |
|
Import Label Formats |
Click the Import Label Formats selector to select a resource from the Resource Selector |
|
Output |
Saves the labels as a PDF or sends them to the selected sheet layer. Labels sent to a sheet layer can be printed or exported as a PDF. If desired, select New Sheet Layer to create a new sheet layer (see Creating layers). |
Save the labels as a PDF, or send them to the selected sheet layer.
If you send the labels to a sheet layer, you can edit the label format parameters (see Label format parameters) and customize the label format (see Customizing a label format), and then save the labels as a PDF for printing.
Print the labels or share them with vendors, clients, or colleagues for printing.
Label format parameters
Label format parameters define how labels are laid out on each page. When you open a set of labels on a sheet layer, the parameters can be edited from the Object Info palette.
Click to show/hide the parameters.Click to show/hide the parameters.
|
Parameter |
Description |
|
Style |
Displays the make and model number of the label format. Replace, edit, or remove the current style, or (for unstyled objects only) create a new plug-in style (see Custom plug-in object styles without catalog options). Editing a style changes all instances in the file that use the style. |
|
Hide style parameters |
Hides the parameters that are set by style; these cannot be edited from the Object Info palette |
|
General |
|
|
Worksheet |
Displays the name of the worksheet report |
|
Skip Top Rows |
Omits header rows from the worksheet report; select the number of rows to omit |
|
Update |
Resets the label format object |
|
Export to PDF |
Saves the labels as a PDF |
|
Type |
Indicates the category of the Spotlight and/or ConnectCAD object (cable, equipment, or device) that the label is created for. Select New to create a new object type. |
|
Format |
Displays the name of the style resource, which is typically the make and model number of a label format |
|
Description |
Provides a description of the label Format |
|
Page |
|
|
Page Size |
Select from a list of standard page sizes. To specify a non-standard size, select Custom and enter the Page Width and Page Height. |
|
Page Width/Height |
Indicates the dimensions of the page |
|
Layout |
|
|
Label Across/Down |
Specifies the number of labels across each page row and down each page column |
|
Offset X/Y |
Displays the X and Y offsets of the labels on the page |
|
Left/Top Margin |
Indicates the margins on the left and top sides of the page |
|
Center on Page |
Centers the page to the top and center of the drawing area |
|
Label |
|
|
Label Width/Height |
Specifies the dimensions of the printable area of each label |
|
Horizontal/Vertical Pitch |
Displays the horizontal and vertical distance between the labels |
|
Number of Copies |
Indicates the number times each label is duplicated. Because cables have two ends, specify 2 copies of the cable labels. |
Customizing a label format
Label formats can display text, graphics, barcodes, and/or QR codes. Labels can consist of static graphics and text that appears on each label, as well as content that varies with each label, depending on the values read from the source worksheet's row or sub-row.
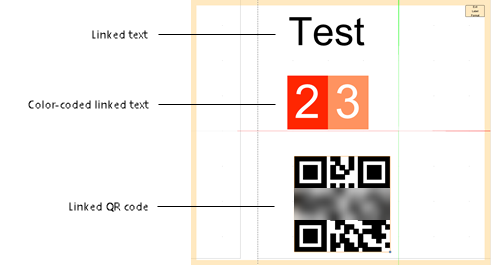
Adding linked text to a label format
To add linked text:
Select the label format object on a sheet layer, and then right-click and either select Edit from the object context menu, or double-click to open it in object editing mode (see Object editing mode).
Create a text field inside the label with the Text tool (see Inserting text) to serve as the placeholder for the information to display. Format the text with the desired font and style.
If a barcode font is installed on your computer, you can create a barcode label by selecting the barcode font.
In the Object Info palette for the selected text (the selection displays as Text), select the Is linked text option under ConnectCAD Text Link Data.
From the Field list, select the worksheet report column linked to the text.
For more information about linked text, see Displaying custom records. In label formats, text is linked to worksheet data instead of records or parameters.
Adding color-coded linked text to a label format
|
Tool |
Workspace: Tool set |
|
Color-Coded Linked Text
|
Design Suite, Spotlight: Lighting ConnectCAD: Layout |

To add color-coded linked text:
Select the label format object on a sheet layer, and then right-click and either select Edit from the object context menu, or double-click to open it in object editing mode (see Object editing mode).
Click the tool.
Click in the label to place the color-coded linked text.
The color-coded linked text displays sample numbers. The background fill colors for the numbers are set according to the standard resistor color code.
The parameters can be edited from the Object Info palette.
Click to show/hide the parameters.Click to show/hide the parameters.
|
Parameter |
Description |
|
Selected Column |
Selects the source worksheet column linked to the color-coded linked text |
|
Sample Text |
Uses placeholder numbers to specify how many numbers to display in the label; format the text appearance, size, and font from the Text command |
|
Width/Height |
Displays the dimensions of the color-coded linked text object; you can also resize by dragging the handles on the drawing |
If desired, change which numbers display.

Exit object editing mode to return to the drawing.
Adding a linked QR code to a label format
|
Tool |
Workspace: Tool set |
|
Linked QR Code
|
Design Suite, Spotlight: Lighting ConnectCAD: Layout |

You can add a QR code image to the label, linked to the values in a selected worksheet column.
To add a linked QR code:
Select the label format object on a sheet layer, and then right-click and either select Edit from the object context menu, or double-click to open it in object editing mode (see Object editing mode).
Click the tool. In the Tool bar, select the worksheet column value to link to from the QR code.
Click in the label to place the linked QR code.
The linked QR code displays.
The parameters can be edited from the Object Info palette.
Click to show/hide the parameters.Click to show/hide the parameters.
|
Parameter |
Description |
|
Selected Column |
Selects the source worksheet column linked to the QR code |
|
Draw Size |
Displays the width and height of the QR code object |
Exit object editing mode to return to the drawing.
