Inserting grade objects
|
Tool |
Workspace: Tool set |
|
Grade
|
Design Suite, Architect, Spotlight: Building Shell Landmark: Site Planning and Dims/Notes |

The Grade tool, in Vertex mode, inserts a series of connected straight or curved grade objects. In Linear Insertion mode, the Grade tool inserts a single linear grade object which can be used to form a network by connecting to other grades.
A grade object can interact with a site model to measure and display its slope, or it can be used as a pad site modifier.
Alternatively, draw a polyline and use the Create Objects from Shapes command to change it to a grade or grade network using the current grade preferences (see Creating objects from shapes).
Inserting curved grades or networks of connected grades
|
Mode |
Tool |
Workspace: Tool set |
|
Vertex
|
Grade
|
Design Suite, Architect, Spotlight: Building Shell Landmark: Site Planning and Dims/Notes |

To insert a single curved grade object or a network of connected grades:
Click the tool and mode, and set the two known parameter types.
Click Preferences to open the Grade Preferences dialog box, and set the general and, optionally, the site model preferences on the General pane to ensure the grade interacts properly with the site model. Optionally, set the appearance of the grade being drawn, and/or define the direction indicator and analysis settings for all grades in the file. See Grade settings.
Grade objects can be edited later from the Object Info palette.
Click to set the start point; each subsequent click ends the current grade object and begins the next according to the creation mode (see Creating polylines). Change the vertex type while drawing to combine straight and curved grades. To complete the object, click back at the beginning of the path, or double-click.
While drawing grades, all the known and calculated parameters are available in the floating Data bar. The two known parameters remain as set, and the other values change as the grade is drawn; although the known parameters aren't changed as part of the calculations, it is possible to edit them if needed. See Drawing with the Data bar.
Inserting a linear grade
|
Mode |
Tool |
Workspace: Tool set |
|
Linear Insertion
|
Grade
|
Design Suite, Architect, Spotlight: Building Shell Landmark: Site Planning and Dims/Notes |

To insert a single linear grade object:
Click the tool and mode, and set the two known parameter types.
Click Preferences to open the Grade Preferences dialog box, and set the general and, optionally, the site model preferences on the General pane to ensure the grade interacts properly with the site model. Optionally, set the appearance of the grade being drawn, and/or define the direction indicator and analysis settings for all grades in the file. See Grade settings.
Optionally, click Review and Adjust mode to automatically open the Grade Settings dialog box and adjust the settings for the newly drawn linear grade as soon as it's inserted.
Grade objects can be edited later from the Object Info palette.
Click to set the start of the grade. Move the cursor and click again to set the end point.
While drawing grades, all the known and calculated parameters are available in the floating Data bar. The two known parameters remain as set, and the other values change as the grade is drawn; although the known parameters aren't changed as part of the calculations, it is possible to edit them if needed. See Drawing with the Data bar.
If connecting the grade object to another grade object, forming a network, the existing grade object is highlighted.
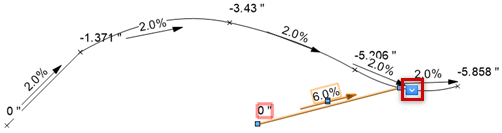
Grade networks
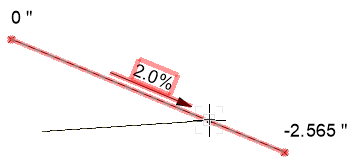
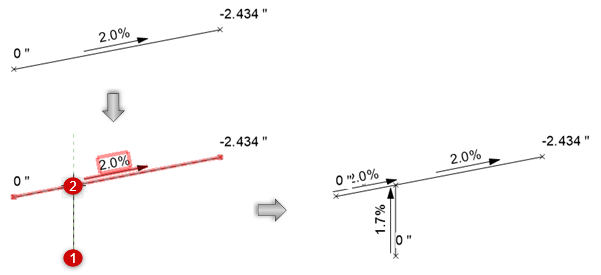
If not automatically connected at insertion, grade objects can be connected to form a network. Either move the endpoint of one grade object onto another grade object, or create a new grade object with an end point on an existing grade object. The existing grade object is highlighted to indicated a connection can be made, and split at the new endpoint when they are joined, creating a network of overlapping grade objects. The elevation of the shared point is interpolated from the slope of the existing object; if an elevation point is updated, all overlapping grade objects automatically update. Click Update mode from the Tool bar of the Grade tool to force an update of all overlapping grade objects.
The Grade tool only connects two grade objects if the existing grade is in an editable state; if it is on a layer or class that is not currently modifiable, you can snap to and apply the height value from the existing grade to the Elevation of the new or modified grade at that point, but the grades are not joined into a network.
When grade objects are connected in a network, they move as one object and all elevations adjust accordingly. Detach a grade from its network, making it an independent grade object, by selecting Detach from Grade Network from the drop-down context menu.