 Editing curbs
Editing curb parameters
Once curbs have been created, the parameters set by instance can be edited from the Curb Settings dialog box, opened by clicking Curb Settings on the Object Info palette. Some parameters can be edited directly in the Object Info palette itself. See Curb preferences.
Editing curb geometry
|
Tool |
Tool set |
Shortcut |
|
Reshape
|
Basic |
- (hyphen) |

Edit the geometry of a selected curb by selecting the Reshape tool in either Top/Plan or a 3D view. The regular 2D reshape modes are available, along with several special modes. The available modes depend on the view. See Reshaping objects for general information about the tool.
To move control points precisely while editing, enter values in the Data bar.
|
Mode |
Description |
|
Edit Path
(Top/Plan view) |
Edits the polyline path using the 2D reshape modes |
|
Edit Modifier
(3D views) |
Moves, adds, or removes front and back edge modifier vertices; when used with Edit Dialogs mode, opens the Edit Curb Elevation dialog box to edit the elevations of curb segments in profile; see Managing curb and modifier elevations |
|
Edit Positions
|
Moves, adds, or removes elevation vertices; when used with Edit Dialogs mode, opens the Edit Curb Elevation dialog box to edit the elevations of the curb in profile, or opens the Edit Corner dialog box to edit a selected corner treatment; Managing curb and modifier elevations or Managing curb corners |
|
Edit Insertions
|
Moves, adds or removes insertions; when used with Edit Dialogs mode, opens the Edit Insert dialog box to edit the selected insertion; see Managing curb insertions |
|
Edit Join
|
Extends two curbs to touch, depending on the submode selected |
|
2D Reshape modes (Top/Plan view) |
In Edit Path mode, selects/adds/removes/changes vertices in Top/Plan view as described in 2D reshape modes |
|
Move Along Path
|
In Edit Modifier mode, moves a modifier vertex along the path. In Edit Positions mode, moves an elevation vertex along the path. In Edit Insertions mode, moves an insertion along the path. |
|
Move Vertically
(3D views) |
In Edit Modifier mode, moves a modifier vertex vertically. In Edit Positions mode, moves an elevation vertex vertically; press the Tab key to enter a specific elevation in the floating Data bar. |
|
Add
|
In Edit Modifier mode, adds a front or back edge modifier vertex. In Edit Positions mode, adds an elevation vertex position. In Edit Insertions mode, adds the insertion selected in Insertion Symbol to the curb; click to place the insertion along the curb. |
|
Remove
|
In Edit Modifier mode, removes a front or back edge modifier vertex. In Edit Positions mode, removes an elevation vertex position. In Edit Insertions mode, removes the selected insertion. |
|
Edit Dialogs
|
For Edit Positions and Edit Insertions modes, opens a dialog box to edit the part of the curb selected; see Editing elevation points and modifiers, Managing curb corners, and Editing insertions |
|
Join Extend
|
In Edit Join mode, extends two curbs to touch in a T position |
|
Join Clip
|
In Edit Join mode, extends two curbs to meet in an L shape, clipping a curb as defined by the click positions |
|
Gravity
|
Re-aligns the curb with the 3D object underneath it; using this mode removes all custom elevation settings from the curb and refits it to the site model. |
|
Insertion Symbol |
When adding an insertion to the curb, selects an insertion symbol from the Resource Selector |


Realigning the curb to a surface
When placed over a site model, apply Gravity mode if the site model elevation changes underneath the curb. The same goes if the curb is placed on top of other 3D objects that change in elevation. The Send to Surface command can't be used with the curb, as this does not allow the curb to to adjust to multiple elevation points. The Apply Send to Surface by Class option (on the Curb settings General pane) controls the objects that affect the curb's elevation; ignore objects by deselecting their class names. Curbs are never sent to the surface of site modifiers, plants, or existing trees.
Curbs that are associated with a hardscape or landscape area automatically adjust to match the associated object.
To realign a curb with the object underneath it:
Select the curb.
Click the Reshape tool, and click Gravity mode.
The curb is reset to fit to eligible objects underneath it.
Joining curbs
You can join curbs in a T or an L configuration, depending on the submode selected; the elevation of the curb being reshaped adjusts to the elevation of the curb it joins. The joined curbs remain as individual objects.
To join two curbs:
With a curb selected, click the Reshape tool in Edit Join mode with either Join Extend (for a T join) or Join Clip (for an L join) submode.
Do one of the following:
For a T join, click on the curb to join's blue handle closest to the curb to be joined. Move the cursor to the joining curb, which highlights to show it's eligible for joining. Click on the second curb to complete the join. The first curb extends to the intersection point with the second curb.
For an L join, click on the curb to join's blue handle closest to the curb to be joined. Move the cursor to the joining curb, which highlights to show it's eligible for joining. Click on the portion of the second curb to be kept in the join clip operation. The first curb extends to the intersection point with the second curb, and the second curb is clipped to form the L. If the two curbs aren't aligned so they intersect when only the first curb is extended, the second curb is also extended so they meet.
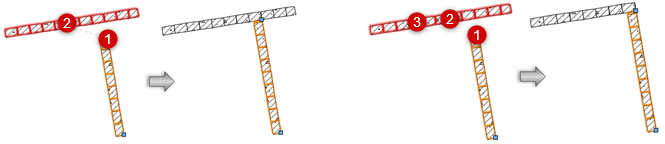
Joining curbs in Join Extend (T join) mode and in Join Clip (L Join) mode
