 Plant Style Manager
|
Command |
Workspace: Path |
|
Plant Style Manager |
Design Suite: AEC > Plants Landmark: Landmark |
The Plant Style Manager functions as a hub for viewing and editing all plant styles in a drawing, including those added as resources but not yet placed on a design layer. You can edit an individual plant style or batch edit multiple plant styles. As a web palette, the Plant Style Manager can remain open while you work in the file, so it can easily be used as a plant palette for the project. A command within the palette lets you activate a style for placement with the Plant tool.
To use the Plant Style Manager:
Select the command.
The Plant Style Manager opens and lists all plant styles in the file.
Click to show/hide the parameters.Click to show/hide the parameters.
|
Parameters |
Description |
|
Reload |
Reloads the plant styles list, to update the list after any changes to 2D and 3D geometry |
|
Column Settings |
Lists the plant parameters and tags that are columns in the Plant Style Manager; enter text in the search box to filter the list. Columns with a check mark display in the list. To change the order of the displayed columns, click the column header above the plant styles list and drag it right or left to the desired location; a blue line to the left of the column being moved previews its location.
|
|
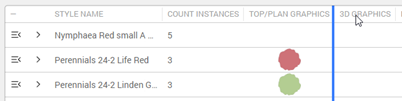
Plant styles list |
Lists all the plant styles in the file, or if column filters are used, all the plant styles that meet the filter criteria. The list offers a variety of controls for ordering and filtering the list and for editing and using the plant styles. You can edit a single plant style without selecting it first; click a parameter in one of the columns to edit it. To edit the columns of a selection of styles, click each row, or press Shift before clicking a second row to select all the styles in the range. Click a row a second time to deselect it. Click the — icon in the upper left corner of the Plant Style Manager to select or deselect all plant styles in the list. Selected styles are highlighted. |
|
Plant style commands
|
Select a plant style row, and click the Menu button to access commands: Place This Plant Style activates the selected plant style in the Plant tool, for immediate placement in the drawing. Duplicate Plant Style opens the Edit Plant Style dialog box prefilled with a duplicate of the selected plant style. Edit Style with Dialog Box opens the Edit Plant Style dialog box to the selected plant style; see Plant settings. Replace Plant Style opens the Replace Plant dialog box; select a new style to replace all instances in the drawing of the replaced plant style. Copy External Data opens the Copy External Data web palette, so you can copy plant data from a nursery into the selected plant style; see Copying external plant data. |
|
Objects that use the style |
Click the disclosure arrow to the left of a style name to display a list of objects, including both plant instances and landscape areas, that use that style. Click the |
|
Column filter |
Click a column header to open a sorting and filtering popover to facilitate selection and editing. To sort, select a sorting option; if the list is sorted by a column, an arrow displays in the column header. To filter the plant styles list, place a check mark beside the parameter values to include; enter text in the search box to filter the list.
|
|
Plant parameter editing popovers |
As you move the mouse over a plant style's parameters and tags, a pencil icon Select whether to apply the new default value to only the current plant style, to all selected plant styles, or to all plant styles in the file, and click Apply.
|
|
Top/Plan and 3D Graphics commands |
To replace, edit, or remove the Top/Plan Graphics and 3D Graphics, click the pencil in the row and select the needed command. Replacing the geometry doesn't affect the plant style's spread or height, so you can batch edit the graphics for multiple styles independently of those values. Replace Top/Plan Graphics opens the Replace Top/Plan Graphics dialog box; see Replacing plant style graphics. Replace 3D Graphics opens the Replace 3D Graphics dialog box; see Replacing plant style graphics. Edit Top/Plan Graphics opens the plant style's current Top/Plan graphic in object editing mode. Edit 3D Graphics opens the plant style's current 3D graphic in object editing mode. Remove 3D Graphics removes the 3D graphic from the plant style. |
|
Add Plant Style |
Opens the Add Plant Style dialog box to add a Plant Style to the file and Plant Style Manager. Select whether to add the plant style based on its data or on plant style content, and select the plant style to add to the file. See Adding plants to the design. |
|
Create Plant Style |
Select a command to create the plant style. See Creating plant styles from a list or Creating a plant style from a selection or Creating plant styles from the plant catalog. |

 icon beside an object to select it in the drawing, or click <Select all> to select all objects that use the style.
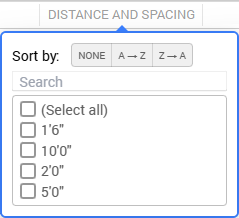
 displays; click the pencil to open a popover and edit the parameter; see
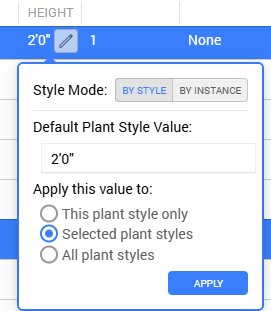
Edit plant style parameters; the parameters are described in Plant settings.
The edits take effect immediately, and by style settings apply to all plant instances that use the style.
![]()